

erica
 Jordanjameire
week 4. https://youtu.be/P76eFEwilEU
Gather Your Materials. Like with any project, the first step should be to gather all your materials in one place and make sure you have everything you need to complete the project. Go ahead and do that and take a picture of all your materials in a counter or work table. You will need this picture as part of your Journal Entry for this week.
Test your Soil. Before you start your terrarium set up, we want to determine the pH (a measure of Acidity or Alkalinity) of your soil. If you are a gardener or a farmer you are familiar with this concept. If that is the case you might have pH test kits or strips that you have used for your garden soil, and you can test the pH of the soil you plan to use for your terrarium using these more accurate methods. HOWEVER, most of us do not have these kinds of pH testing ability. In that case you can use this simple method Links to an external site. to determine if your soil is acid, alkaline or neutral. All you will need are a few plastic cups or containers, vinegar and baking soda. Regardless of what method you use, take pictures while you are doing it and report your results and post the pictures as part of your Journal Entry this week.
Set Up Your Terrariums You might want to see how a terrarium is set up before you do your own following the instructions bellow. Here is a video that will be very helpful, even if the way it describes might vary a little form the instructions I give you.
Prep
1. Spread some newspaper or plastic sheet over your workspace.
2. Mix the activated charcoal and gravel and pour into the bottom of the container. You will need a layer about .5 to 1 inch deep, depending on the size of the container or Jar.
3. Add a layer of soil to the container. This layer will need to be about 2 to 3 inches deep over the gravel.
4. Spray the soil down with water, depending on how dry is the soil. It should be enough to moisten, but not saturate the soil.
Insert the Plants
5. Prepare 3 or 4 young plants. If you bought potted plants, start by removing them from their plastic pots, and gently shaking some of the soil from their roots. Remove only enough soil to allow each plant to fit through the mouth of the bottle. If you collected the plants make sure you followed the instructions.
6. Decide how you would like to arrange your plants. The smallest should go towards the outside, and the largest (or those that will eventually grow to become the tallest) should be planted in the center.
7. Insert the smallest plants first. Make a hole in the soil down to the level of the gravel, and wide enough to accommodate the roots of the plant. Drop the plant into the jar, and nudge the plant into the hole, roots first. Push a little soil up around the plant stem to cover the roots. Gently pack the soil around the roots and stem of the plant.
8. Insert the remaining plants, as above. Leave space between them. If you have mosses, plant them last.
Add Water and Decorations
9. At this point, the soil should be moist, but not wet. Use the spray bottle to gently mist the plants. If any soil clings to the side of the container, adjust the spray to the “squirt” setting, and wash the clinging soil down.
10. Scatter the woody materials - bark and twigs around on the soil between the plants. A decorative stone or two can add some interesting visual detail.
Seal the Bottle
11. Seal the bottle using a cap. Be sure you can easily open it again to add more water if necessary.
12. Monitor the condition of the plants over the next few days. If they appear to wilt slightly, add more water with the plant sprayer. Use a little water at a time. It is important not to overwater: if the soil becomes saturated, the plants’ roots will rot, and undesirable bacteria and fungi will take over and kill the plants.
week 5
https://youtu.be/koDeGamrxV4
If everything has been done carefully, very little care and maintenance is required to keep your plants growing and the terrarium healthy.
- Keep the container away from direct sunlight. Sunlight may heat the air inside the bottle to a temperature that will kill the plants.
- Place the bottle near a window where it can get indirect light.
- Keep the bottle sealed. Do not water or fertilize. The plants inside will adjust to the amount of water and nutrients, and will not be helped by adding more water,or more fertilizer. It is important to not over-water the terrariums. The excess water fills the spaces between the soil particles creating conditions that favor undesirable fungi and bacteria, which ultimately kill all the plants. It is best to water the bottles sparingly.
- Watch the plants over the next day or two for signs of wilting. If the plants appear to be wilting, use a plant sprayer to add water.
Note: Not all terrariums work out the first time. It is possible that soil fungus could develop in your bottle, or that other problems could occur which kill your plants. If this happens, discuss your options with the professor.
Testing and documenting your Closed Terrarium.
- Using a sharpie, make a grid of I inch squares on a piece of plastic. A clear plastic cover for a report folder or a plastic document sleeve works fine.
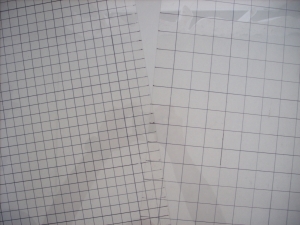
- Once your Terrarium is stable and ready (within a week of starting), place the plastic grid on top of the terrarium and take an aerial photo using your phone or a camera. You will do this for every week until your terrarium project is complete. You can also take side views, but make sure you always do it from the same angle. You might want to make a small mark in the jar in order to remember the side you took the picture from.
- Use the picture to count the number squares in the grid where you can see plant growth.
Count the total number of squares that cover the area of the Jar. If your Jar is round, count each partial squares on your border as one. This will be your Total Squares number. Then count every square where you can see any part of the plant, probably you mostly see leaves. You can use this number to determine the percentage of plant cover = (number of squares showing plants/total squares) x 100.
- You should also monitor room temperature on your terrarium. You can use the temperature reading from your heater/AC thermostat. NOTE - You should try and pick a room where the temperature is more or less steady. If you turn of the heat or AC when you go to work/study, make a note of the temperature fluctuations.
- Record your observation of other physical components, such as condensation on the jar,height of plants, or any other thing that could give you a tangible measurement of the health of the ecosystem you have built in your terrarium.
To help you organize your data you can use a table like this -
Week #
Room Temp
% Plant Cover
Plant Height
Condensation
Did I do something to the terrarium?
Week 5
73 F
47%
Fern 1- 12 cm.
Fern 2- 7 cm
None observed
No
Week 6
75 F
50%
Fern 1- 13 cm.
Fern 2- 9 cm
heavy condensation
Opened the jar for 2 hrs to reduced condensation and closed it back.
If you need help creating your table, Here is a tutorial.
Watch the videos corresponding to 4 and 5 month updates on the aquarium. Continue applying what you learned what you have learned as you observe the progress of the tank. Has the changes in the aquarium made you rethink any of the answers you gave for Lab 3? What is the effect of the food supply and food availability over the plants in the aquarium? What is the effect over the animals? How do they interconnect?
 5 months ago
 10
10