


Running head: Lab 1 Report, Assessment, and Challenge
1
Lab 1 Report
Liberty University
Applied Network Security
CSCI 611
September 9, 2017
Hands-On Steps

Lab 1 Report, Assessment, and Challenge
2
1. From the course dashboard, review the Navigating the Labs file.
2. On your local computer, create the lab deliverable files using your word-processing
program of choice.
3. Review the Lab Assessment Worksheet at the end of this lab. You will find answers to these
questions as you proceed through the lab steps.
Part 1: Verify Encryption
1. On your local computer, open a new Internet browser window.
2. Read each of the following Web pages to get a background on cryptography.
o Cryptography Concepts in Depth at
https://developer.apple.com/library/mac/documentation/security/Conceptual/cryptoservices/Cryptogr
aphyConcepts/CryptographyConcepts.html
o How Does SSL/TLS Work?at
http://security.stackexchange.com/questions/20803/how-does-ssl-tls-work
o Transport Layer Security at http://en.wikipedia.org/wiki/Transport_Layer_Security
•
In the virtual lab topology pane, click the Start Topology button to open the virtual
lab environment.
•
In the right pane, double-click the 611Client.skillbridgesecurity.com machine
(Client)to open a connection to the machine.
•
When the Client desktop is visible, click the Firefox icon in the taskbar at the top of
the screen to start that application.
•
In the Web browser’s address box, type
https://611Server.skillbridgesecurity.com and press Enter to verify that there is an open
connection between the client and the server.
Note:
In this part of the lab, you will ensure that the client/server communication is encrypted.
First, you will research the fundamentals of networking. In particular, you will learn the basics of
symmetric key and public key cryptography, how they are similar and how they differ, and how they are
used in SSL and TLS to protect communications. While some of this material might already be well known
to you, a refresher of this material ensures all students have at least a standard level of understanding.
This first part of this lab is completed outside the virtual lab environment.
Note:
This lab contains detailed lab procedures, which you should follow as written. Frequently performed tasks
are explained in the “Navigating the Labs” document on the course dashboard. You should review these
tasks before starting the lab.
Note:
The first time you connect to a system, you may be required to log in. To connect to the Client system,
you will log in as root. The username is user, and the password is abc123.
Lab 1 Report, Assessment, and Challenge
3
•
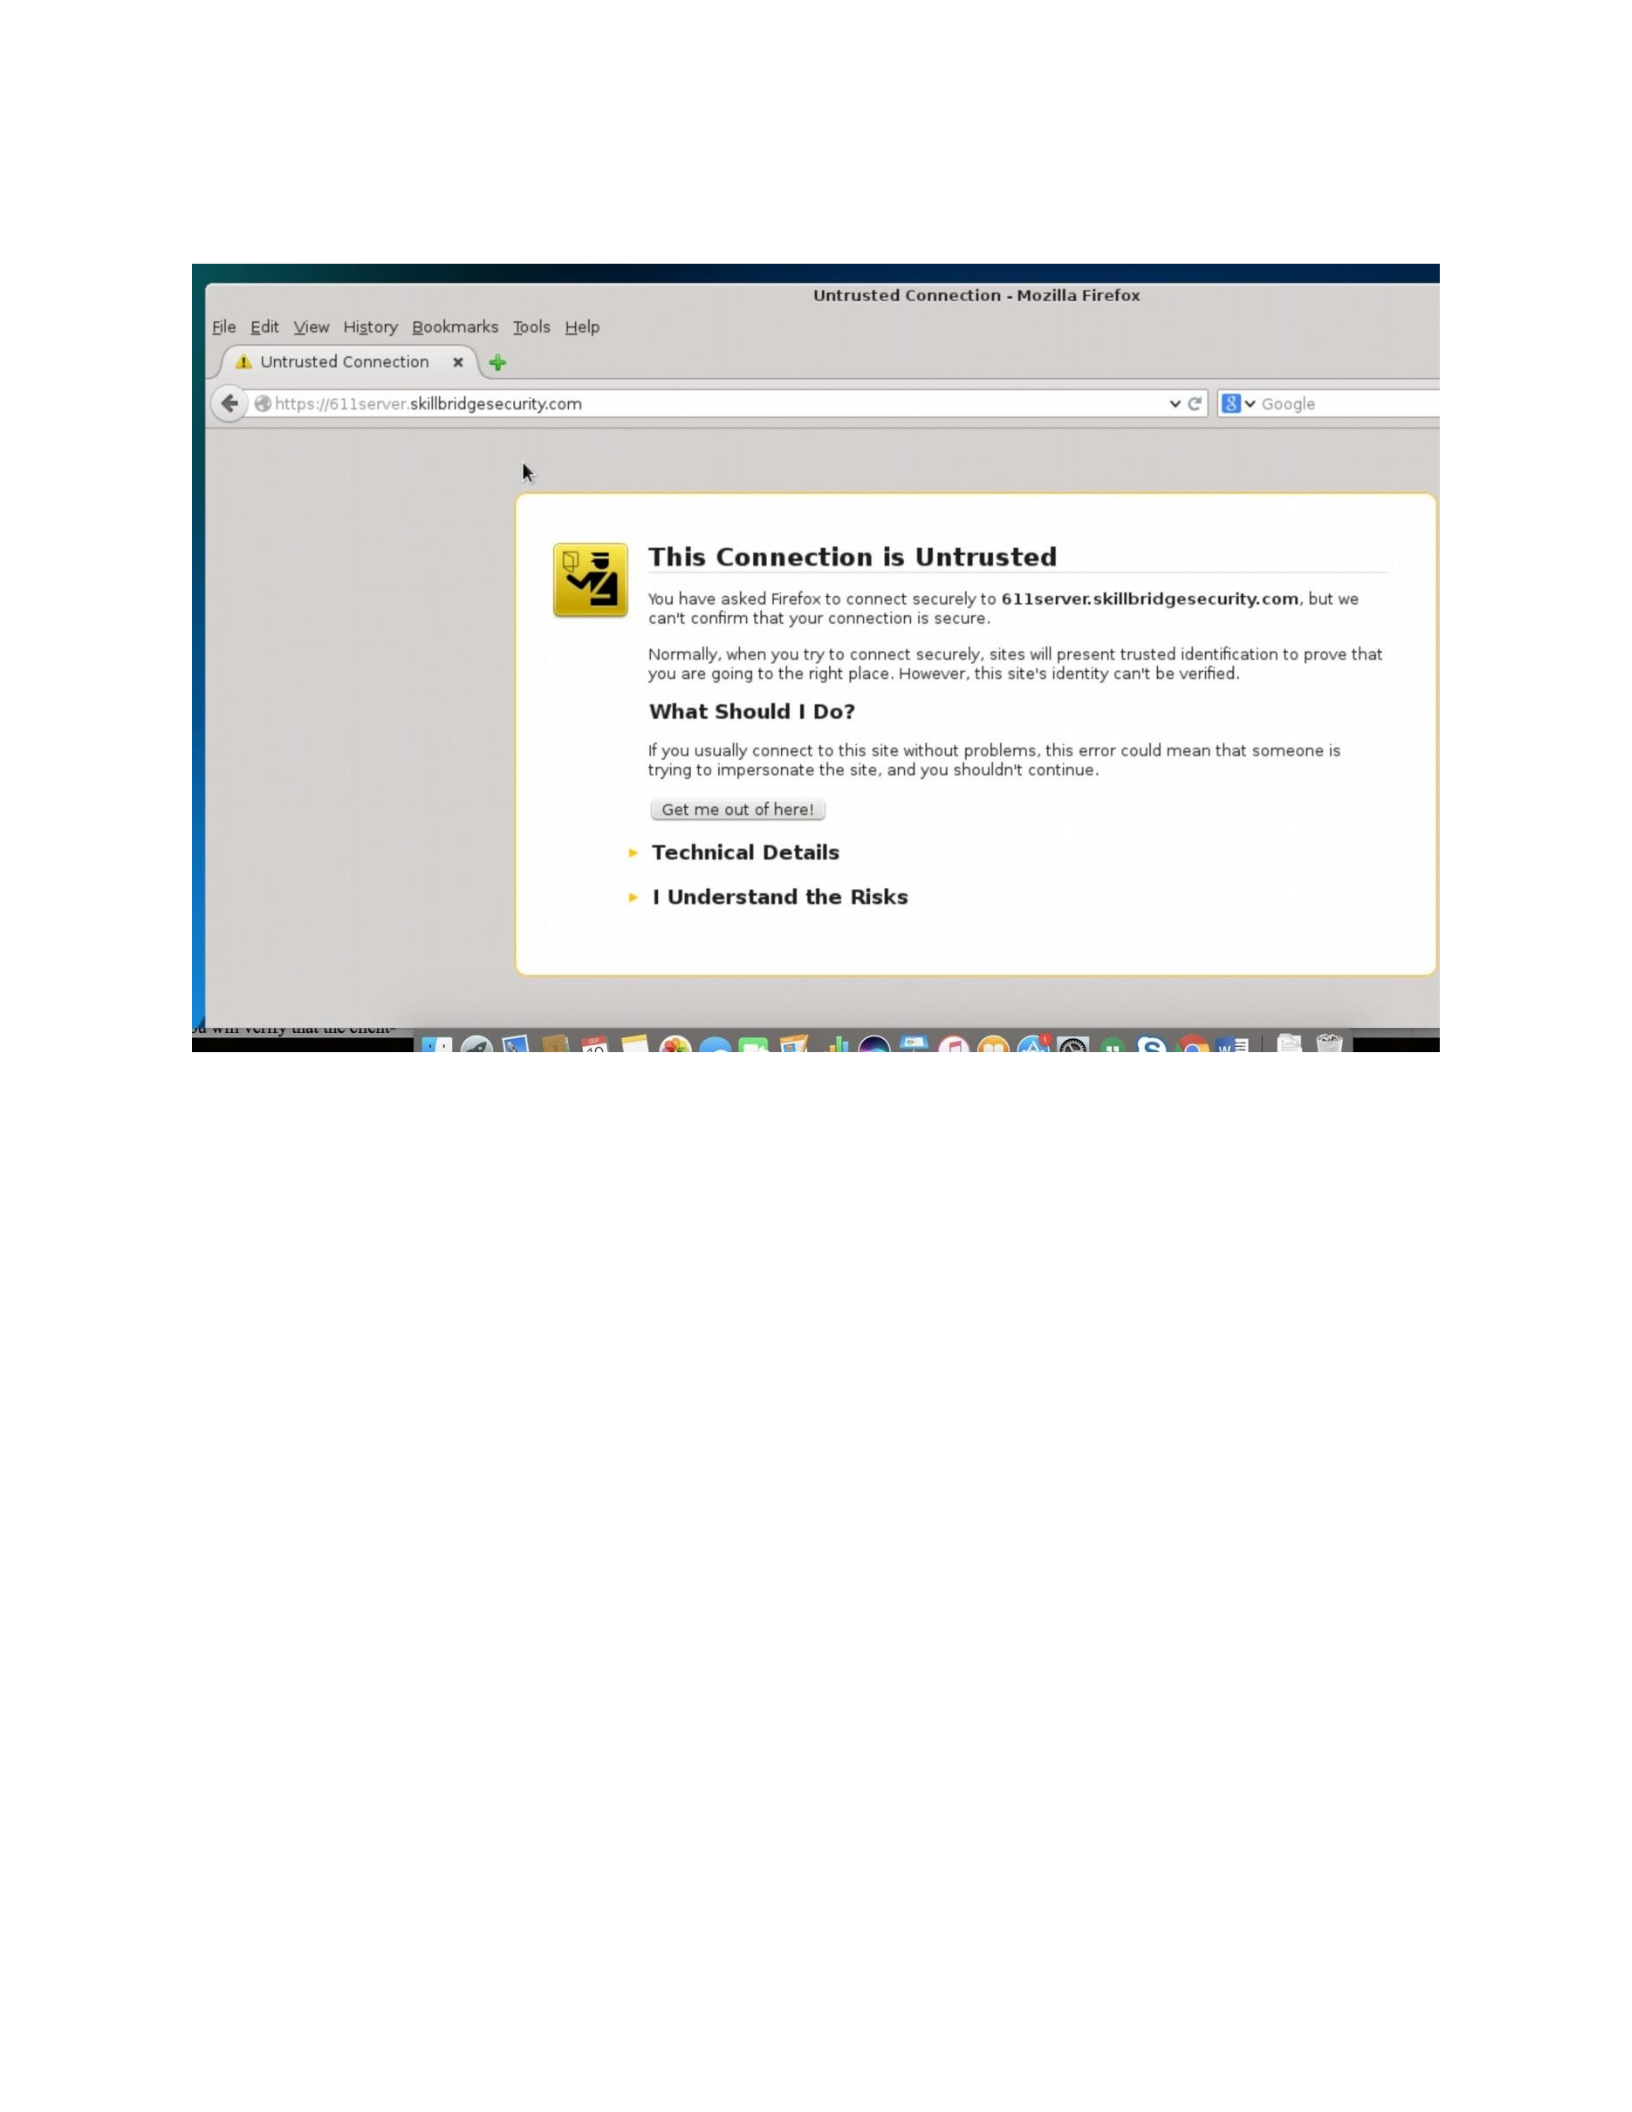
Make a screen capture showing the https://611Server.skillbridgesecurity.com
home pageand paste it into your Lab Report file.
•
Close the Firefox window
•
Click the Terminal window icon from the task bar to start that application.
•
At the command prompt, type sudo wireshark and press Enter to open the
Wireshark application.
•
When prompted for a password, type abc123, the password for the user account,
and press Enter.
•
In the Capture section of the Wireshark home page, select enp4s1 from the interface
box and click Start to begin recording traffic.
•
From the Client desktop, click the Firefox icon in the taskbar to reopen that
application.
•
In the address box, type https://611Server.skillbridgesecurity.com and press Enter.
•
Minimize the Firefox window.
•
If necessary, restore the Wireshark window.
The Wireshark window opens with detailed information about the first packet captured, Frame 1,
displayed in the middle pane. Use your mouse to drag the borders of any pane up or down to change
its size.
o Below the Wireshark toolbar is the Filter bar. Wireshark offers the ability to filter
traffic to locate specific packets more easily.

Lab 1 Report, Assessment, and Challenge
4
o The top pane of the Wireshark window contains all the packets that Wireshark has
captured, in time order, and provides a summary of the contents of the selected packet in a format
close to English. This area of the Wireshark window is referred to as the packet list.
o The middle pane of the Wireshark window is used to display the packet structure and
contents of fields within the packet. This area of the Wireshark window is referred to as the packet
details.
o The bottom pane of the Wireshark window displays the byte data. All the information
in the packet is displayed in hexadecimal format on the left, and in decimal format—in characters
when possible—on the right. This can be a very useful feature, especially if the passwords you are
looking for are unencrypted. This area of the Wireshark window is referred to as the packet bytes.

Lab 1 Report, Assessment, and Challenge
5
Figure 1 Wireshark window panes
•
In the Wireshark toolbar, click the Stop Capture button (the red square) to stop the
capture.
Figure 2 Stop the capture
Lab 1 Report, Assessment, and Challenge
6
•
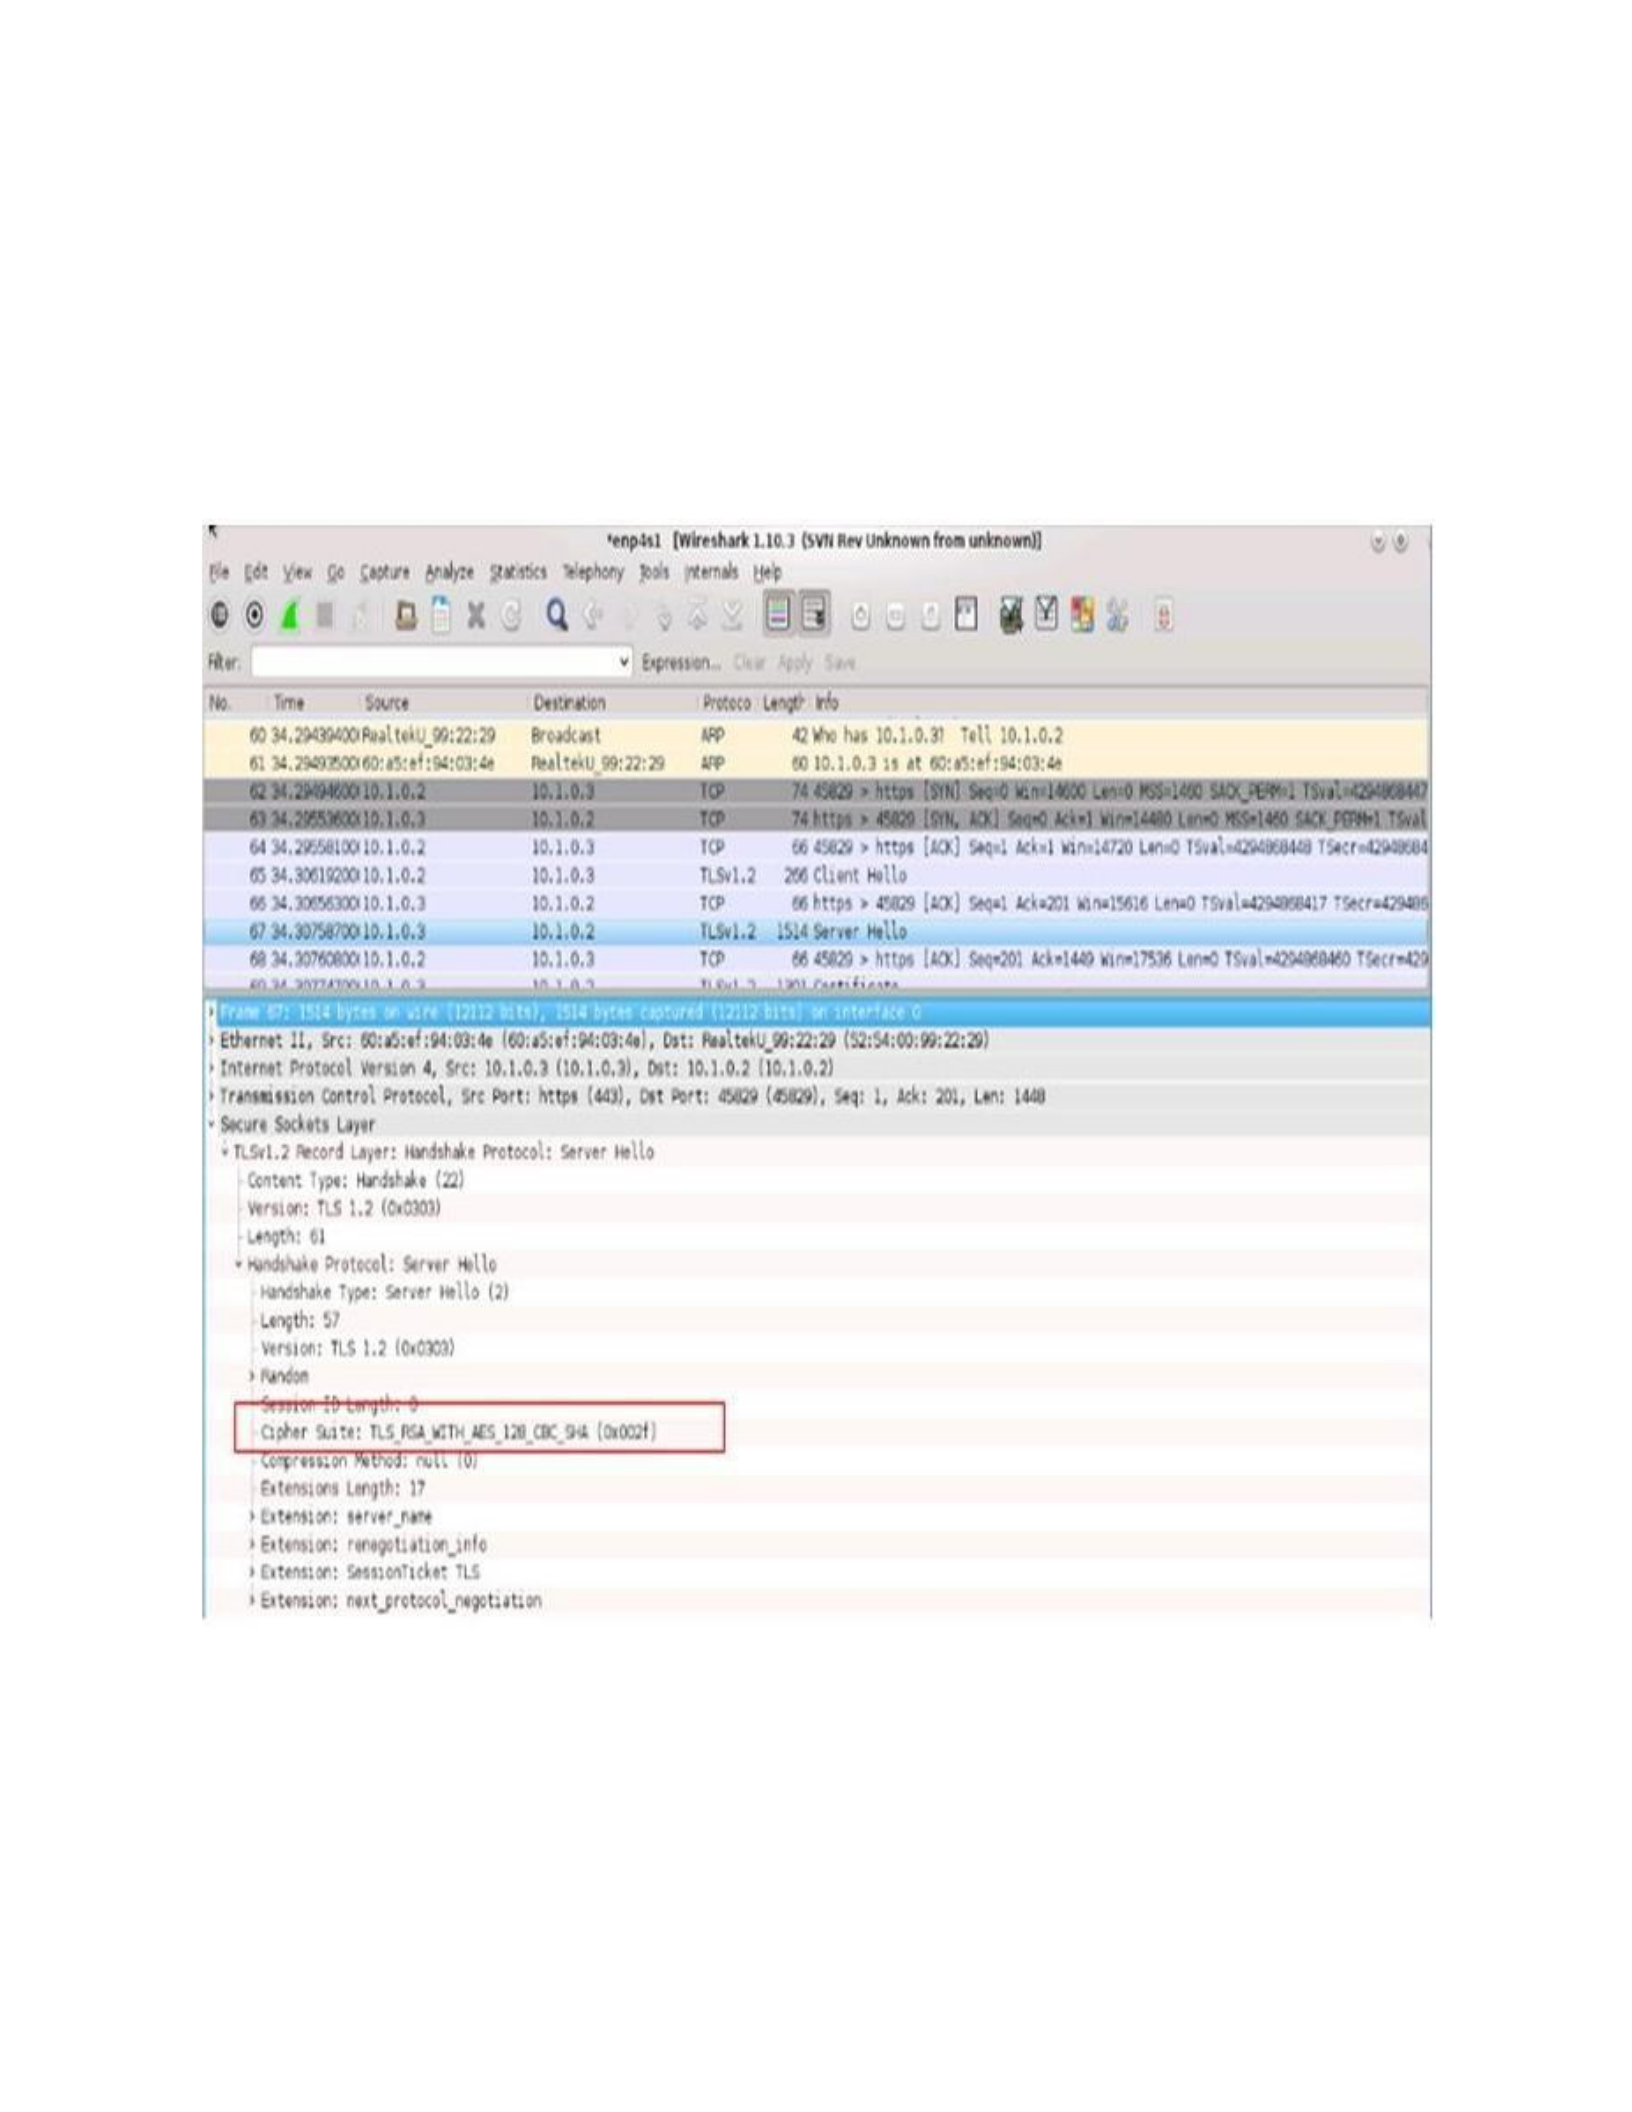
In the packet list, click the packet that has a protocol of TLSv1.2 and that
shows Server Hello in the Info column to open the packet details.
Your packet numbers will not match those in the lab.
•
In the packet details, navigate to the Handshake Protocol details (Secure Sockets
Layer > TLSv1.2 Record Layer > Handshake Protocol) to review the data available from the
Cipher Suite.
Cipher Suite annotates which public key algorithm, symmetric key algorithm and key length, and
hash algorithm are in use.
Figure 3 Cypher Suite data
•
In the Lab Report file, document the public key algorithm, symmetric key
algorithm and key length, and hash algorithm used.
TLS_RSA_WITH_AES_128_CBC_SHA
Lab 1 Report, Assessment, and Challenge
7
•
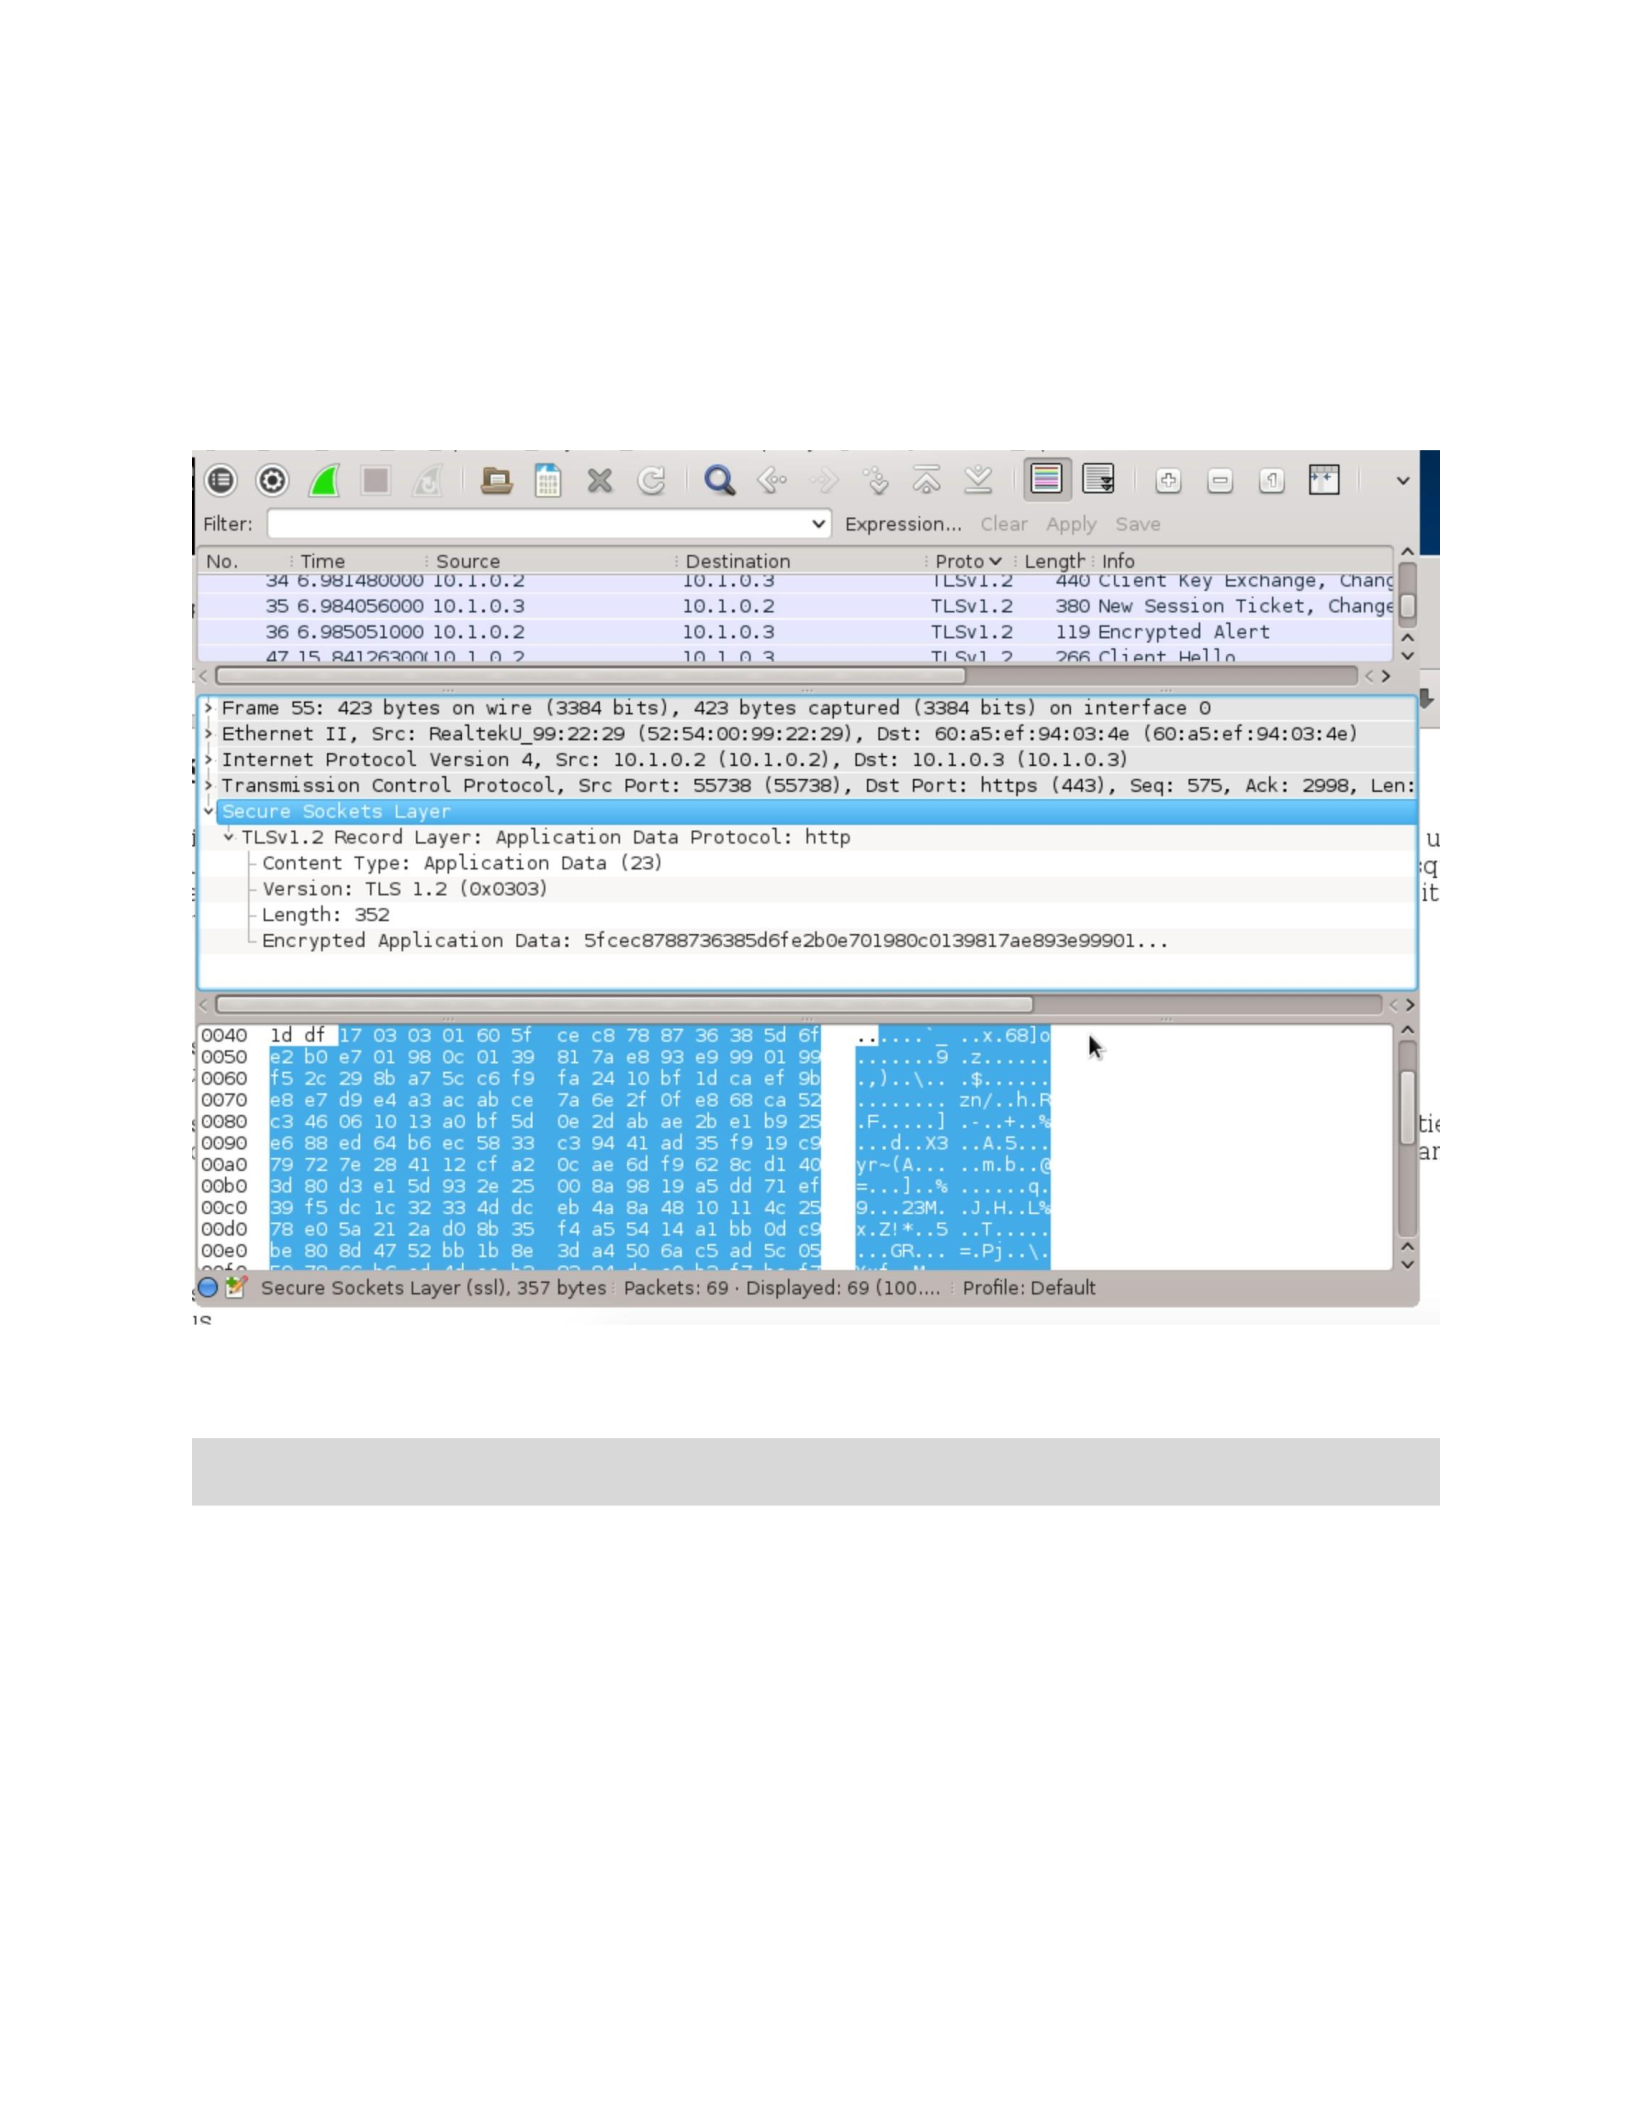
In the packet list, click the packet that has a protocol of TLSv1.2 and that
shows Application Data in the Info column to open the packet details.
•
In the packet details, navigate to the TLSv1.2 Record Layer details (Secure Sockets
Layer > TLSv1.2 Record Layer) to review the encrypted application data.
•
Make a screen capture showing the encrypted application data and paste it into
your Lab Report file.
•
Minimize the Wireshark window.
Part 2: Collect Client-Side Data
1. If necessary, restore the Firefox window.
2. In a new tab, type file:///home/user/firebug-2.0.4.xpiand press Enter.
3. In the pop-up window that appears, click the Install Now button to install the plug-in.
4. From the Firefox menu, select Tools > Add-ons and click the Extensions tab on the left side of the
page.
When the plug-in is successfully installed, Firefox will display the Firebug 2.0.4 tool in the list of
extensions.
Note:
In the next steps, you will look at the data received on client side .

Lab 1 Report, Assessment, and Challenge
8
5. Make a screen capture showing that Firebug was successfully installed and paste it into your
Lab Report file.
6. In the browser window, click the https://611Server.skillbridgesecurity.com tab to view that page.
7. From the Firefox menu, select Tools > Web Developer > Firebug > Open Firebug to view the
page using the Firebug plug-in.
Firebug will display a new pane at the bottom of the window. This pane includes the following tabs:
Console, HTML, CSS, Script, DOM, Net, and Cookies.

Lab 1 Report, Assessment, and Challenge
9
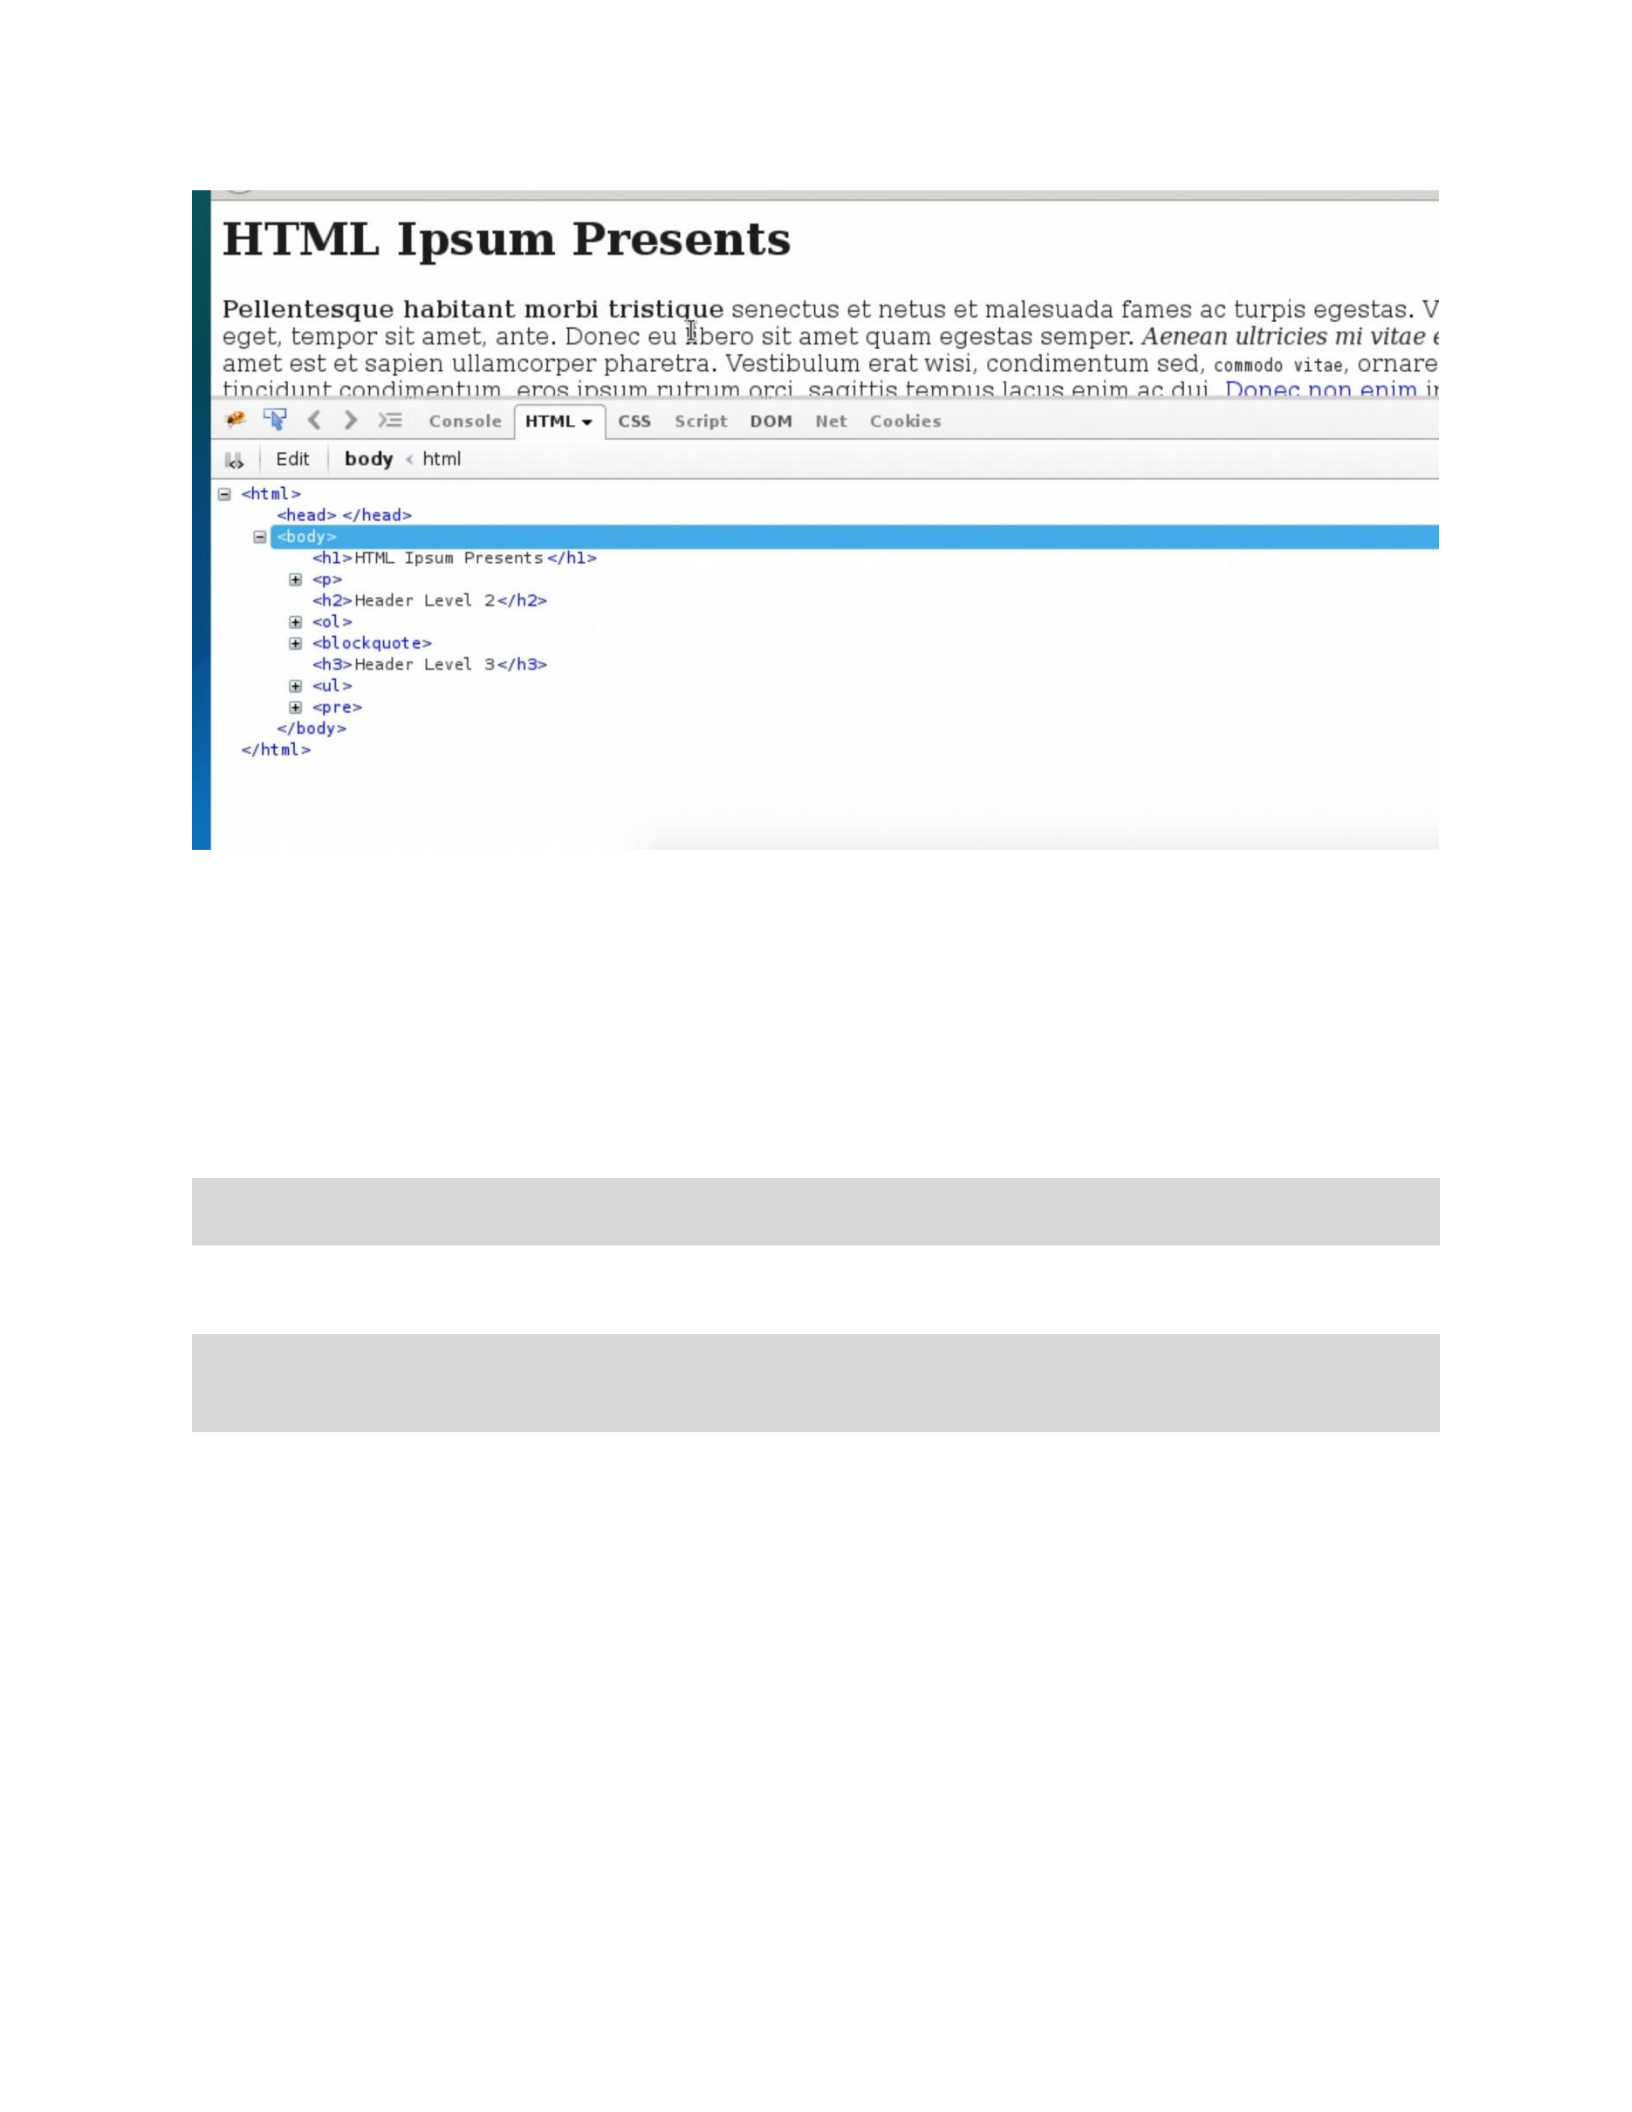
Figure 4 Firebug source HTML
8. If necessary, click the HTML tab and expand the HTML source entities, such as <body>,
<p>, <ol>, and <ul> to fully display the HTML data.
You may choose to resize the Firebug pane to better view the HTML data in its entirety.
9. Make a screen capture showing the Web page and the source HTML, maintaining a balance
between the rendered HTML and the HTML source, and paste it into the Lab Report file.
Lab 1 Report, Assessment, and Challenge
10
In the lab environment, this page contains no real information. In a real-life situation, however, an
attacker could potentially view any page loaded. The tool also allows an attacker to see all keystrokes
and mouse operations performed by the user.
10. Close the Firefox window.
11. If necessary, click the Close tabs button to close Firefox.
12. Minimize the Client machine.
Part 3: Collect Server-Side Data
1. In the virtual lab topology pane, double-click the 611Server.skillbridgesecurity.com
machine (Server)to open a connection to the machine.
2. Click the Terminal window icon from the taskbar to start that application.
3. At the command prompt, type sudo wireshark and press Enter to start the application.
4. When prompted for a password, type admin, the password for the user account, and press Enter.
5. In the Capture section of the Wireshark home page, select enp4s1 from the interface box and
click Start to begin recording traffic.
6. Restore the Client machine window.
7. On the Client machine, click the Firefox icon in the taskbar to reopen the browser.
If you did not close the Firefox browser at the end of Part 2, do so now and the reopen it. Do not skip
this step. Firefox must be freshly started for the lab to work properly.
Note:
In the next steps, you will look at the server-side communication.
Note:
The first time you connect to a system, you may be required to log in. To connect to the Server system,
you will log in as root. The username is admin, and the password is admin.

Lab 1 Report, Assessment, and Challenge
11
8. In the Web browser’s address box, type https://611server.skillbridgesecurity.com and press Enter
to open the Server machine’s home page.
9. Restore the Server machine window.
10. In the Wireshark toolbar, click the Stop Capture button (the red square) to stop the capture.
11. In the packet list, click the packet that has a protocol of TLSv1.2 and that shows Application Data in
the Info column to open the packet details.
12. In the packet details, navigate to the TLSv1.2 Record Layer details (Secure Sockets Layer >
TLSv1.2 Record Layer) to review the encrypted application data.
13. Make a screen capture showing the encrypted application data and paste it into your Lab Report
file.
Compare this result with that of Part 1, Step 23. Because you have control of the server, you have
access to the encryption key. In the next steps, you will use that key with Wireshark to decrypt the
communication.
14. From the Wireshark menu, select Edit > Preferences > Protocols > SSL to open the SSL page in
the Wireshark Preferences dialog box.

Lab 1 Report, Assessment, and Challenge
12
Figure 5 SSL protocol options
15. Click the RSA keys list Edit button to open the SSL Decrypt dialog box.
16. Click the New button to add a new entry.
The New Profile dialog box may open at the bottom of the screen. Resize your window to find it and
move it to a more convenient position on the screen.
17. In the IP address box, type 10.1.0.3, the Server machine.
18. In the Port box, type 443 for secure HTTP.
19. In the Protocol box, type http.
20. From the Key File drop-down list, select the localhost.key file, the server’s key from the Server
machine’s directory system.

Lab 1 Report, Assessment, and Challenge
13
Figure 6 New SSL entry
21. There is no password, so leave the Password box empty, and click OK to add the new entry.
22. Click OK to close the SSL Decrypt dialog box and return to the SSL page of the Wireshark
Preferences dialog box.
23. In the SSL debug file box, type /tmp/ssl.debug.
For some versions of Wireshark, you must enter a valid path to a file here, but the specifics do not
matter for this lab.
24. Click OK to save your changes and return to the packet list.
The highlighted packet, which previously included the words Application Data in the Info column,
now includes HTTP in both the Info column and the Protocol column. In addition, the packet details
now include Hypertext Transfer Protocol details describing the HTTP communication that occurred.
25. In the packet details, navigate to the Hypertext Transfer Protocol details (Secure Sockets Layer
>Hypertext Transfer Protocol) to review the decrypted data available.
26. Make a screen capture showing the Hypertext Transfer Protocol details and paste it into the Lab
Report file.
27. In the decrypted packets, locate the packet that indicates the client’s browser (user-agent).
28. In the Lab Report file, document the browser identified by Wireshark. Firefox
31.0

Lab 1 Report, Assessment, and Challenge
14
29. In the decrypted packets, locate the packet that indicates the client’s server type.
30. In the Lab Report file, document the server identified by Wireshark. Apache
2.4.6
31. With one of the new HTTP packets still selected, select Analyze > Follow SSL Stream from the
Wireshark menu to open a new window showing the entire SSL stream.
32. Resize the Follow SSL Stream window to fill as much of the screen as possible.
33. Make a screen capture showing the Follow SSL Stream window and paste it into the Lab Report
file.
34. Close the Follow SSL Stream window.
35. Close the Wireshark window.
36. Click Quit without Saving when prompted to close the application.
37. Close the virtual lab or proceed with Part 4 to answer the challenge questions for this lab.
Lab Assessment Questions & Answers
1. What threat models does TLS/SSL address?
Bad certificate
Replay
Bad key

Lab 1 Report, Assessment, and Challenge
15
2. What threat model does TLS/SSL not address?
Known key
Man in the middle
Man in the browser
3. What are the TLS parameters (the public key encryption algorithm, the symmetric cipher and key
length, and the cryptographic hash algorithm) negotiated by the client and server?
TLS_RSA_WITH_AES_128_CBC_SHA
4. In Part 3, Step 31 of this lab, in the Follow SSL Stream window, what HTML tags surround the
sentence Aliquam tincidunt mauris eu risus?
<li></li>
5. From the decrypted data (HTTP protocol) collected on the server with Wireshark, what browser
is the client using? What is the server information?
Firefox 31
Apache 2.4.6
Part 4: Challenge Questions
1. Browser helper objects, add-ons, extensions, and/or plug-ins are commonly used in a man-in-the-
browser (MITB) attack, similar to a man-in-the-middle (MITM) attack. Come up with three different
examples for how such an attack could cause serious consequences for the user and/or the
organization with which she is communicating.
Change amounts of withdrawal or deposit on bank account
Capture user id password
Redirect transfers purchases or payments
2. Research three examples of known MITB threats. In a one-paragraph summary for each
threat, describe the name of the threat, targeted operating system(s) and browser(s), what the attack
targets, how the attack is installed into the browser, and how it works. At least one of the attacks must
not target Microsoft Windows as the OS.
Note:
The following challenge questions are provided to allow independent, unguided work, similar to what you
will encounter in a real situation. You should aim to improve your skills by getting the correct answer in as
few steps as possible. Use screen captures in your Challenge Questions file where possible to illustrate
your answers.

Lab 1 Report, Assessment, and Challenge
16
1. Holding open a bank session could prevent updates or allow time for further
compromise by recording the session, changing inputs, values, accounts etc. EX:
oddjob (Samson, 2011)
2. For mac osX there is “The Weyland-Yutani BOT supports web injects and form
grabbing in Firefox; however both Chrome and Safari will soon follow. The
webinjects templates are identical to the ones used in Zeus and Spyeye.” (Bott, 2017)
3. In the case of Silentbanker “The Trojan targets many different banks using
various methods in order to Gain access to accounts, Divert transactions to attacker
controlled accounts” EX: SILENTBANKER (Symantec.com, 2017)
3. Suppose you were an attacker. For HTTPS communication, how might you successfully
perform
an MITM attack without control of either endpoint? Hint: According to Edward Snowden, the NSA
used this method.
add static routes for the target traffic redirecting them to your server. (Techdirt, 2017)
4. In the introduction, you learned that many people believe that simply by
using good cryptography, their communication is protected from the eyes of an attacker. Give an
example of bad encryption. Explain why it is bad, how an attacker could exploit the weakness, and
what resources would be required for this exploit.
Using a known or available public key would be bad use the key decode the data easily sniffer
only tool required
Using less than 128 bit encryption would allow rapid cracking of the encryption runa tool crack
the encryption decode the data brute force decryption tool, GPU card sniffer only tools
required
5. Related to the previous question, how can you know that good encryption is in use?
Secure private key Higher Bit depth with current or new algorithms and ciphers equals harder
to break
6. Other than using Wireshark, as you did in this lab, give at least one other way that an attacker
with control of the server could see the communication between the two parties.
Network monitor, tcpdump, web logs, commandline
Note:
This completes the lab. Close the virtual lab if you have not already done so.

Lab 1 Report, Assessment, and Challenge
17
*References
(Techdirt), M. (2017). 166819124 Mitm Google. [online] Documentcloud.org.
Available at: https://www.documentcloud.org/documents/785152-166819124-
mitm-google.html [Accessed 10 Sep. 2017].
Bott, E. (2017). Coming soon to a Mac near you: serious malware | ZDNet. [online]
ZDNet. Available at: http://www.zdnet.com/article/coming-soon-to-a-mac-near-
you-serious-malware/ [Accessed 10 Sep. 2017].
Mickey Boodaei, s. (2017). Man-in-the-Browser attacks target the enterprise. [online]
Network World. Available at:
https://www.networkworld.com/article/2201601/tech-primers/man-in-the-
browser-attacks-target-the-enterprise.html [Accessed 10 Sep. 2017].
Samson, T. (2017). Crafty OddJob malware leaves online bank accounts open to
plunder. [online] InfoWorld. Available at:
https://www.infoworld.com/article/2623446/cyber-crime/crafty-oddjob-malware-
leaves-online-bank-accounts-open-to-plunder.html [Accessed 10 Sep. 2017].
Symantec.com. (2017). Trojan.Silentbanker Technical Details | Symantec. [online]
Available at: https://www.symantec.com/security_response/writeup.jsp?
docid=2007-121718-1009-99&tabid=2 [Accessed 10 Sep. 2017].

