


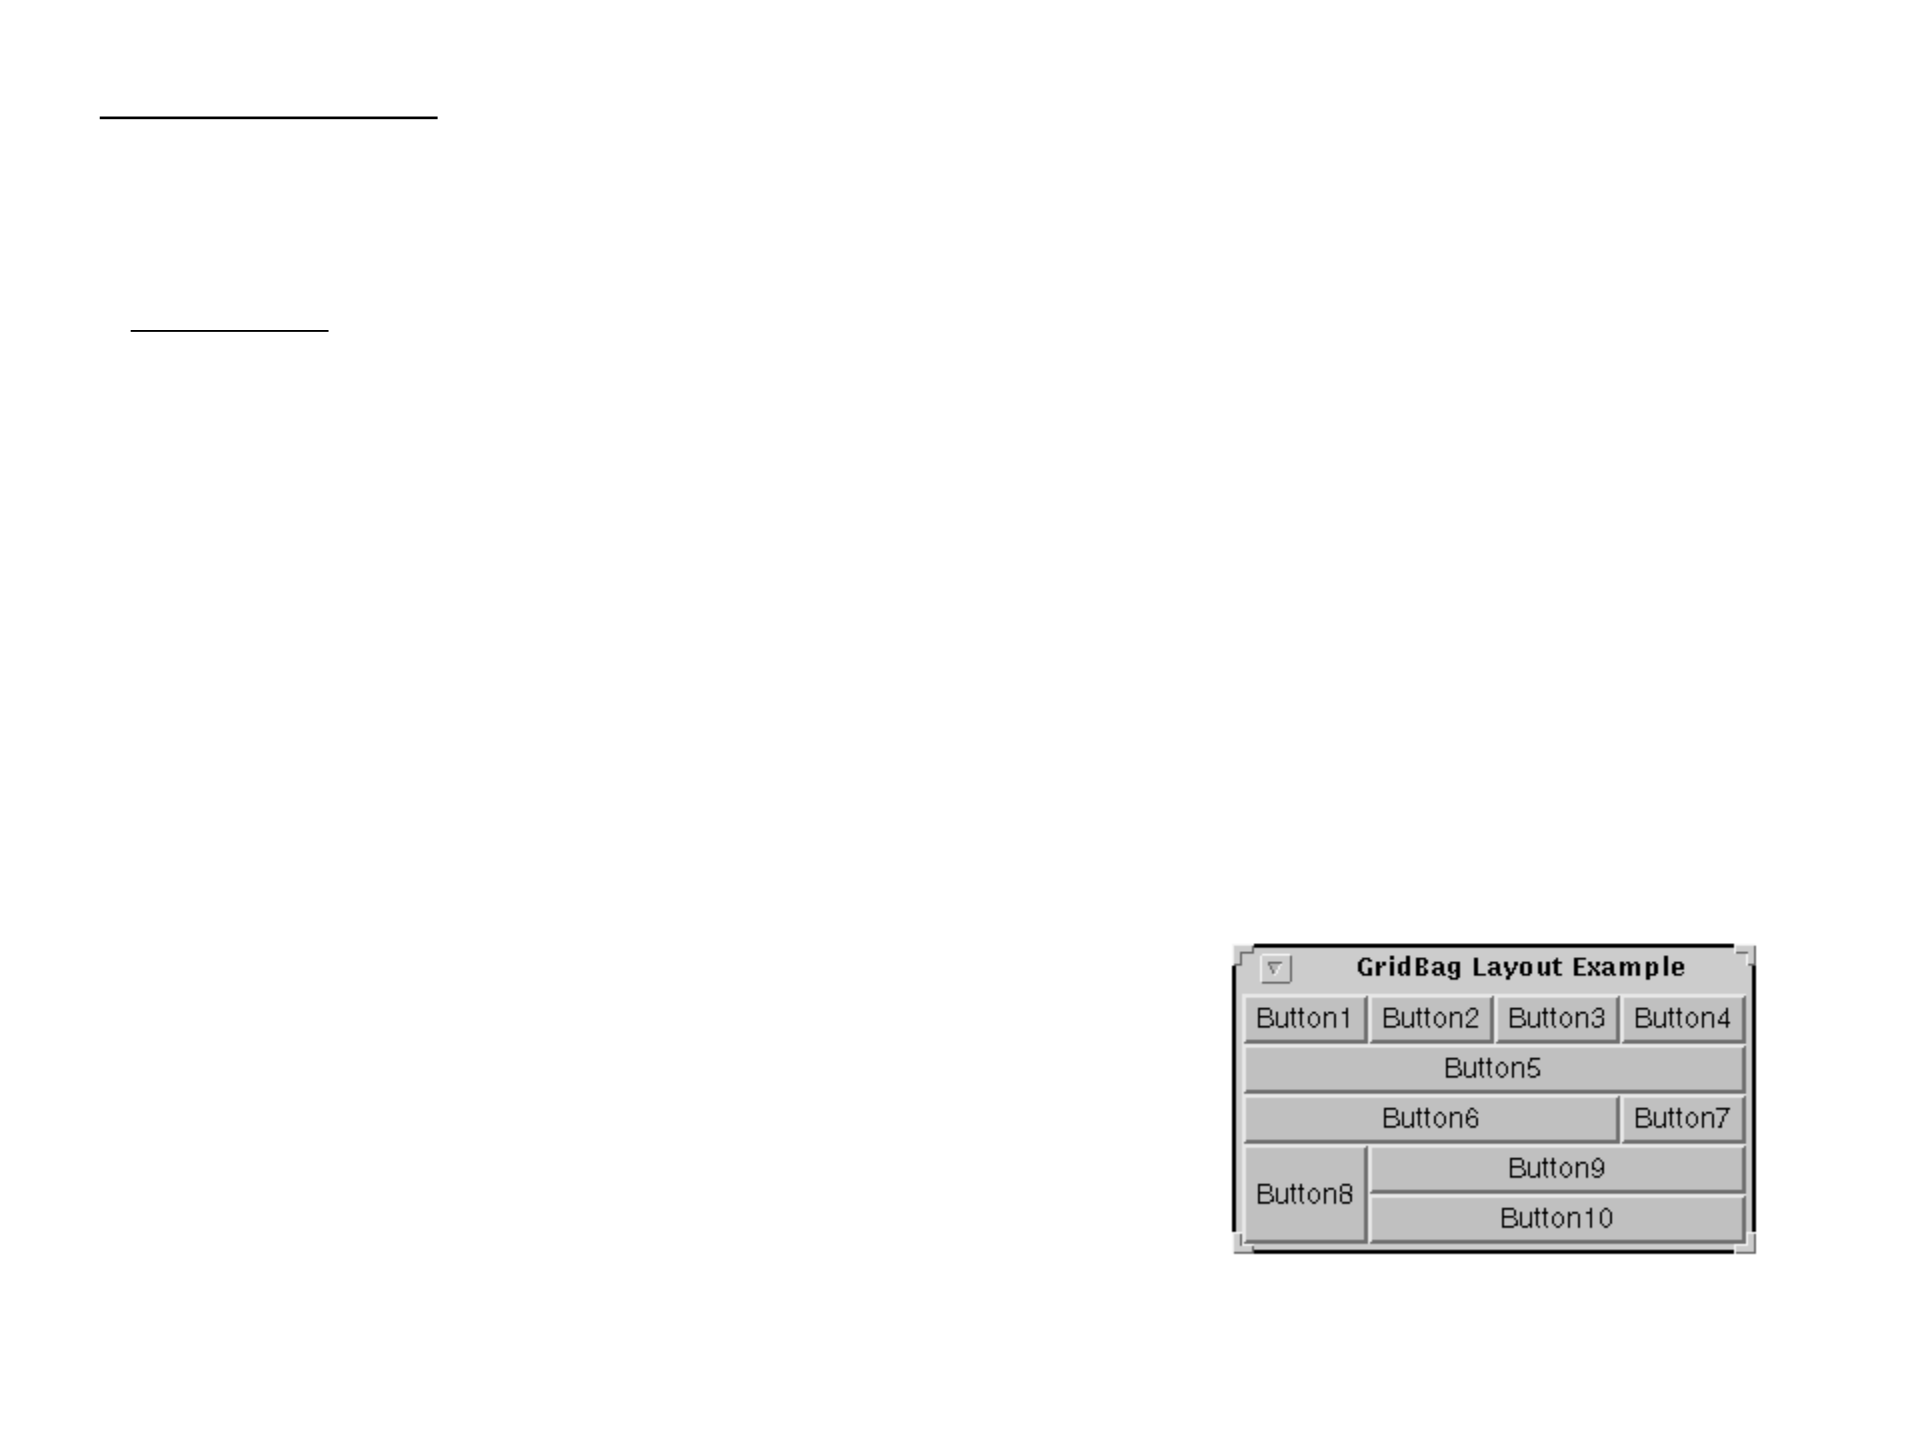
Once we start adding more than one component to a container, we need to consider how we organize/arrange them.
For this purpose, we can use layout managers.
A layout manager is an object that determines the manner in which components are arranged in a container.
Here is a list of commonly used layout managers: (they are defined in java.awt package.)
BorderLayout – it organizes components into five areas (North, South, East, West, and Center).
FlowLayout – it organizes components from left to right, starting new rows as necessary.
GridLayout – it organizes components into a grid of rows and columns
BoxLayout – it organizes components into a single row or a single column.
CardLayout – it organizes components into one such that only one is visible at any time.
GridBagLayout – it organizes components into a grid of cells, allowing components to span more than one cell.
Layout Managers
import javax.swing.*; // to use JApplet
import java.awt.*; // to import FlowLayout manager
public class AppletFlow extends JApplet
{
public void init()
{
Container content = getContentPane();
// to use FlowLayout to add components
content.setLayout(new FlowLayout());
// create three buttons
Button button1 = new Button("Button1");
Button button2 = new Button("Button2");
Button button3 = new Button("Button3");
// add three buttons to the content pane of JApplet object
content.add(button1);
content.add(button2);
content.add(button3);
setSize(270,70);
}
}
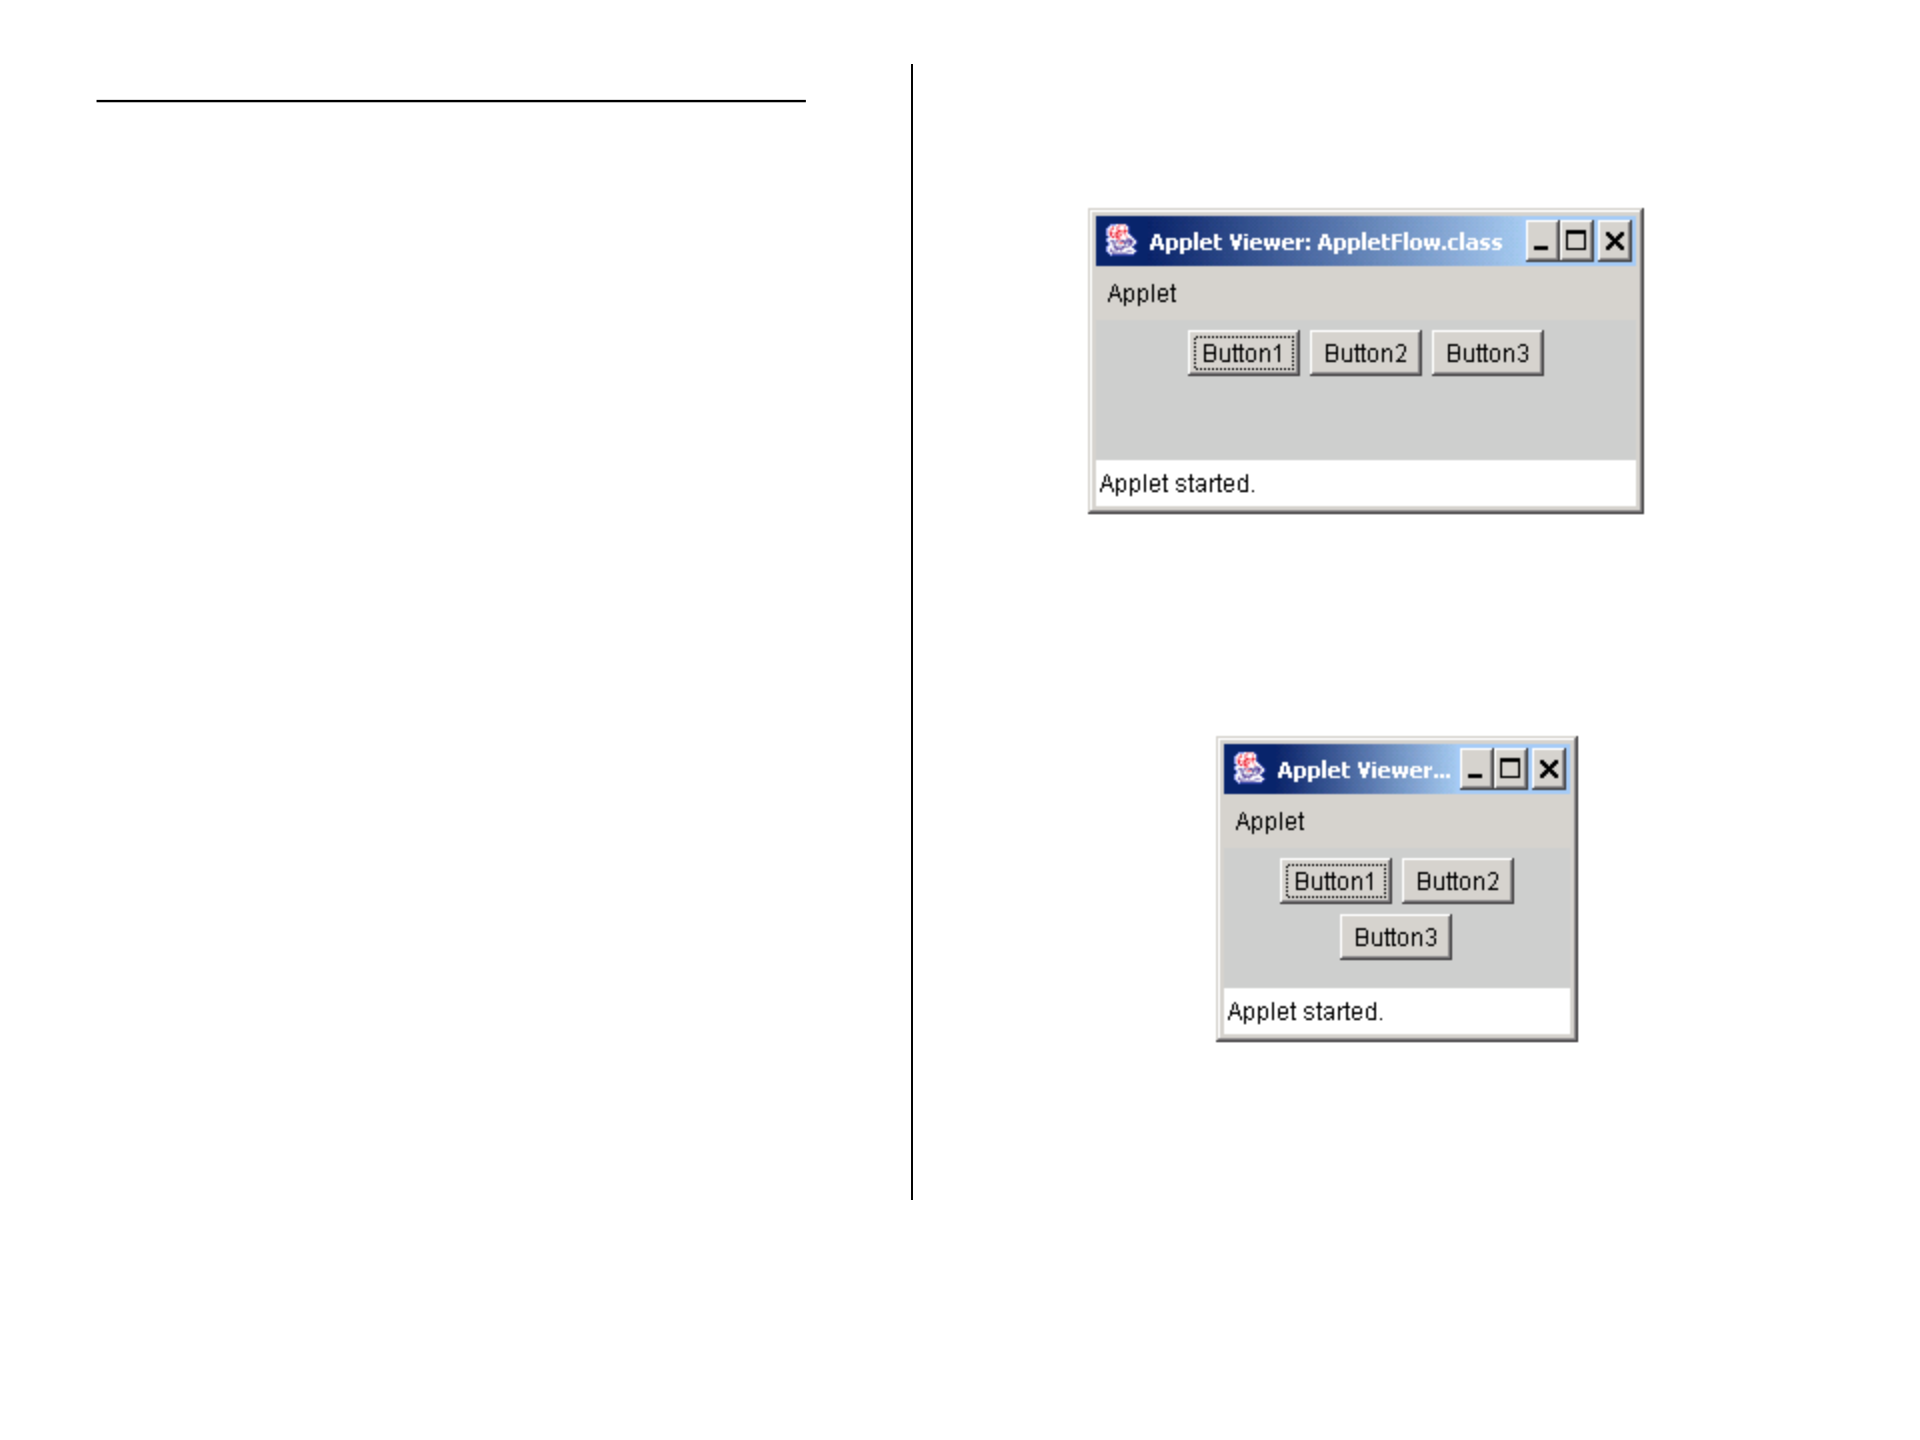
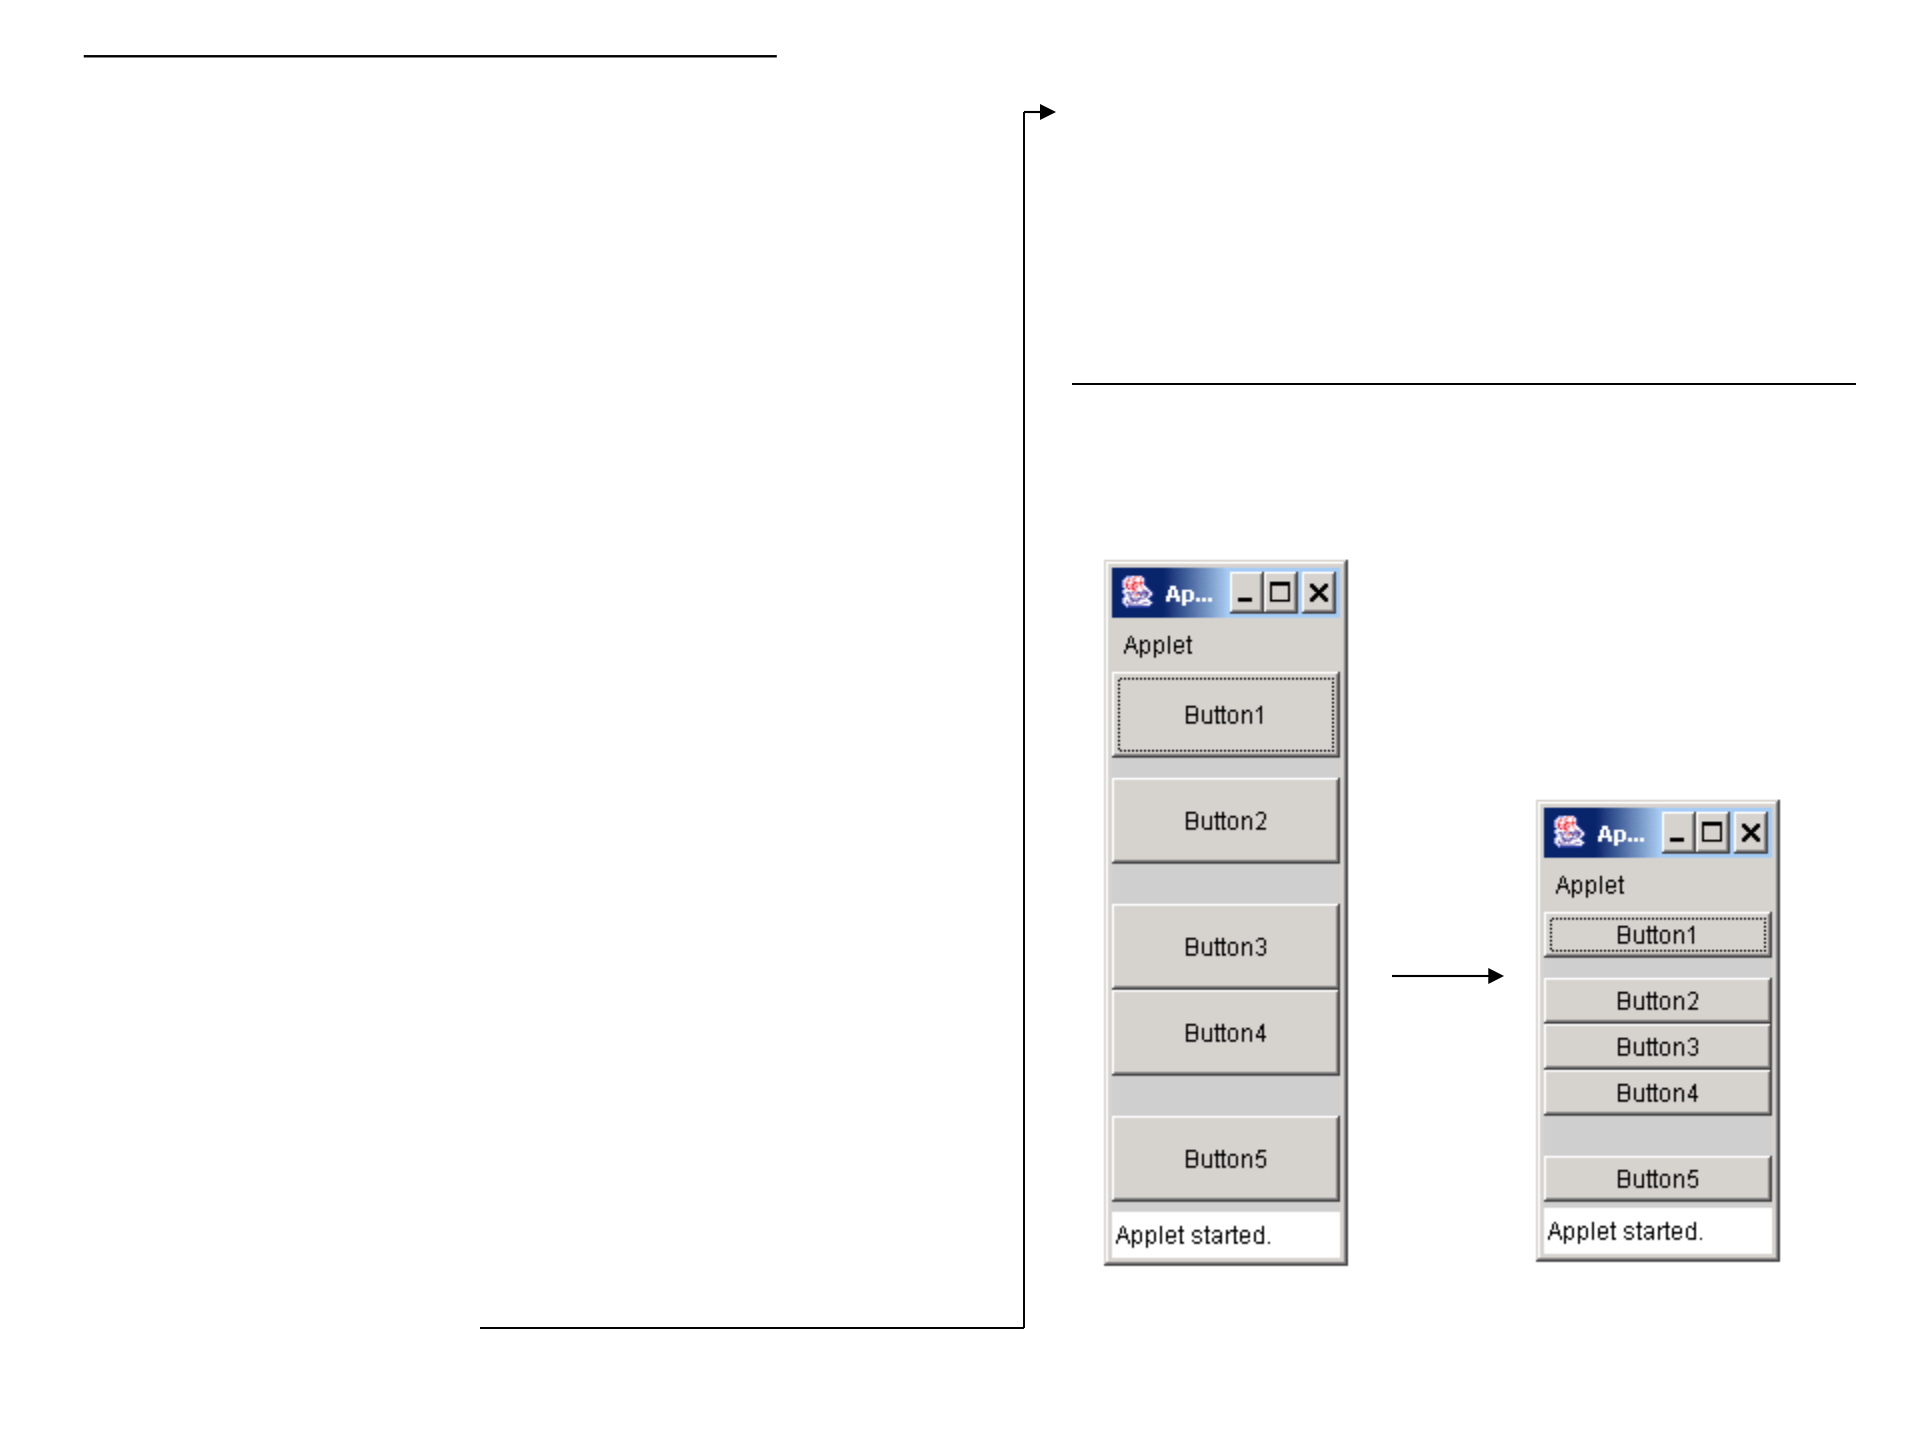
An Example of Applet using FlowLayout This program using FlowLayout organizes three buttons
in the following manner.
If a user narrows the size of the applet, any component that
did not fit in the first row will appear in the next row and so on.
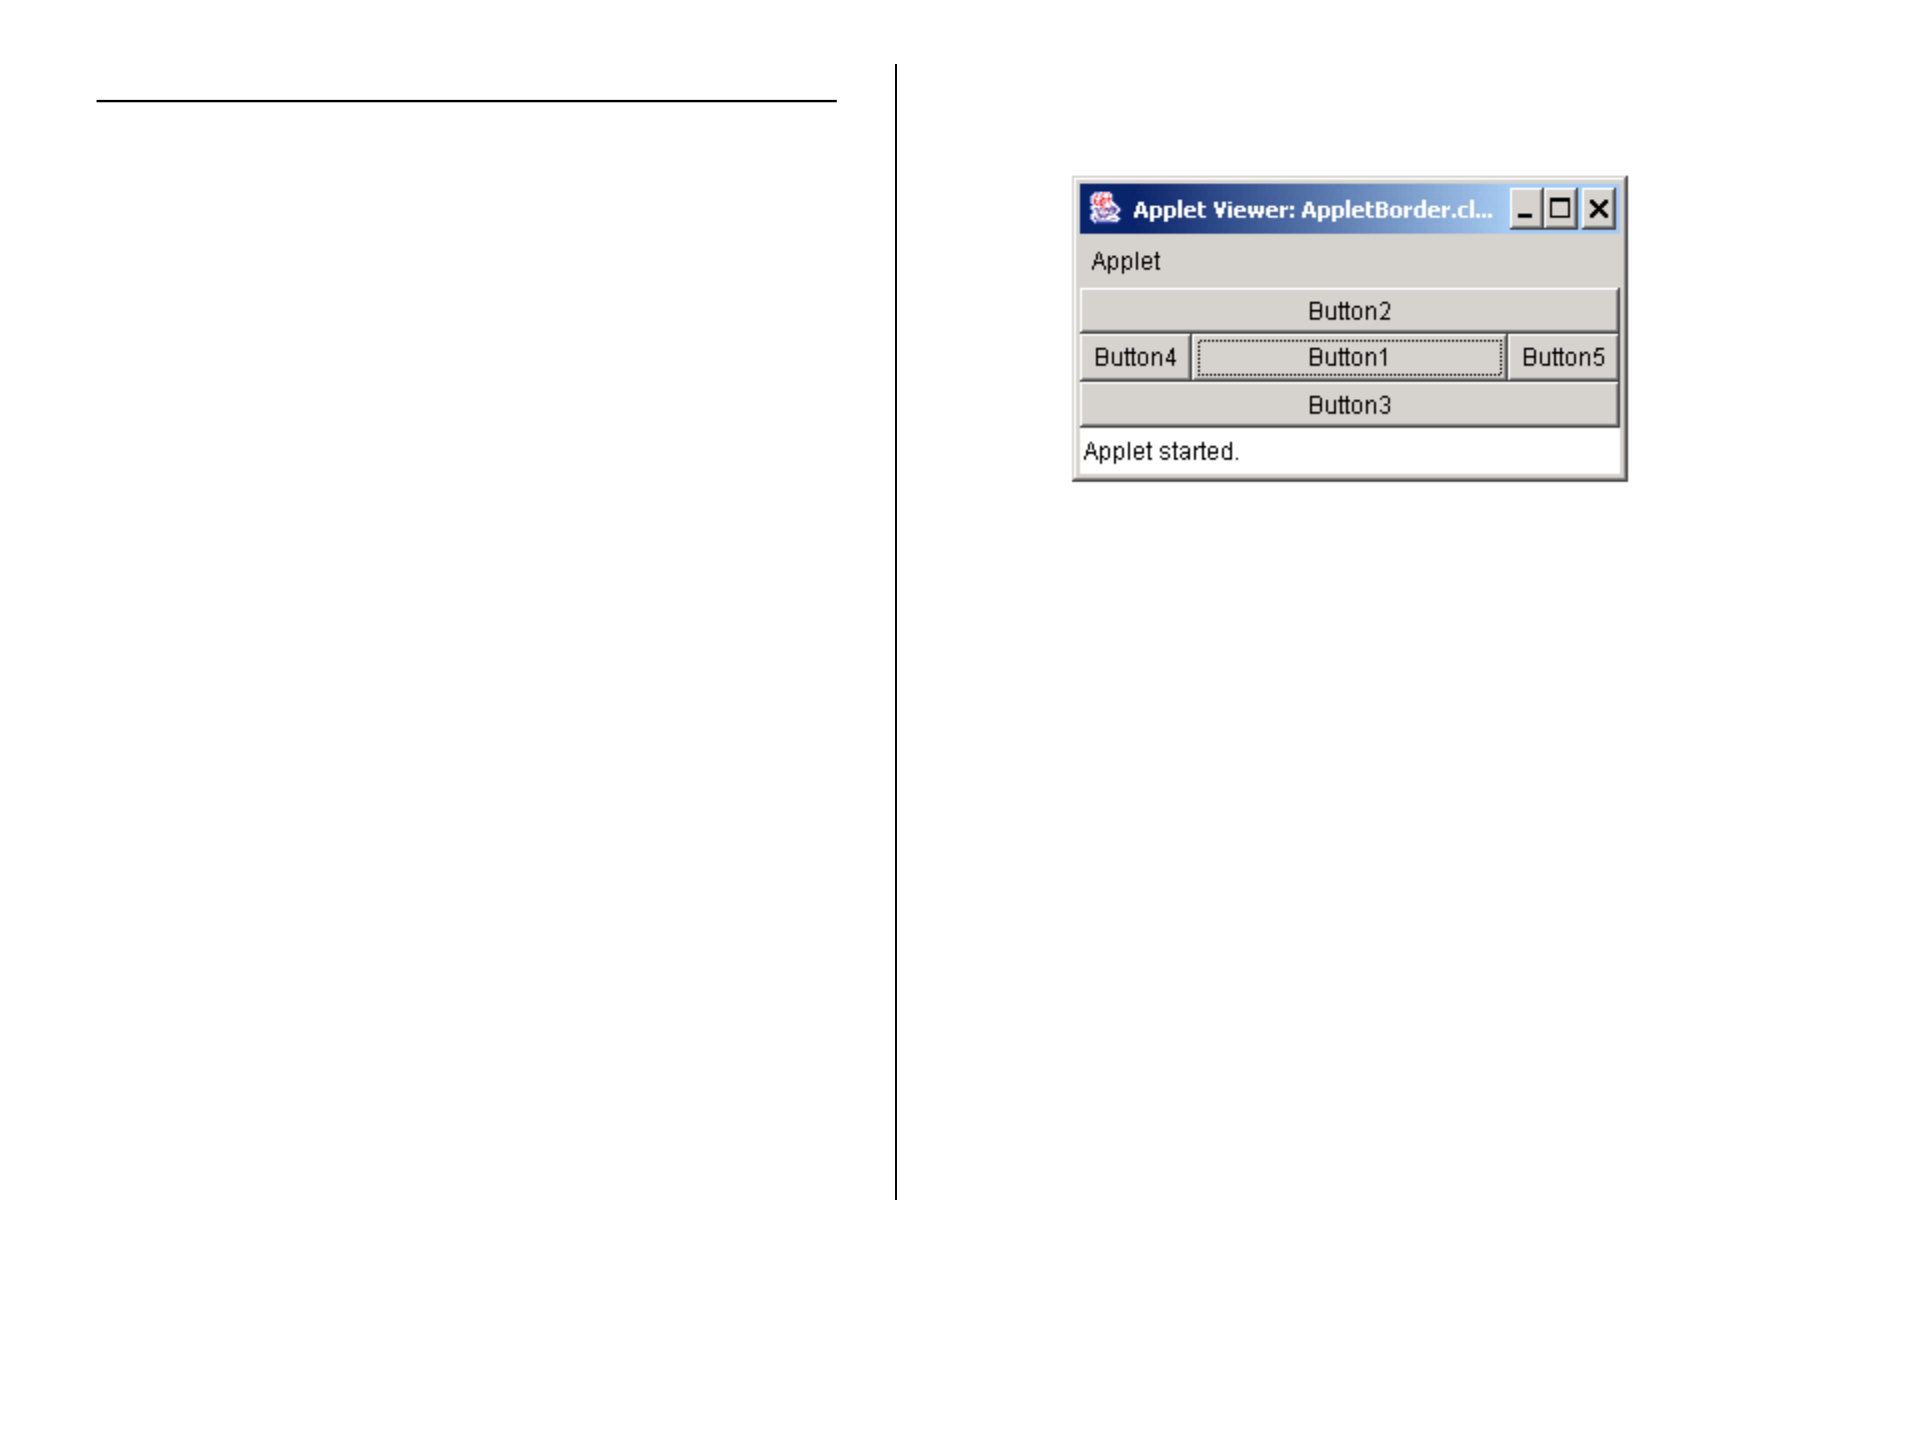
An Example of Applet using BorderLayout
import javax.swing.*; // to use JApplet
import java.awt.*; // to import BorderLayout manager
public class AppletBorder extends JApplet
{
public void init()
{
Container content = getContentPane();
// to use BorderLayout to add components
content.setLayout(new BorderLayout());
// create five buttons
Button button1 = new Button("Button1");
Button button2 = new Button("Button2");
Button button3 = new Button("Button3");
Button button4 = new Button("Button4");
Button button5 = new Button("Button5");
// add five buttons to the content pane of JApplet object
content.add(button1, BorderLayout.CENTER);
content.add(button2, BorderLayout.NORTH);
content.add(button3, BorderLayout.SOUTH);
content.add(button4, BorderLayout.WEST);
content.add(button5, BorderLayout.EAST);
setSize(270,70);
}
}
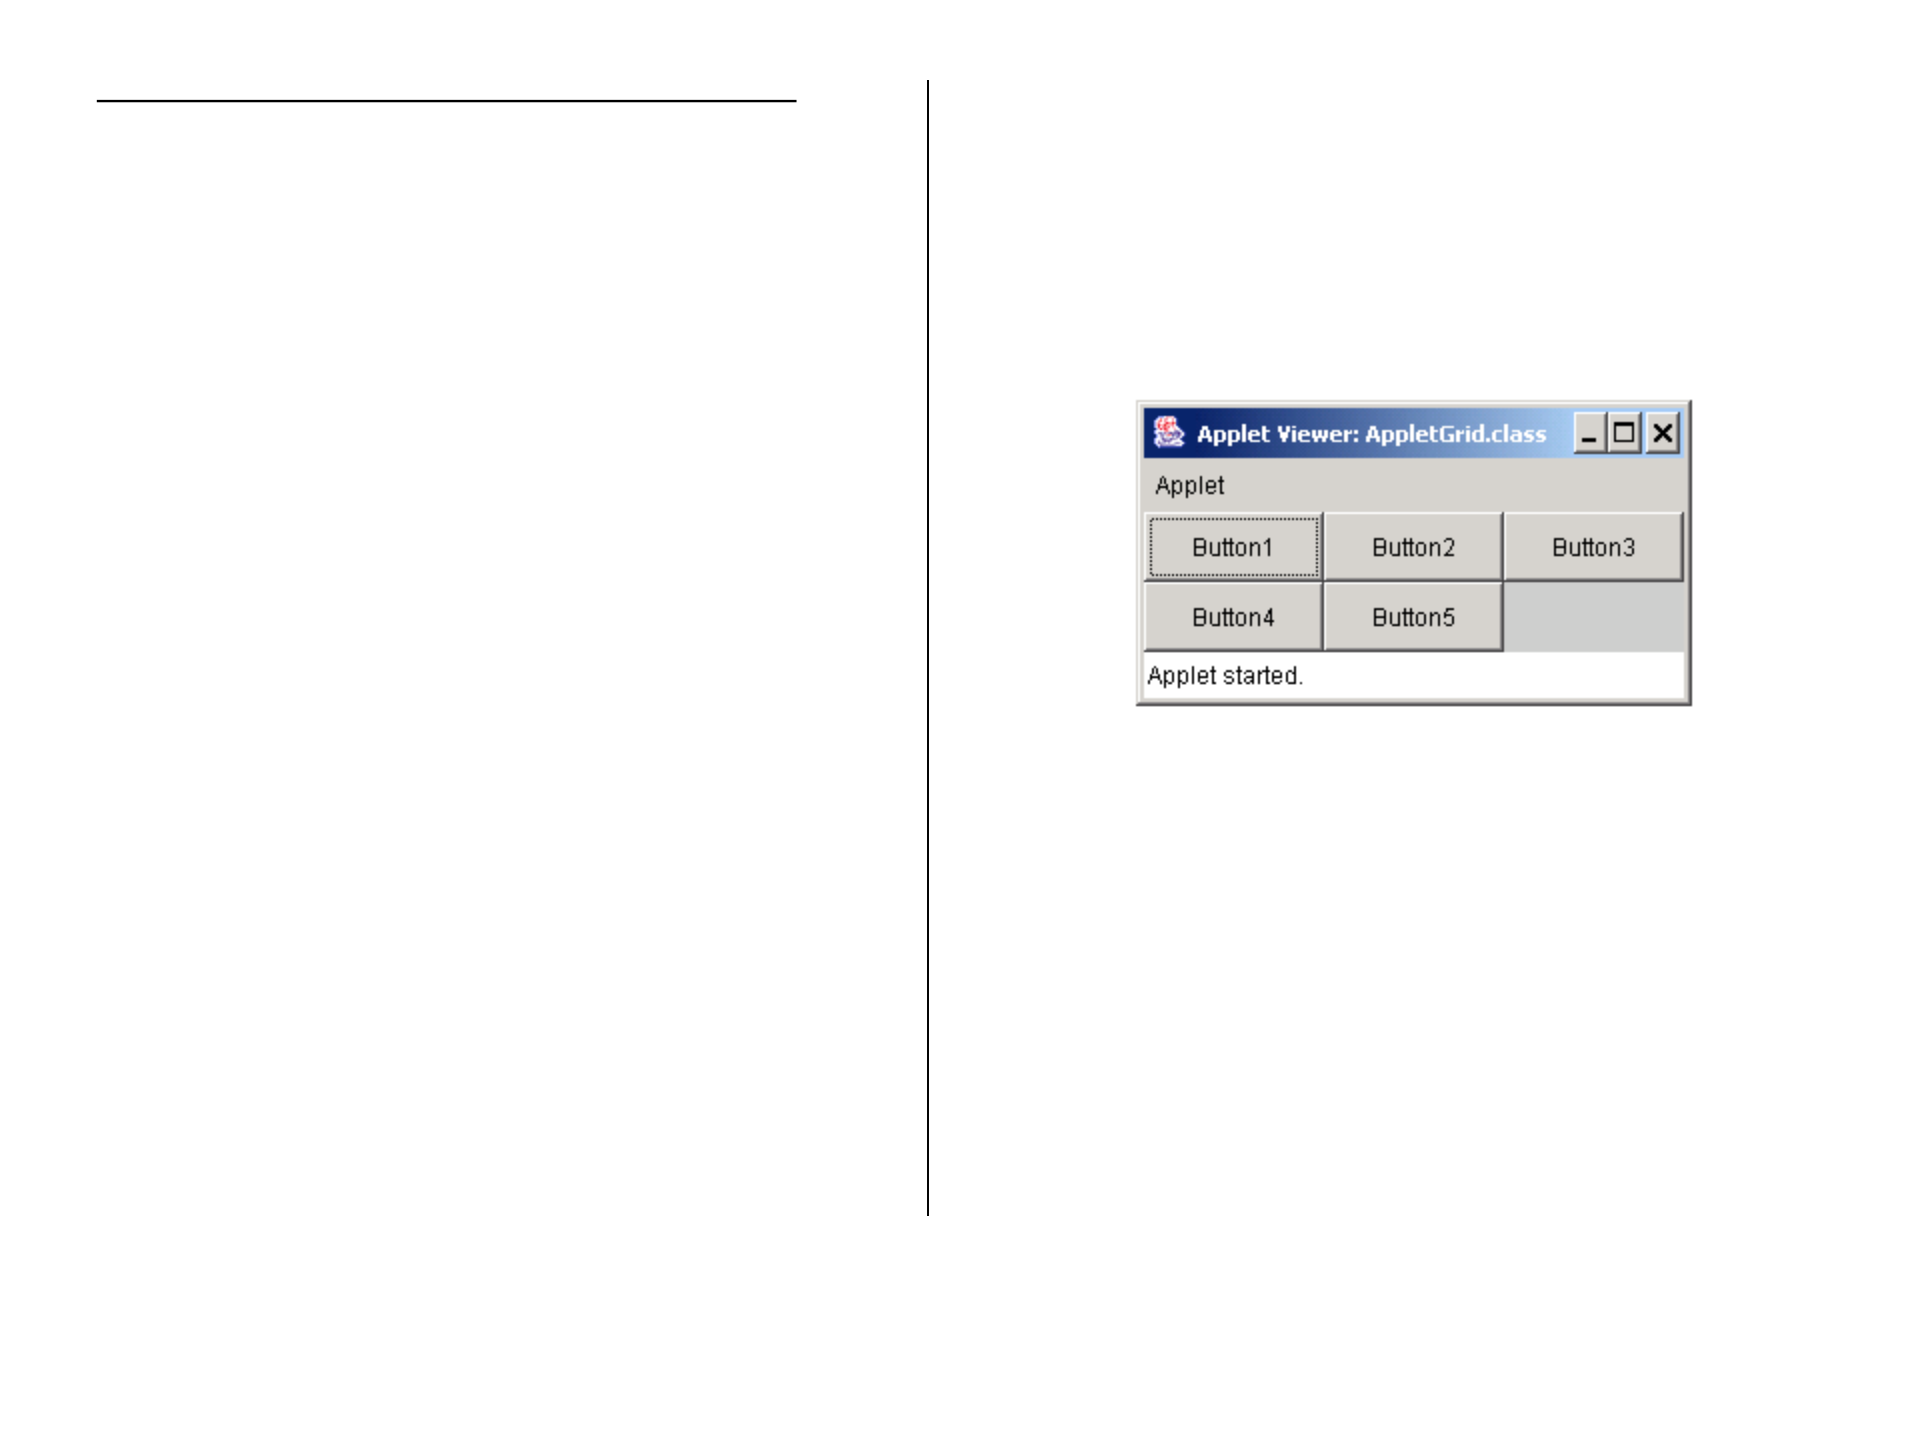
An Example of Applet using GridLayout
import javax.swing.*; // to use JApplet
import java.awt.*; // to import GridLayout manager
public class AppletGrid extends JApplet
{
public void init()
{
Container content = getContentPane();
// to use GridLayout to add components
// by specifying its number of rows (2) and columns (3)
content.setLayout(new GridLayout(2,3));
// create five buttons
Button button1 = new Button("Button1");
Button button2 = new Button("Button2");
Button button3 = new Button("Button3");
Button button4 = new Button("Button4");
Button button5 = new Button("Button5");
// add five buttons to the content pane of JApplet object
content.add(button1);
content.add(button2);
content.add(button3);
content.add(button4);
content.add(button5);
setSize(270,70);
}
}
It will fill the first row from left to right first, then fill the second
row, and so on. Here we have only five components to add, so the
last slot is empty and it is showing its background color – gray,
the default color for the content pane.
An Example of Applet using BoxLayout
import javax.swing.*; // to use JApplet
import java.awt.*; // to import BoxLayout manager
public class AppletBox extends JApplet
{
public void init()
{
Container content = getContentPane();
// to use BoxLayout to add components vertically(Y_AXIS)
// The first parameter is the container that needs to be laid out,
// in this case, it is the content pane of the JApplet.
content.setLayout(new BoxLayout(content, BoxLayout.Y_AXIS));
// create five buttons
Button button1 = new Button("Button1");
Button button2 = new Button("Button2");
Button button3 = new Button("Button3");
Button button4 = new Button("Button4");
Button button5 = new Button("Button5");
// add five buttons vertically
content.add(button1);
// create an rigid area between button 1 and button 2
content.add(Box.createRigidArea(new Dimension(0,10)));
content.add(button2);
// create a glue between button2 and button3. Glue area changes its size
content.add(Box.createVerticalGlue());
content.add(button3);
content.add(button4);
// create an rigid area between button 4 and button 5
content.add(Box.createRigidArea(new Dimension(0,20)));
content.add(button5);
setSize(70,270);
}
}
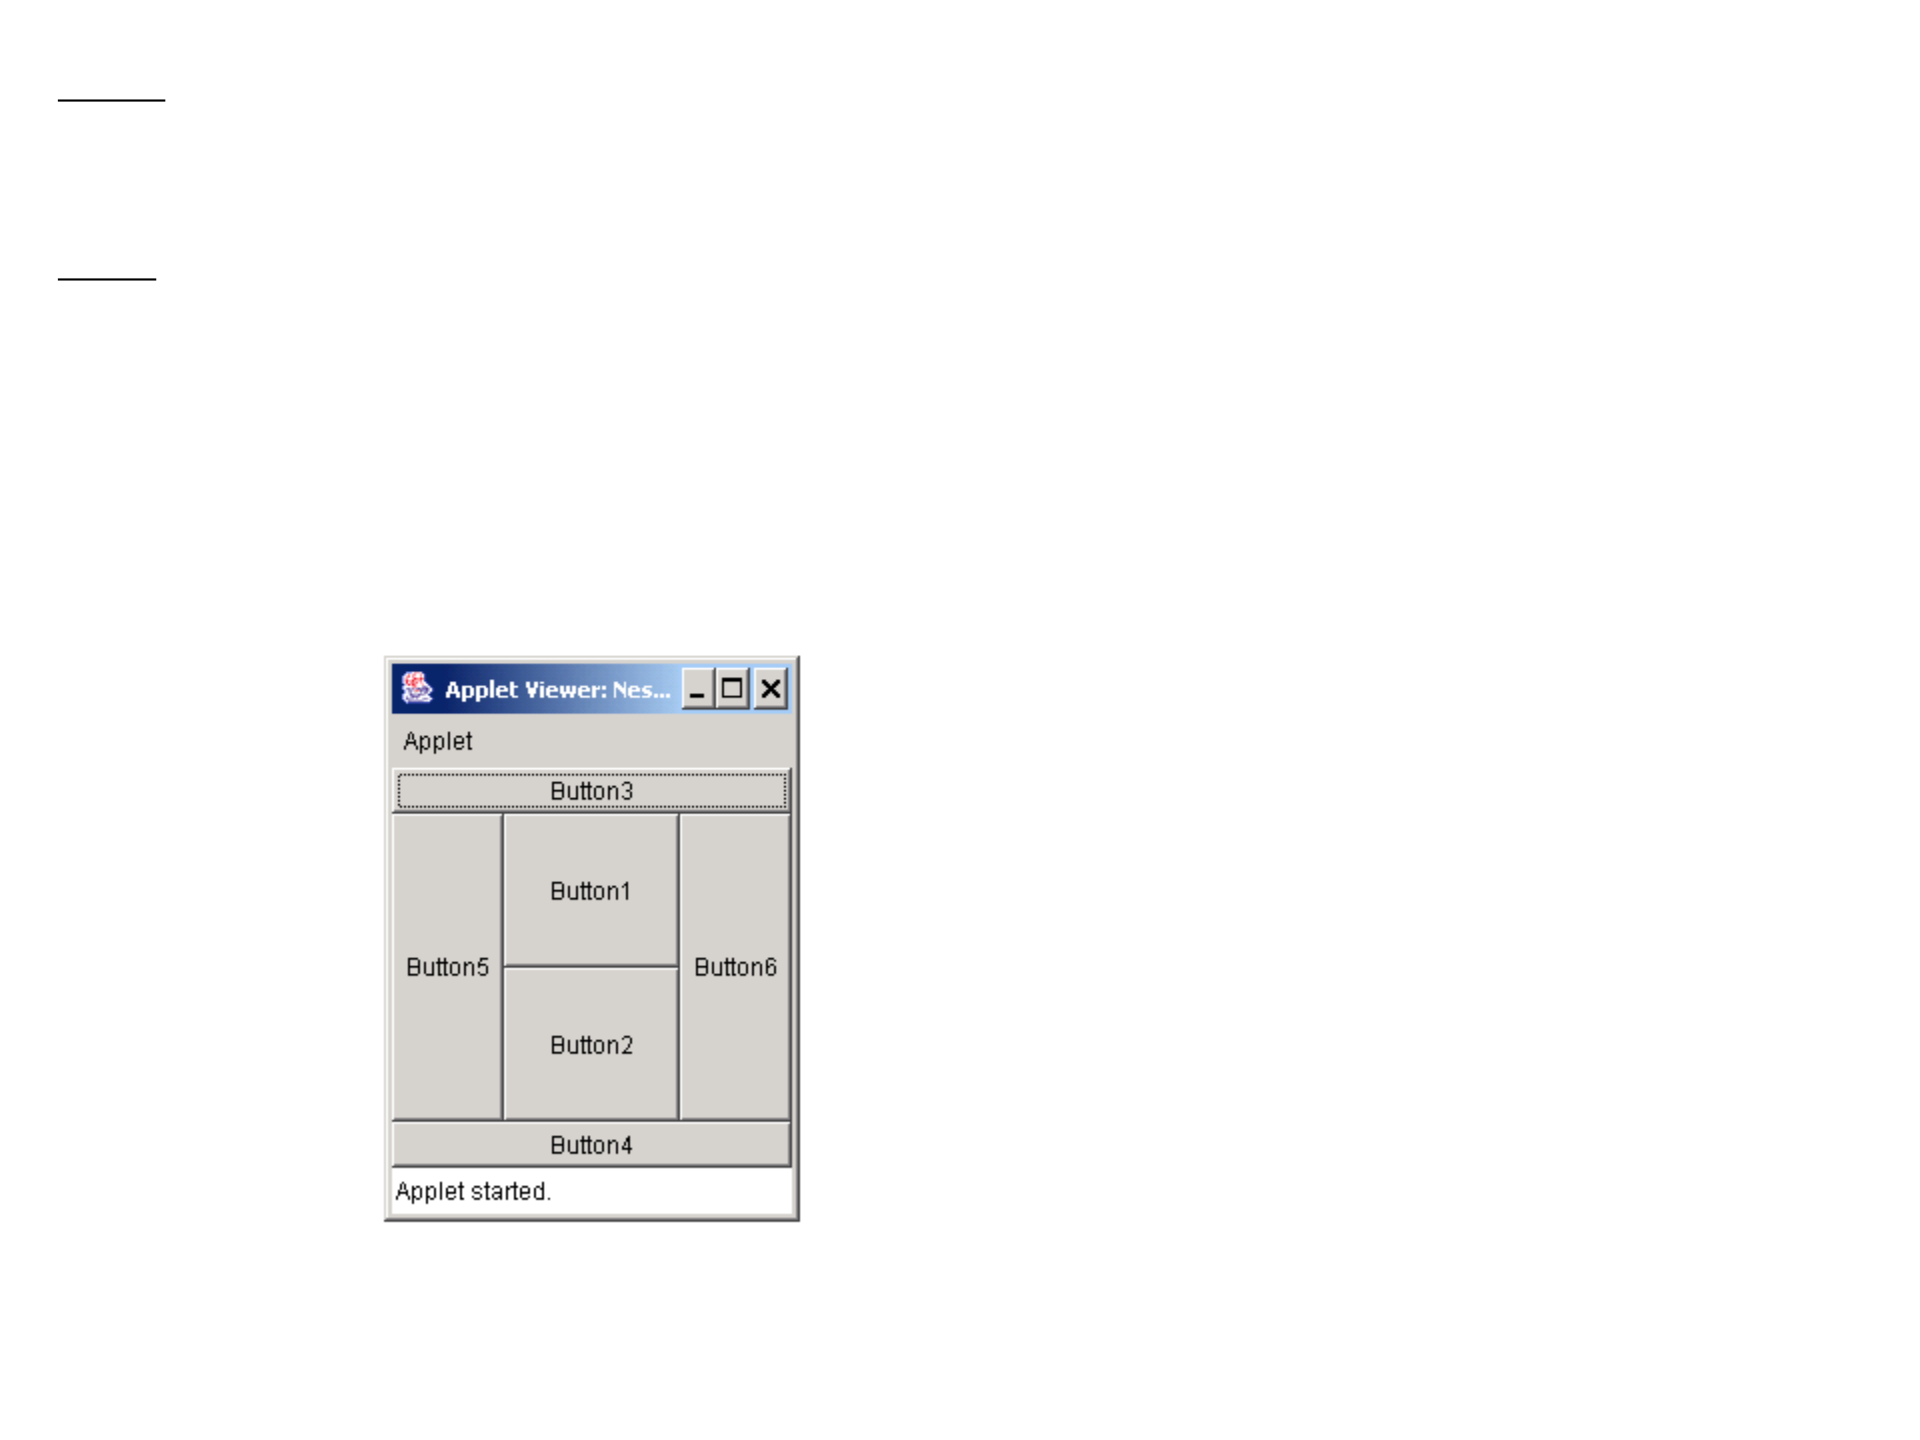
If a user shrinks the height of
the applet, the area between
button2 and 3 also shrinks
while the areas between button1 and
2 and between button 4 and 5 stay
same.
JPanel (defined in javax.swing package)
If we want to combine more than one layout manager, we can use JPanel.
JPanel is a container that holds user-interface components.
-- JPanel can be nested, i.e., A JPanel object can contain another JPanel object.
-- JPanel cannot be displayed by itself. It must be contained in a container such as JFrame and JApplet.
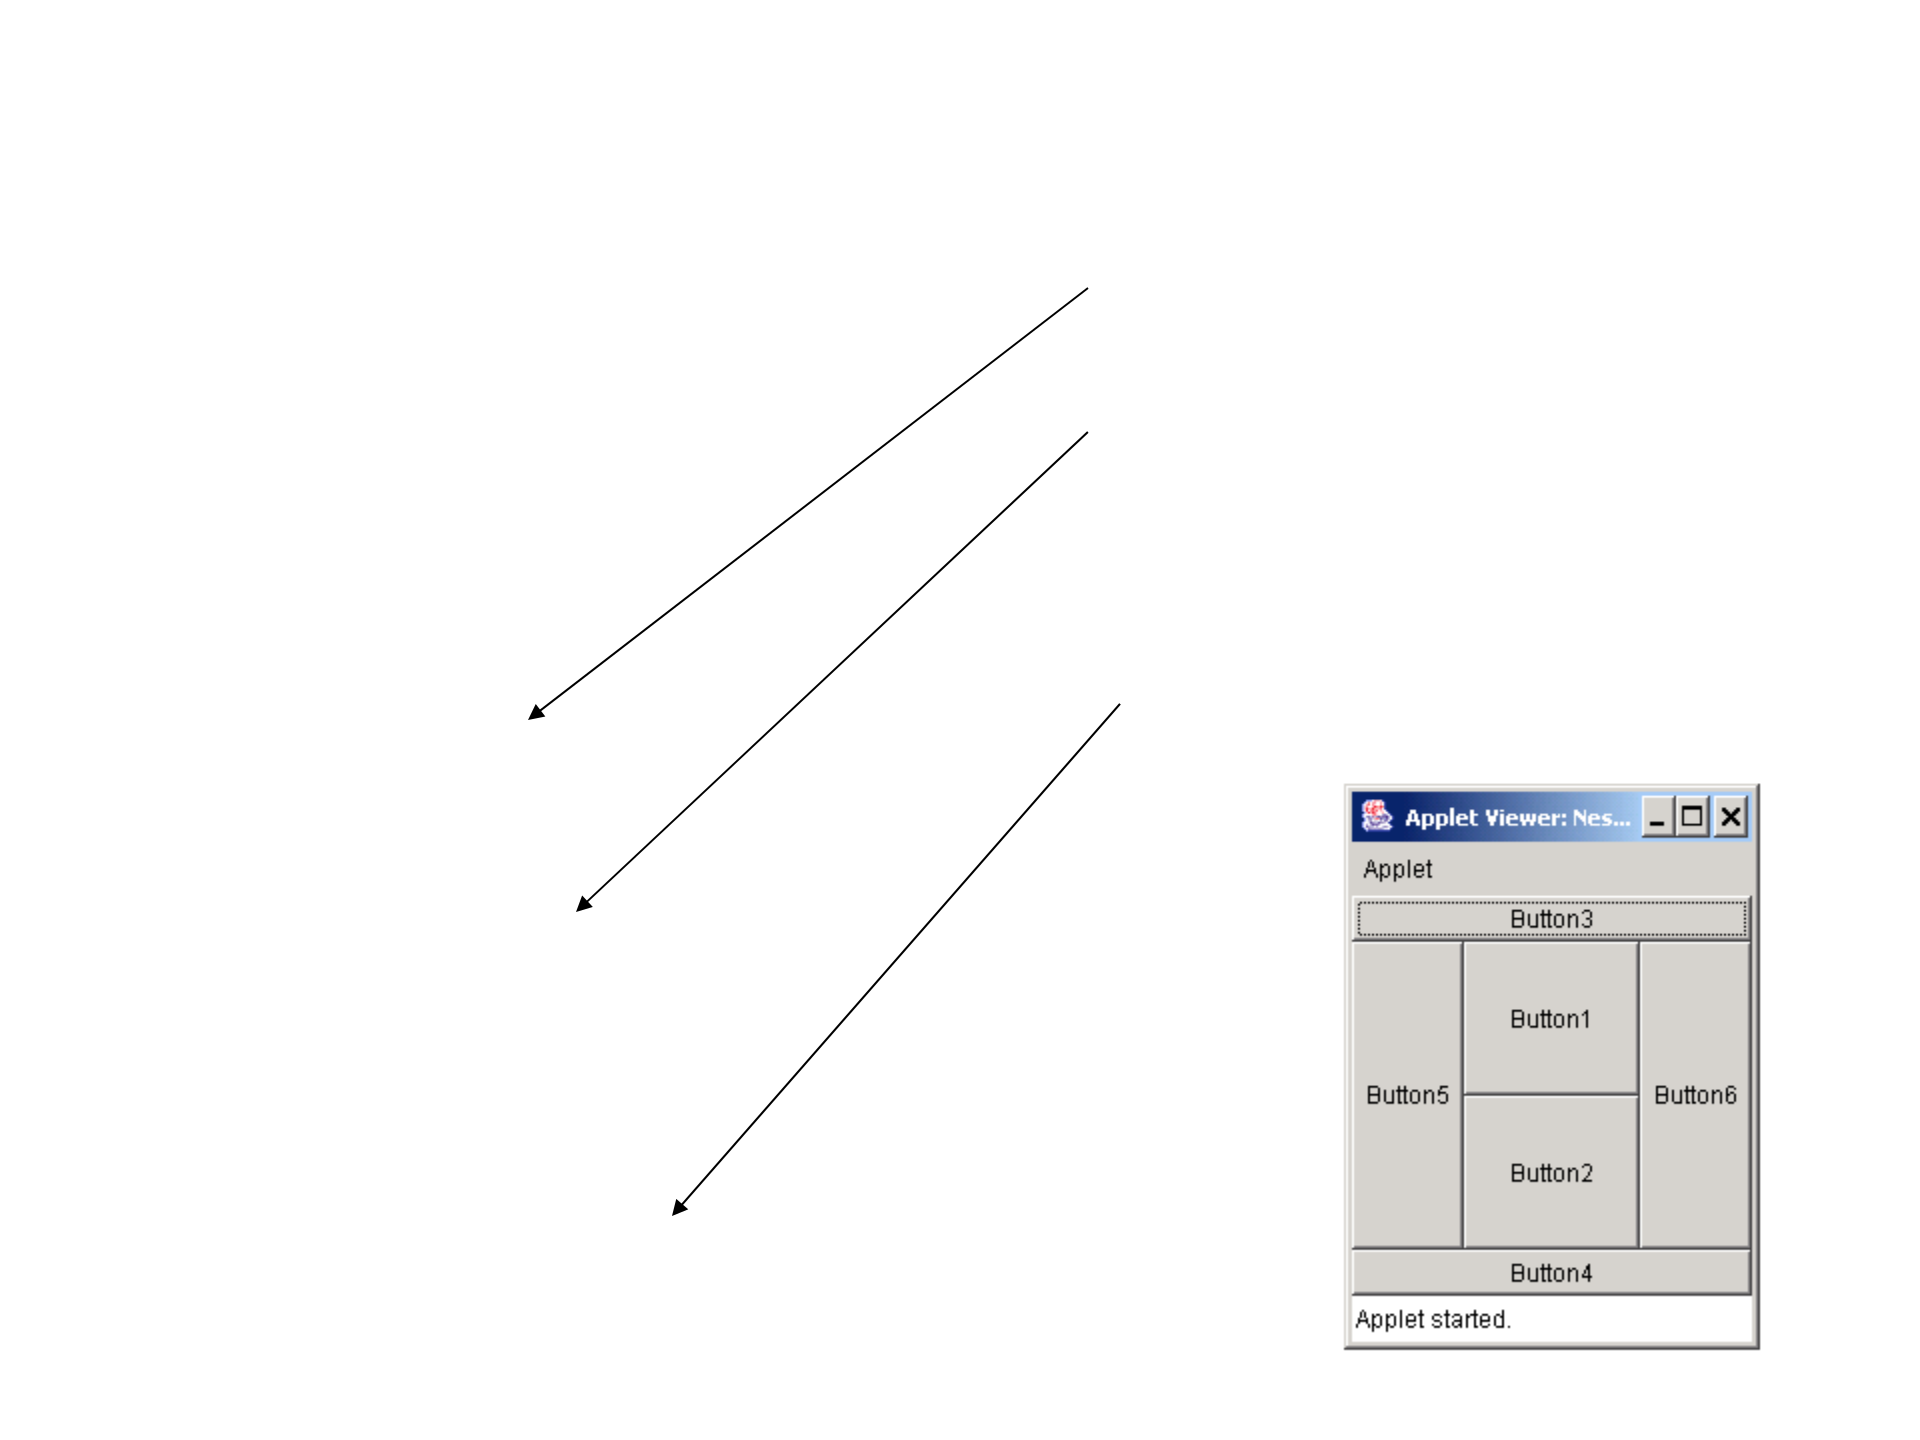
For instance, the following applet seems to be using BorderLayout, but button1 and button2 in the center
seem to be organized using GridLayout.
import javax.swing.*;
import java.awt.*;
public class Nested extends JApplet
{
public void init()
{
Container content = getContentPane();
// create six buttons
JButton button1 = new JButton("Button1");
JButton button2 = new JButton("Button2");
JButton button3 = new JButton("Button3");
JButton button4 = new JButton("Button4");
JButton button5 = new JButton("Button5");
JButton button6 = new JButton("Button6");
JPanel panel1 = new JPanel();
panel1.setLayout(new GridLayout(2,1));
panel1.add(button1);
panel1.add(button2);
JPanel panel2 = new JPanel();
panel2.setLayout(new BorderLayout());
// add five buttons to panel2
panel2.add(button3, BorderLayout.NORTH);
panel2.add(button4, BorderLayout.SOUTH);
panel2.add(button5, BorderLayout.WEST);
panel2.add(button6, BorderLayout.EAST);
panel2.add(panel1, BorderLayout.CENTER);
content.add(panel2); // content pane contains panel2 that contains everything
setSize(200,200);
}
}
First, we create a JPanel object to organize button1 and 2
using GridLayout.
Then, create another JPanel object to organize everything
using BorderLayout.
At the center, panel2 contains panel1 that contains
button1 and button2.

Note that the default layout manager of content pane is BorderLayout, and with add method, a component is added to its center.
The default layout manager of JPanel is FlowLayout.

import javax.swing.*;
import java.awt.*;
public class ExamplePanel extends JPanel
{
public ExamplePanel()
{
// create six buttons
JButton button1 = new JButton("Button1");
JButton button2 = new JButton("Button2");
JButton button3 = new JButton("Button3");
JButton button4 = new JButton("Button4");
JButton button5 = new JButton("Button5");
JButton button6 = new JButton("Button6");
// panel to contain two buttons
JPanel panel1 = new JPanel();
panel1.setLayout(new GridLayout(2,1));
panel1.add(button1);
panel1.add(button2);
// panel to contain all components
JPanel panel2 = new JPanel();
panel2.setLayout(new BorderLayout());
panel2.add(button3, BorderLayout.NORTH);
panel2.add(button4, BorderLayout.SOUTH);
panel2.add(button5, BorderLayout.WEST);
panel2.add(button6, BorderLayout.EAST);
panel2.add(panel1, BorderLayout.CENTER);
// use the same layout (BorderLayout) as content pane
setLayout(new BorderLayout());
add(panel2); // by default, it adds it at its center
} // end of constructor
} // end of ExamplePanel class
import javax.swing.*;
import java.awt.*;
public class Applet2 extends JApplet
{
public void init()
{
Container content = getContentPane();
// An ExamplePanel objects contains all components
ExamplePanel panel = new ExamplePanel();
content.add(panel);
setSize(400,400);
}
}
We can separate the organization of components into another class
and keep the applet class concise.
Note that there are many ways of separating them into two or
more classes as you may see in the examples of the textbook.

ExamplePanel.java file in the previous page can be used with the following driver class to
create an application instead of an applet.
import javax.swing.*;
import java.awt.*;
public class Application2
{
public static void main(String[] args)
{
JFrame frame = new JFrame("Application2");
frame.setDefaultCloseOperation(JFrame.EXIT_ON_CLOSE);
Container content = frame.getContentPane();
// An ExamplePanel objects contains all components
ExamplePanel panel = new ExamplePanel();
content.add(panel);
frame.setSize(400,400);
frame.setVisible(true);
}
}
East:
two
labels,
a
slider
and
a
combo
box
with
vertical
The
entire
interface
is
governed
by
4
North:
two
labels
spacing
in
a
box
layout
border
layout
with
a
panel
in
each
area
ee
©
Male
|
EB
.
|_|
Classic
Sports
poner
|_|
Xtreme
Sports
Other:
Be
West
four
smaller
panels
in
a
vertical
box
layout
=
One
panel
for
each
label
i
test
field
combination
and
et
mr
a
South:
two
buttons
preceded
by
another
for
the
gender
radio
buttons
:
horizontal
glue
in
a
box
layout
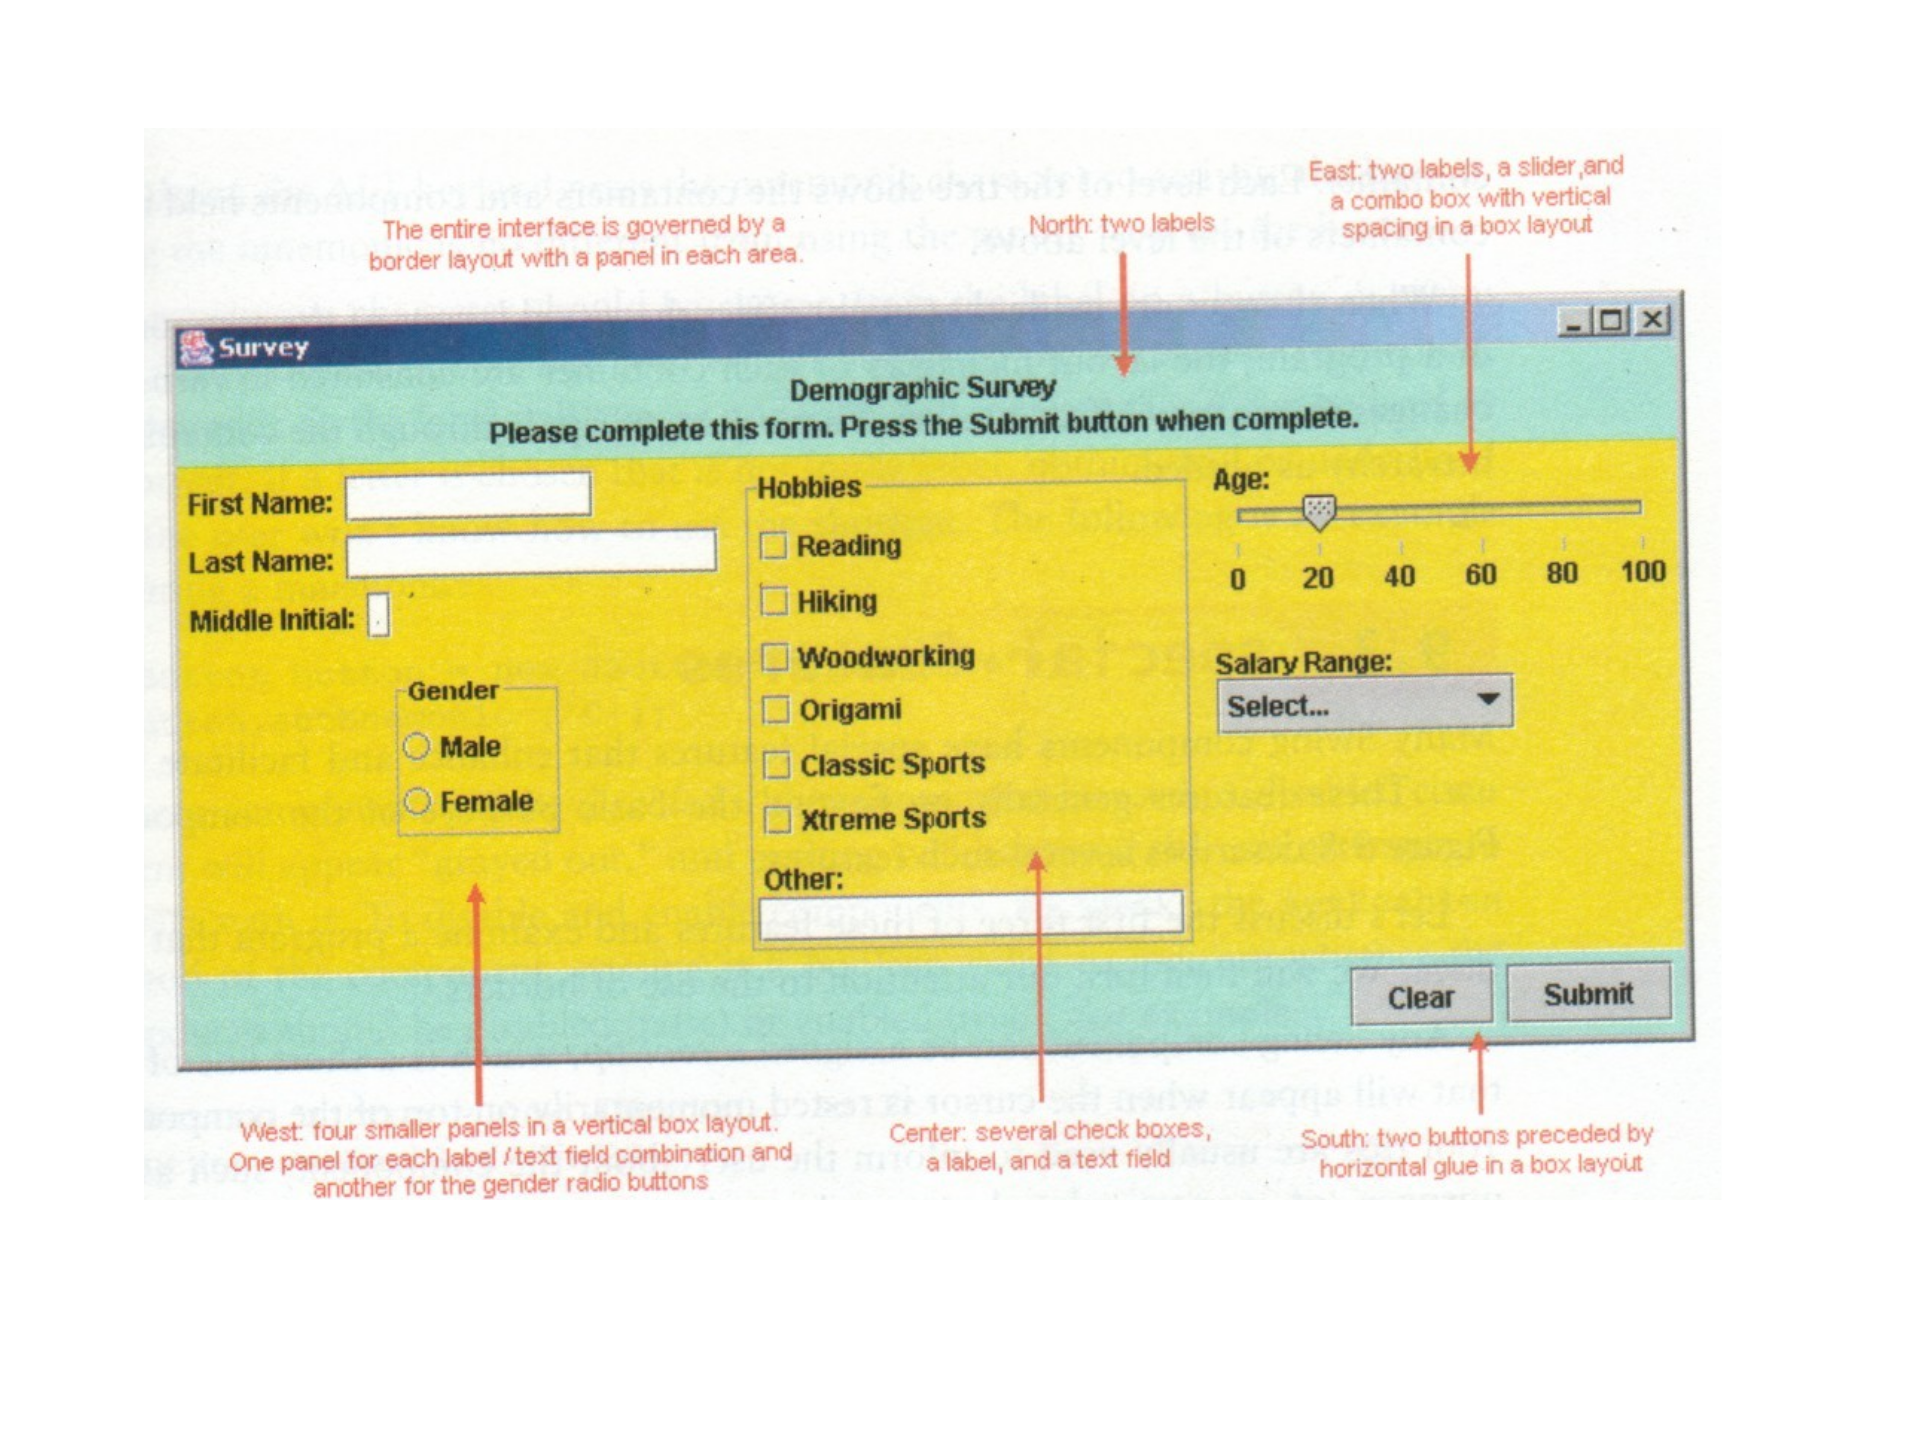
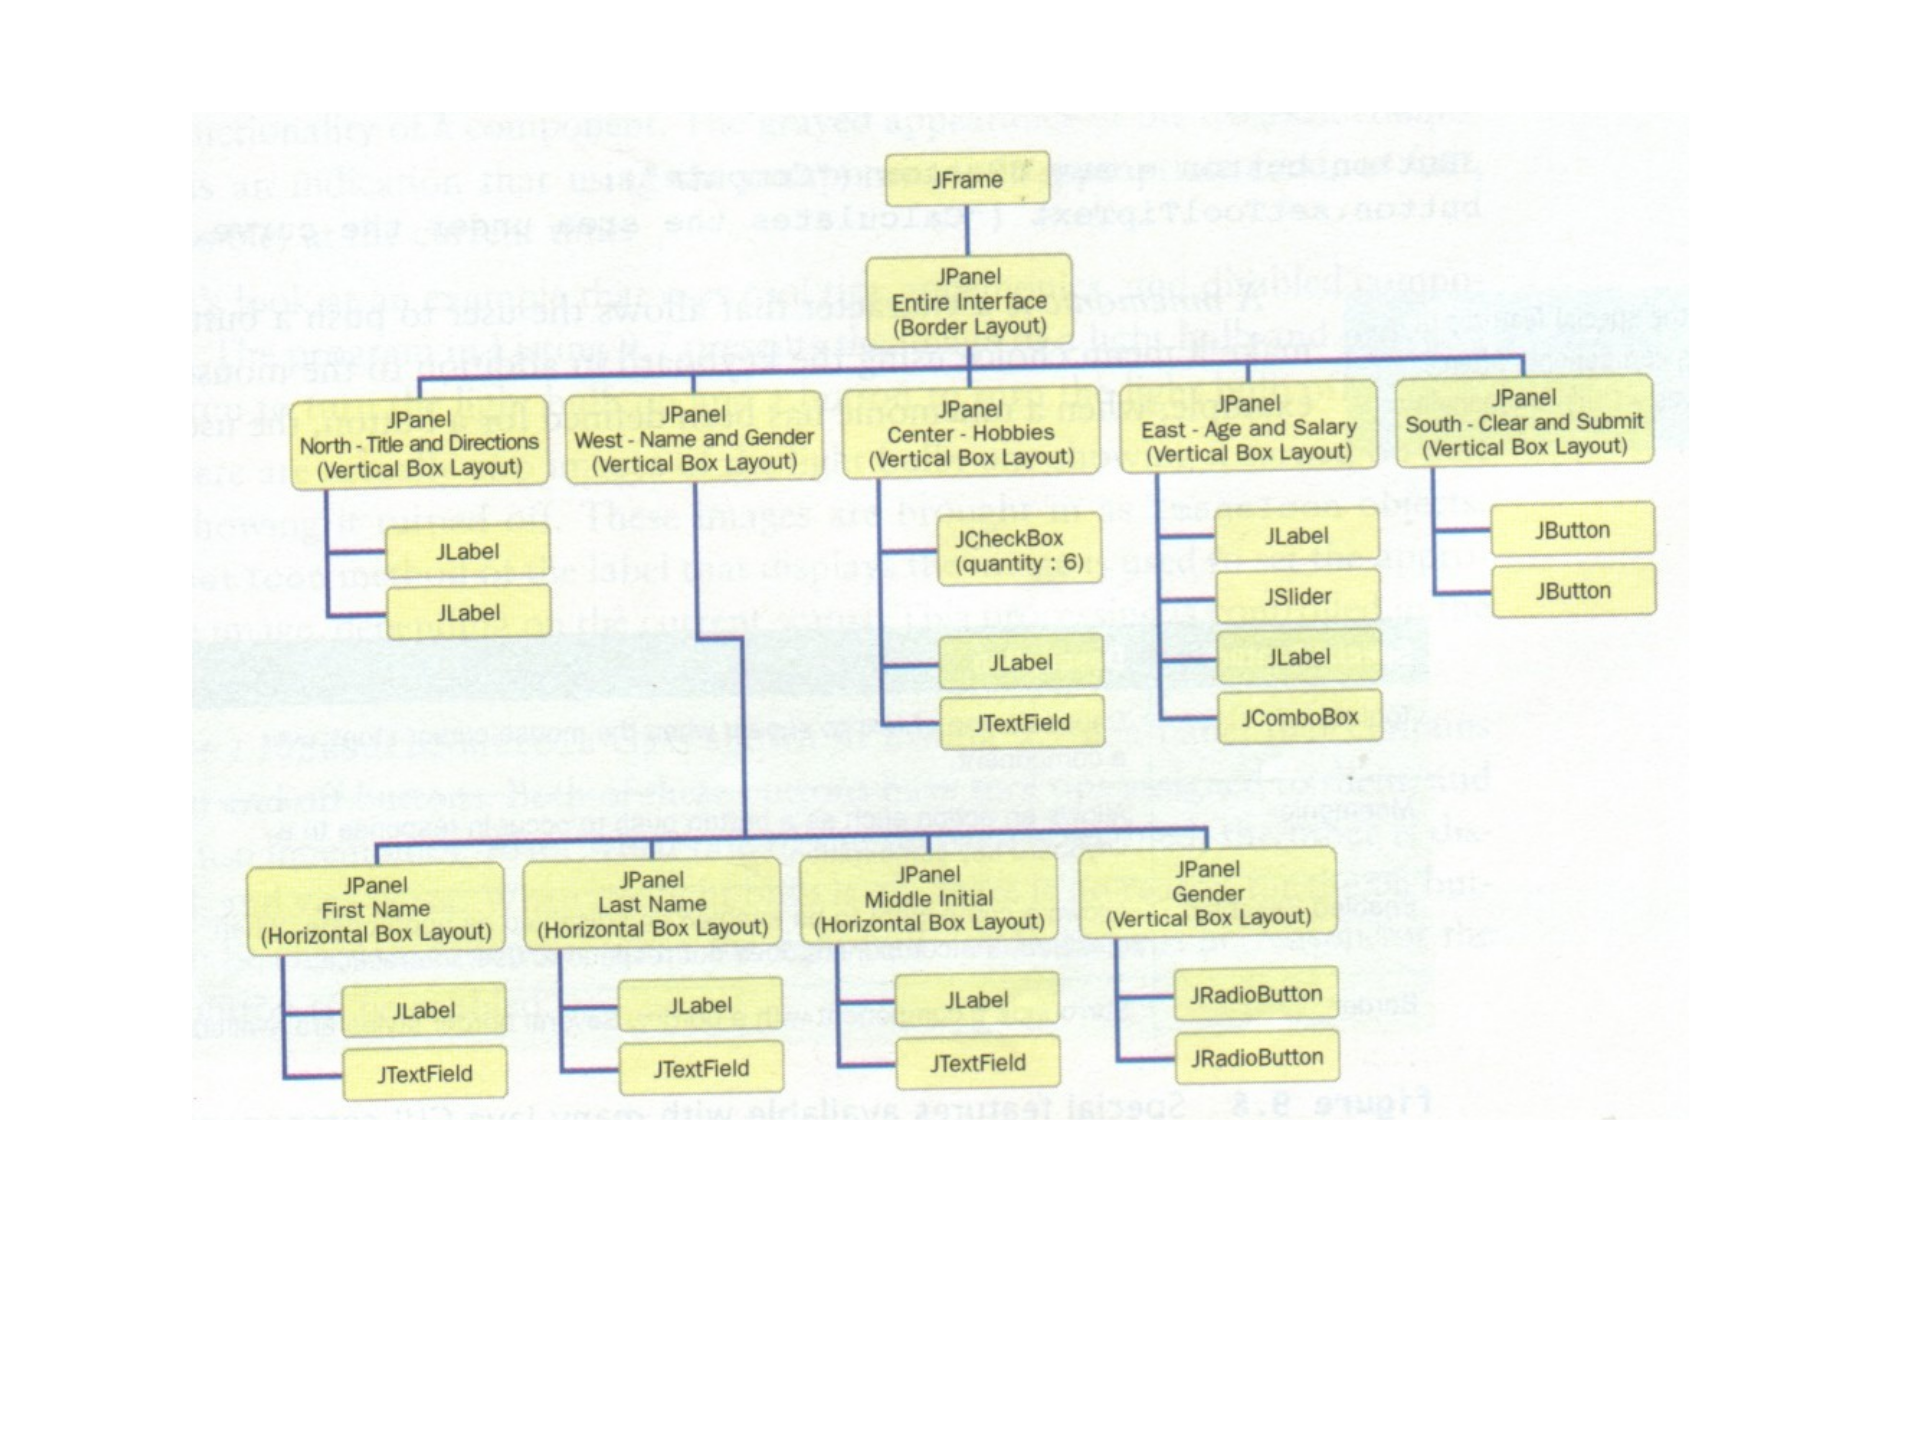
The following shows how a complicated appearance of a GUI program can be made by combining several layouts.
Wy

